


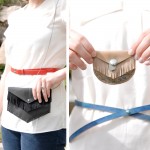
Back in January wen I went thrift shopping with a bunch of awesome ALT ladies, I picked up a really rad bow-inspired belt. I’m not sure why I never included a pic of the belt here because it’s awesome. You can sort of see it in this outfit, but the lighting isn’t great. Anyway, that’s what spurred this cuff. Plus the fact that Chris & I bought a cow & a half worth of leather the other day. We bought a full hide of silky awesome black leather & a half hide of gorgeous grey patent leather. You’re going to be seeing a lot of leather crafts around here in the near future. Beware!

I’m very pleased with the end result of this little project. It’s a simple project that anyone half-decent with scissors could master. It’s another 15 minute craft. Also, I’m totally digging the hard/soft contrast of the button-stud & the bow. For the full outfit, click over to my fashion section.
Now without any further ado, here’s the tutorial.
• B O W C U F F T U T O R I A L •

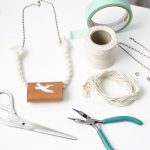
• S U P P L I E S •
- hammer
- sharp scissors
- hole punch 1/4 inch & 1/8 inch
- clamp or bulldog clip
- double-stick tape
- button-stud
- 1-2 ounce leather 10×3 inches
- leather needle (not pictured)
- waxed linen thread or artificial sinew (not pictured)

Cut out your pattern pieces, affix double-stick tape to the back & place on your leather. Cut out leather.

Punch holes in designated spots on pattern. If using a button stud, punch one of the end holes larger than the other.

Sew through middle holes with needle & thread, starting from the front, weaving in & out.

Pull thread together to create pleats & cinch together with your clamp. Tie a square knot on the back side.

Wrap the smalls trap around the middle of the cuff, making the holes at the end match up. Insert needle from outside to inside.

Wrap the smalls trap around the middle of the cuff, making the holes at the end match up. Insert needle from outside to inside.

Cut a 1/4 inch slit in the larger hole to allow for the button stud. Affix the button stud to the other end. Button & wear.

I’m flaunting my left hand because I *FINALLY* found my wedding ring on Sunday. HOORAY!
• O P T I O N A L •
This project could easily be done with fabric or other vegan materials. Additionally, the button-stud is my attachment of choice, but snaps or decorative buttons could easily be used in its place. If you make one of these, I’d love to see how it turns out! Add your pics to the IS•LY flickr page.
Click the download button below for the printable pattern & tutorial.

This tutorial is free for personal use and should not be distributed/republished without my consent. Altering the file NOT ALLOWED. If you would like to use this tutorial for commercial purposes, please email me. Thanks!


Super cute… and I think you should nickname Felix : Felix-zinho. :o)
That is so cute! I’m going to pick up supplies today!
cute bow cuff. i love that color, too. you should totally publish a book of all your diys, melissa. that would be so neat. :-)
what an awesome idea! I love that! Its so girly, but not overly! the color is really cute too
This is amazing!! Such a wonderful idea, I will definitely give it a try.
I may be buying myself some leather in the near future…
-C
I.Love.That!
That is so cute! I love bows! Thanks so much for sharing this! I’d love to try it out!
I love that you bought a ton of leather. Even more, I love that your husband was into it too! Seems like you guys are quite the pair!!
And, love that wedding ring too! What a great design! Congrats on finding it!
oh, and of course, your cuff is DARLING. good work, girl! Shouldn’t you be RESTING or something? You did, after all, just have a baby!!
You floor me. Good work, girl!
OMG! Sooooo amazing adorable. What a neat idea. Thanks so much for sharing your DIY expertise with us. I love that bracelet.
I love how your cuff turned out. Way cute! Also, so glad you found your wedding ring. ;)
Lovely! And great tutorial! I’d love for you to submit this to the M&T Spotlight at http://www.makeandtakes.com/spotlight
This is wonderful! Do you think I could find all those supplies at Joann’s?
gorgeous bow! Would love to try this one day. Thanks for sharing!
[…] Totally want to try this sweet & simple leather bow cuff DIY. […]
When I saw your outfit picture, I was like ” I love that bracelet! I want on!” And then I scroll down and saw your tutorial. Would it be to much to ask for you to share the pattern?
Thanks!
Very very cute and I’ve been planning to pick up some leather for another project so this will fit right in!!
[…] are in, there’s no doubt about that. So, this Bow Cuff Tutorial over at IS•LY may be the fix that you’ve been looking for. This one is made of leather, so it’s […]
oh it is too cute. love it!
LOVE this bow cuff!! Thanks for the great tutorial! I’m stopping by from One Pretty Thing. :)
Omg, this is so freaking awesome! <3
Love this. Super simple and awesome.
That’s so pretty! Great tutorial
[…] handmade, […]
[…] I wish I'd thought of this leather bow cuff. […]
Que bello todo lo que tu presentas en tu pagina.Dios te bendiga
Gracias por tantas cosas bellas que nos proporcionas a todos los que visitamos tu pagina
[…] strik van leer – I Still Love You […]
[…] DIY Leather Bow Cuff from Melissa Esplin is so cute and whimsical. I’ve seen so many in Japanese fashion […]
[…] fuente:Bracalete de cuero 0 comments […]
[…] make this bracelet […]
Where is the best place to buy leather? I love this cuff!!
Thank you for this DIY ! I have make this cuff today !
What a great diy, I made one and it is really easy
I did not use a button stud but a button
I’m gonna post it on my blog this week
[…] diy-leather-bow-cuff […]
[…] DIY Leather Bow Cuff by I Still Love You […]
Oh I love your ring! Can you show a close up of it???
[…] a simple DIY Leather Bow Cuff from ISLY | I Still Love You. This leather version probably holds its shape well, but I think this would also be nice for […]
[…] Bracelet • Bow Cuff • Wallet Cuff • Twisted Leather […]
[…] Bow Cuff Tutorial by I still Love You Bow belt tutorial by Momtastic […]
[…] ortaya ç?kacakt?r. Bu sadece sizlere küçük bir fikir olsun. yap?m?n? görmek için buraya t?k t?k […]
I used your idea as a topic for my public speaking class. I had to do a demonstration speech so I taught everyone how to make my version of a bow cuff bracelet in ten minutes or less (the length of my speech). I was sooooooo nervous that I threw in “you could make these anywhere, even on a plane” LOL!!! I got an A!!! Thank you!
[…] DIY Leather Bow Cuff via ISLY I Still Love You […]
[…] qui s’est amusée à réaliser des bijoux, en s’inspirant d’un lien trouvé sur Pinterest. En suivant le lien vous trouverez le pas à pas complet […]
[…] make leather bow cuffs! SO CUTE! Who wouldn’t want to make these? […]
[…] 14 / 15/ 16 / 17 / […]
hi
nice and simple, but just a comment on the hammer….. DON’T. Using a wood, rawhide, or other type of mallet, is better for your tools. Using the hammer… steel on steel… you damage the end by mushrooming it out, causing ‘spurs to form, and eventually can cause one of these spurs to shoot like a bullet when struck. I have been a leather worker since 1991, but this is a tool no-no I learned the first time I did it and was slapped up along the side of the head…. PLEASE do not do this for your safety and others that follow your posts…
[…] Original Source: http://melissaesplin.com/2011/03/diy-leather-bow-cuff/ […]
[…] Get the directions here. […]