


I had the pleasure to check out the latest Laser Square & Mat by We R Memory Keepers. It’s the hottest thing to hit the shelves for calligraphers. It’s basically a replacement for the slider writer (which I have). Now you can’t find the Slider Writer anywhere. Not that you were missing out on much, because the laser never sat still, the apparatus was bulky and only right-handed users really could ever take advantage of the set-up.
See above for the full video. Hayley & I got to play around with it (thanks to WRM for providing us with product). Check it out to see it in action. Some of the video we took was completely blown out, so there’s not a ton of footage of us using it. :( And speaking of technical difficulties, the mic (we decided to use a new mic) didn’t end up recording, so you get to hear my tinny room instead. #sorrynotsorry I’m not going to fix it. Next video will be better. We’re having fun figuring out this whole film production thing.
TOOLS USED:
PROS
- You can take it apart. It’s a little hard to take the square part apart, but you can take the mat off easily and store it in a tight spot.
- No erasing! No need for drawing in lines on dark or opaque paper!
- The laser is a little bit above the surface of the paper so it’s not so harsh on the eyes.
- You can set it up easily for lefties or for righties.
- The bottom has a grid, so you can easily keep your papers aligned!
- The gridded mat is self-healing material!
- The lasers don’t fall out of alignment easily. They stay in place until you want to move them.
- The work area is 12×12, allowing you to work on a wide variety of sized papers.
CONS:
- Each laser requires a 9v battery. 9v batteries aren’t very common, you can find rechargable 9v batteries, and I would definitely recommend getting some because replacing 9v batteries often is expensive!!
- The lasers weren’t perfectly aligned with the grid out of the box. I could do some minor 1/2 mm adjustments before using the laser, but ultimately it’s just a little off. But it stays the same degree off no matter where on the ruler you position the laser, so it’s consistent.
WISHLIST:
- I wish the laser angles could be repositioned so that I could align with the grid but also so the vertical laser could serve as an angle line.
- Hayley brought it up that it would be so cool if there were two lasers per axis point. Then you could set up x-heights or cap heights.
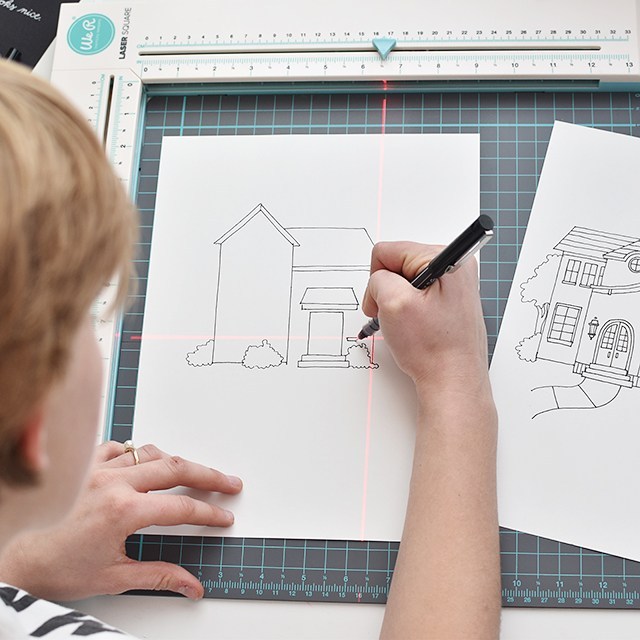
Perfect for house drawings, right? Hayley did the cutest little house drawings using the laser lines as guides.
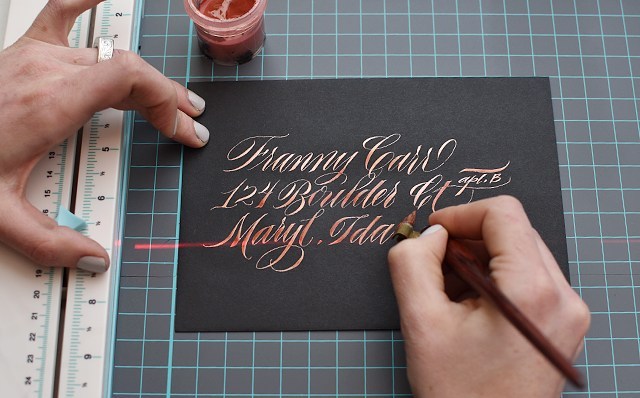
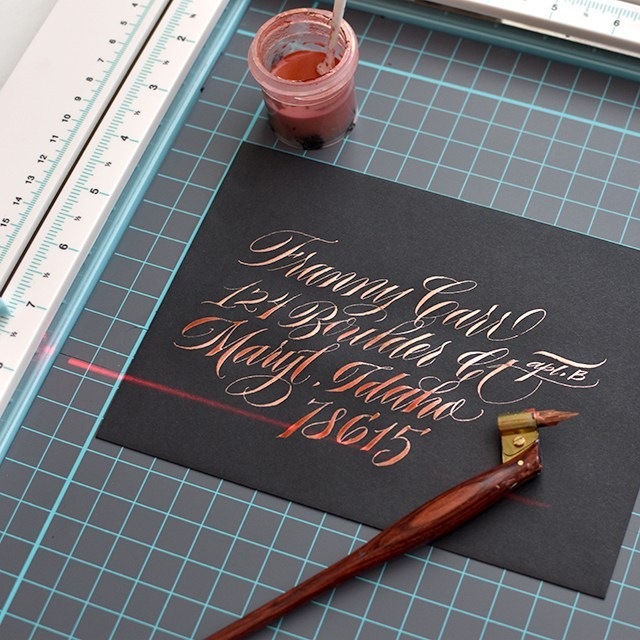
This is great for dark envelopes. I really liked the flow. I could easily hold the paper down with my non-writing hand and reposition the envelope OR the laser to get new baselines for each line of text.
VERDICT: I’d put this one in the win column. I think it’s a great tool, especially for envelopes and quotes. I felt like I could quickly and effortlessly write out envelopes and quotes without a ton of planning ahead (you know how lazy I am). Click here to purchase.
What do you think? Will you be using one in your future?
Product was provided for free from WRM, but all thoughts and opinions are our own. Affiliate links used help support the continuation of the blog and YouTube videos. Thank you for your support!


I detach the laser guides from the 90 deg angle and use one laser as the horizontal guide line and the other laser is at 54deg for slants. I don’t use the matt. I tape them on my desk with painters tape and mark on the desk the horizontal line stops, and just move the lasers along as I need them. I you want me to send you a pic let me know.
Oh that’s awesome! I’d love to see a pic! melissa@melissaesplin.com