*Use code Melissa15% for 15% off your purchase at myprimaplace.com!
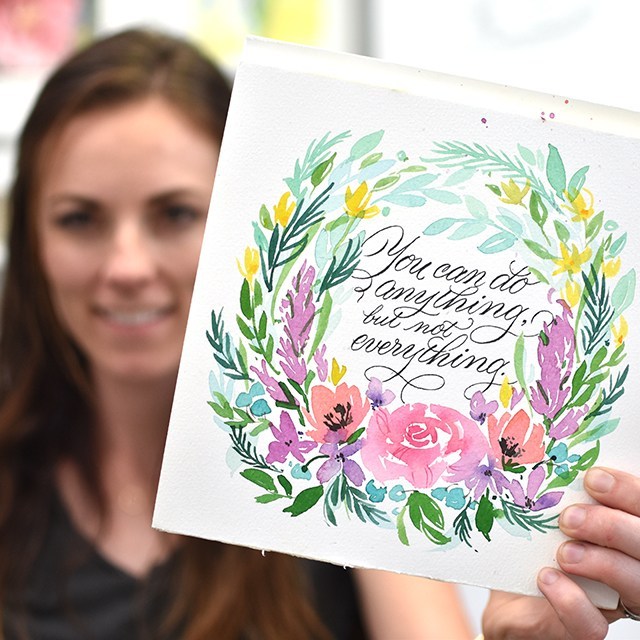
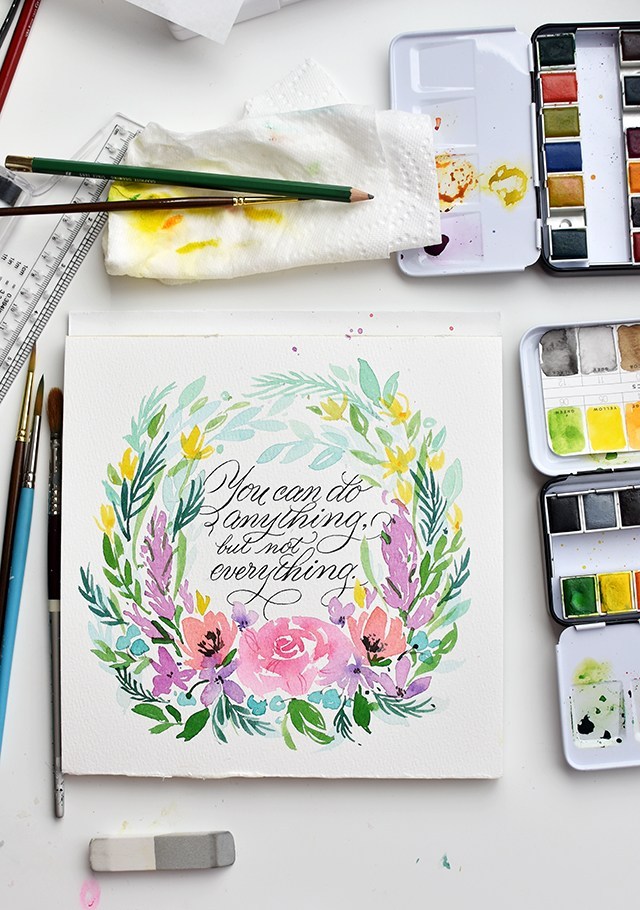
This quote has been rolling around in my head all week. I’m thinking of doing a mental/physical inventory of my life and let go of the things that I don’t need to hold on to. I don’t need to hold onto the idea of making a line of women’s swimsuits, or writing a hymn, or learning how to cobble shoes. I can let go of all of those things. So this is just a reminder of that. I plan on framing it sometime soon and hanging it in my studio as a reminder to stay focused and to really dive deep into what it is I want to do with my life. Like seriously, I got asked this week what I wanted to do and I was like… uhhhhh……
I should probably figure out what my end goal is here so I can actually run towards it.
So click play on the video above if you want to hear more about the materials I used, why, what was going on in my head at the time of illustrating it out. I want to let you know, Natalie Malan was a huge inspiration (her classes are the best) for the style of florals for this piece.
And if you want to learn brush lettering, I’m teaching a local workshop in utah. REGISTRATION IS HERE. And there’s always my online class which includes personal coaching, right here.
Affiliate links are used, your purchases support additional videos on this channel. Thank you!
Learn brush lettering based on more traditional foundations and how to manipulate those foundations to write some funky letters! All skill levels welcome, but it is geared more toward beginners. Lefties welcome!
Learn the art of beautiful penmanship and how to harness your own style to tell your story. This is perfect for beginners, lefties and future brides! We’ll go through foundations, style and how to address an envelope.
Join me in Nashville for a whole lot of fun with a 2-day lettering intensive with the pointed brush. We’ll dig deeper than in any other class in the two days. We’ll go letter-by-letter through variant options, work on word and compositional structure and style structure. At the end of the class, we’ll work on the beginning essentials of digitization by making our own personalized stamps with our artwork. All skill levels welcome.
I hope I can see you at one of the above workshops this summer. We always have a blast and I try to pack as much information as possible so you leave the workshop motivated, empowered and ready to continue your calligraphy journey.
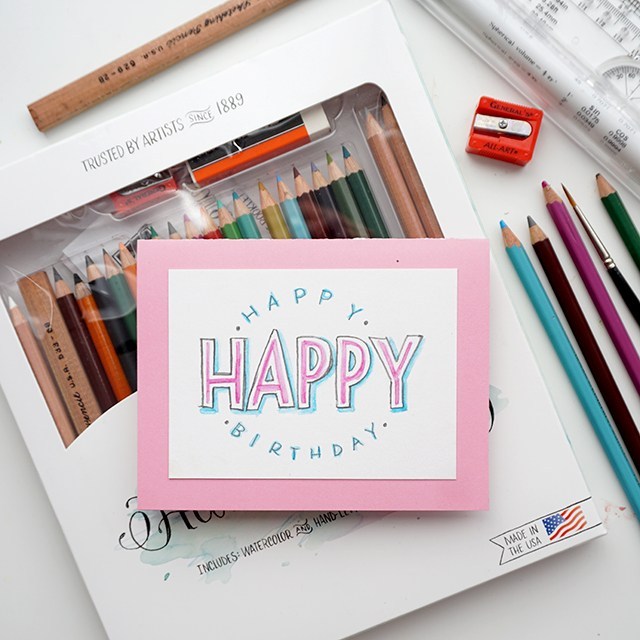
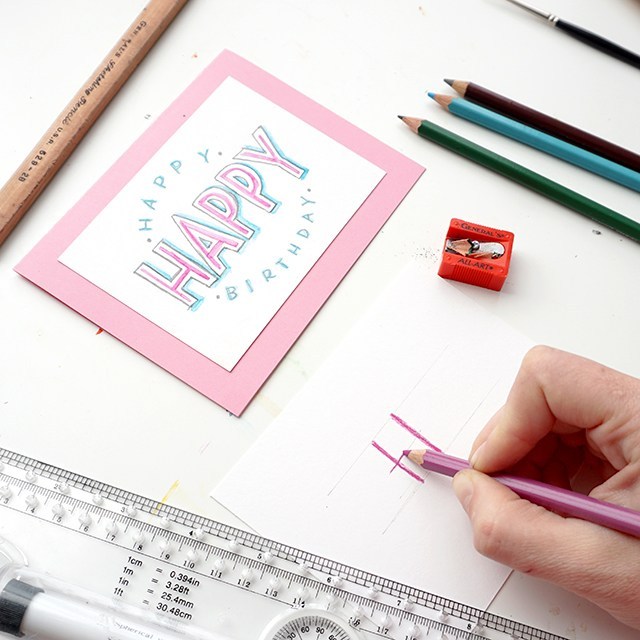
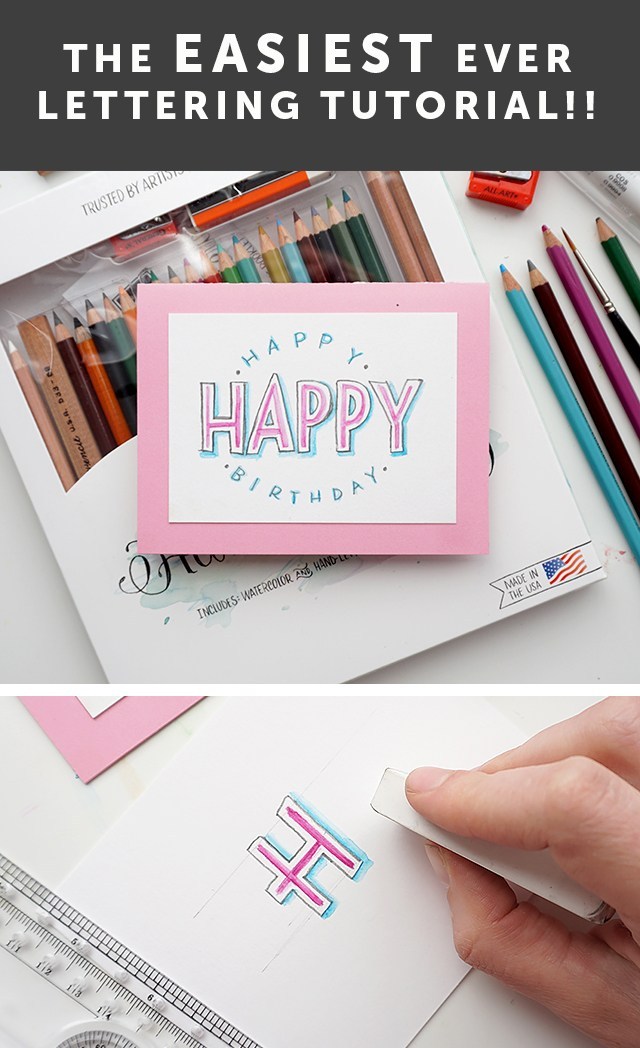
Now let’s talk hand-lettering!! Calligraphy and hand-lettering can be intimidating. Especially if you’re just starting out and teaching yourself. That’s where the humble, yet mighty pencil comes in. The pencil’s got your back. In fact, I have my online class students pull out the pencil before they touch any kind of pen or marker. The master penmen use pencils, so you can, too. I’m really excited to have shared this fun and simple technique on KSL’s Studio 5 on how to incorporate pencil lettering into your every day creativity. Let’s do this, shall we?!?
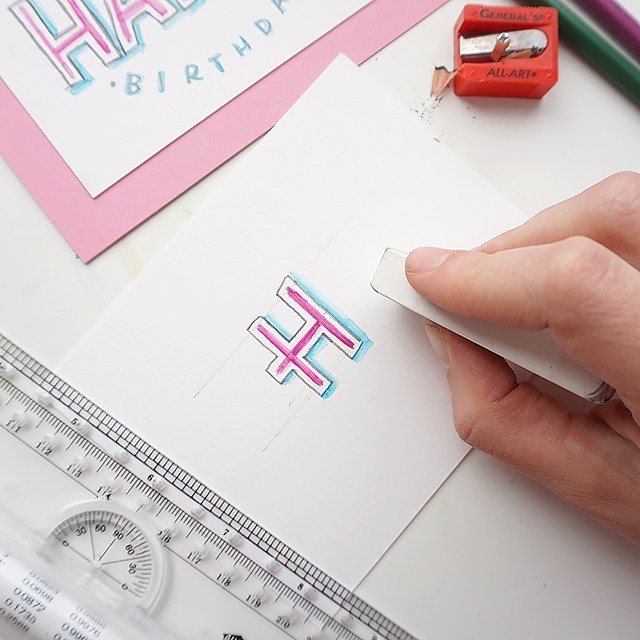
Isn’t this a fun card? You can totally make this in about 10 minutes.
The cool thing about pencil is that you can erase it until you commit. So watercolor pencils you can erase until you add water. You can erase most pencils quite effectively until you commit by pressing really hard or going overtop in pen. You can see the difference between committing with pressing hard with a dark pencil on the right and a marker on the left. The cool thing is you don’t have to have fancy materials in order to be successful with your pencil lettering. Here’s what you need:
Paper – use a mixed media paper if you’re using watercolor pencil.
Ruler – you gotta draw light grid lines or your lettering will be all over the place. Clear grid rulers are my fave.
Pencils – I’ve teamed up with General Pencil to create a pencil lettering kit, try it! It’s great.
Brush – I like small round brushes for this, but any brush you have on hand could also work!
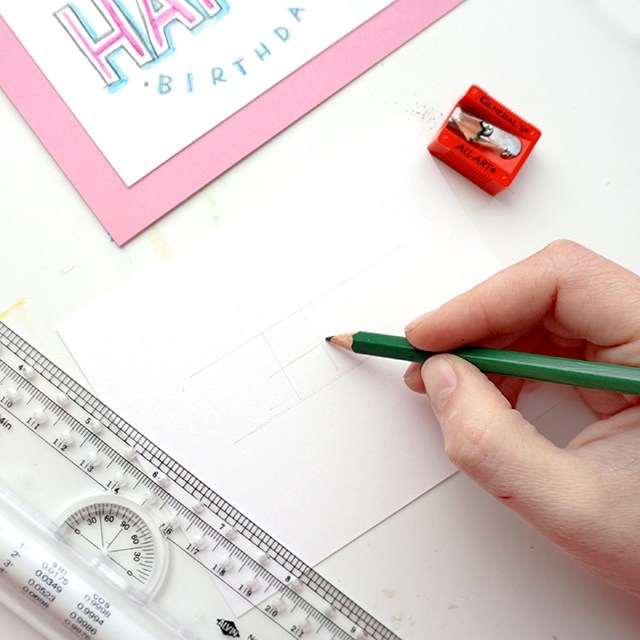
Step 1: Cut down your paper to size. I’ll leave it up to you as to what size you want to trim it down to. Get a ruler and mark out your top and bottom lines. The master penmen use a ruler to mark out guides, you should too.
Lightly draft out your message. I find that short words in this style work best. Also, when drafting out your letters, make sure they’re generously spaced apart. Because we’ll be outlining around each letter, you’ll want to make sure you give yourself enough room for those outlines.
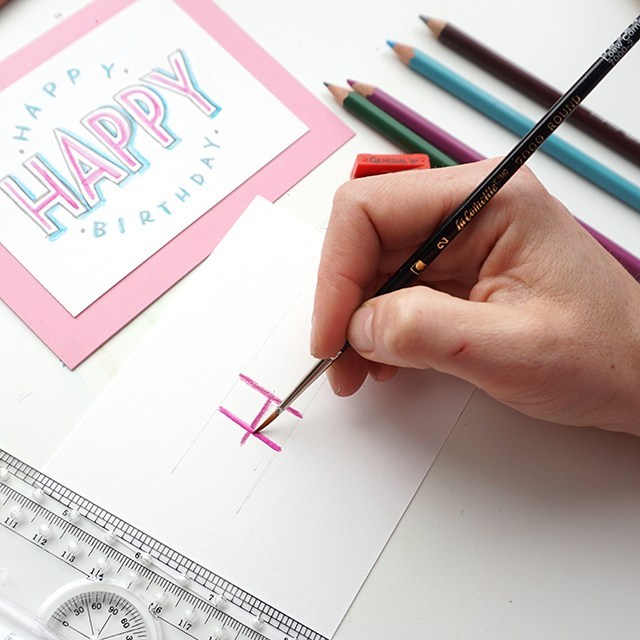
Grab a watercolor pencil and roughly mark out the outlines with watercolor pencils. For the sake of this style, pick two colors that you’d like to go together. Use the darker of the two colors for this part of the outline.
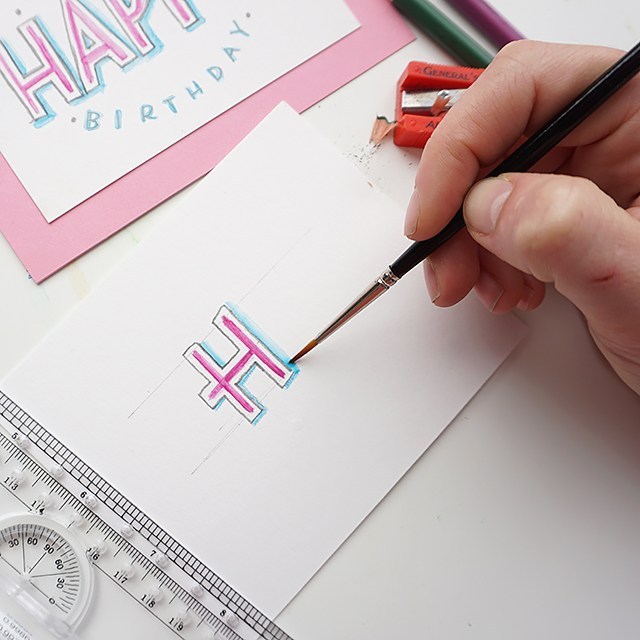
Wet a small round brush (this is a size 2 round) and smooth out the outline of your watercolor pencil.
Leave a little bit of white space and outline each letter. I love the General’s draughting pencil for this. It’s hard enough to maintain a stable line, but it’s smooth and dark.
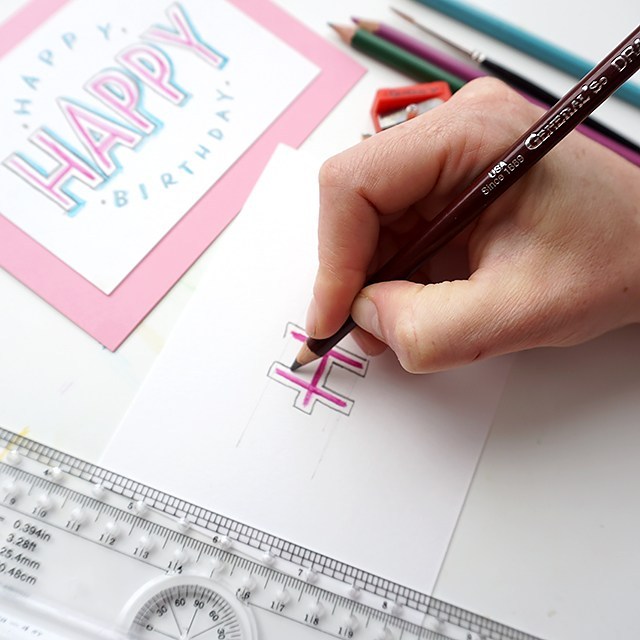
With your lighter color, outline the right-hand and bottom sides of your outline. You’ll use a light touch to lay down pigment to not disrupt the draughting pencil layer.
Using the same wet round brush, smooth out and soften the drop shadow you’ve created.
Once the watercolor is dry, erase away guidelines carefully. I like to use the corner of the eraser.
Bam! You’re done. You can send it as-is, or you can trace over the darker pencil marks in pen or marker to make the layout pop even more.
This tutorial is free for personal use. Affiliates are used to link to products I actually use and have. Your support here makes more content possible. Thank you!
Another YouTube video coming at you this week! It’s taken me forever to get this post out, the end of school stuff just took so much out of my week last week. So here we are posting late. If you want to stay up-to-date on new videos, subscribe over on YouTube! I’d love to see you over there. You can expect to see product reviews, art tutorials and time-lapse/real-time calligraphy work.
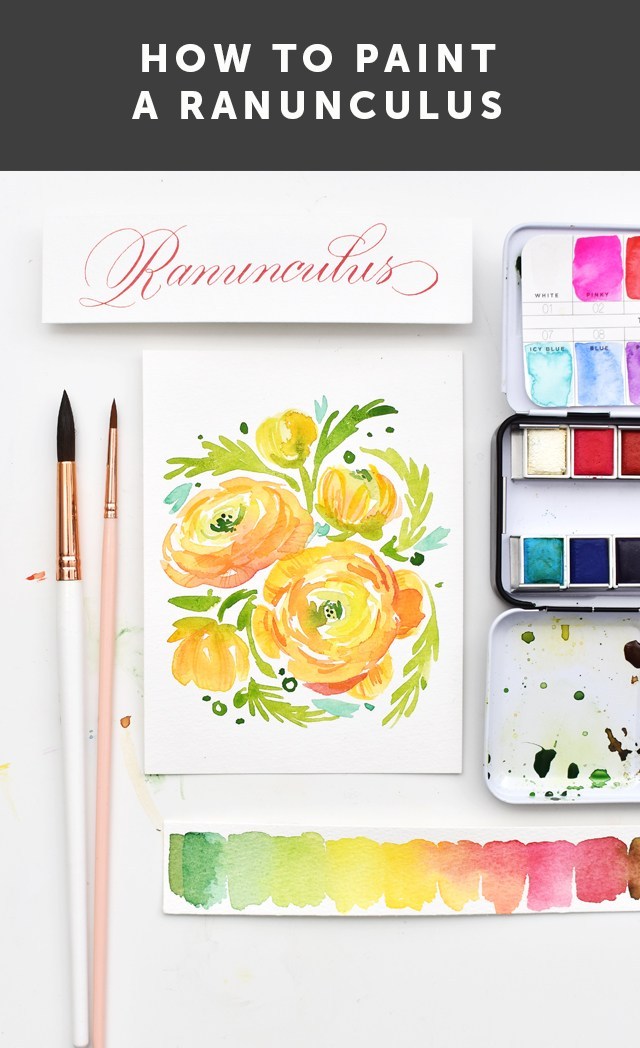
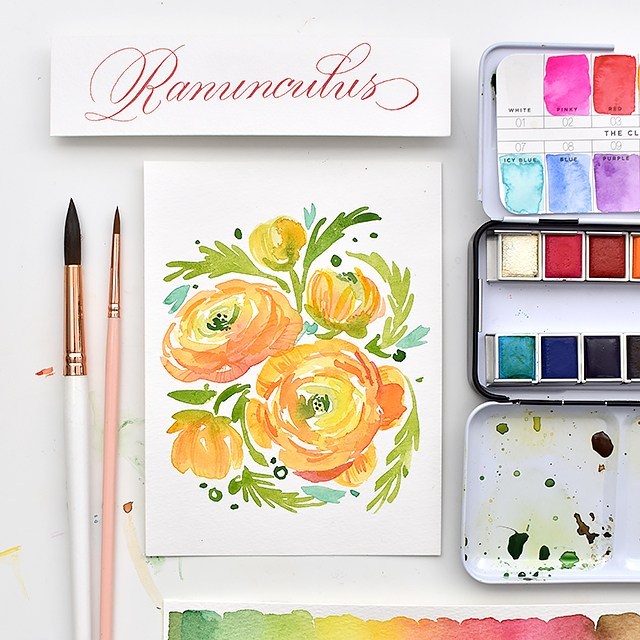
I’m giving you a peek into my process with my 100 days project (follow along here!). It’s a fun but crazy challenge to attack so many of these flowers. And ultimately I’ve come to grips with the fact that I won’t be able to finish them all in 100 days. I’m so far behind. But I’m determined to see this series through, no matter how long it takes!! Here’s what you’ll need (these are the exact materials I used):
HEY!! Use code Melissa15% at myprimaplace.com for 15% off your order. I tried the Prima Watercolor Confections for the first time with this flower set and I’m loving how the colors blend, lay down, dry and mix. They’re just lovely. And aren’t these little tins just the cutest things ever?!?
Here are the steps broken down. But I HIGHLY recommend watching the video. I give far more detail in the video. To do:
Start by using your largest brush and mix a light yellow green, bright yellow, and yellow orange. You’ll want all three colors mixed before you start.
Lay down brush marks in a circle with the light yellow green. As you make a larger circle (keep it uneven), start picking up the yellows, then as you get to the outside of the flower, move on to the yellow orange.
Allow the colors to melt into each other creating a subtle gradation from green to yellow to orange.
Let your flower dry fully
Next, use the size 6 brush and a darker version of your orange to create smaller concentric circles around, creating the shadows.
While you’re waiting for the flower to dry, add the foliage. Work and frame your flower by branching the foliage back into the flower.
Now get the liner brush with the same color, or just slightly darker (not by much) and add the details to the petals and darken up the concentric lines and the greenery in the middle.
Add any other decorative bits and you’re done!
Try changing up your perspective for a full bouquet of ranunculus! I hope you give this tutorial a try. I’d love to see your work if you do! Tag me (@melissapher) on Instagram or message me here if you end up trying this technique out!
This tutorial is free for personal use. Affiliate links are used to products I actually use and have. Your support here makes more content possible. Thank you!
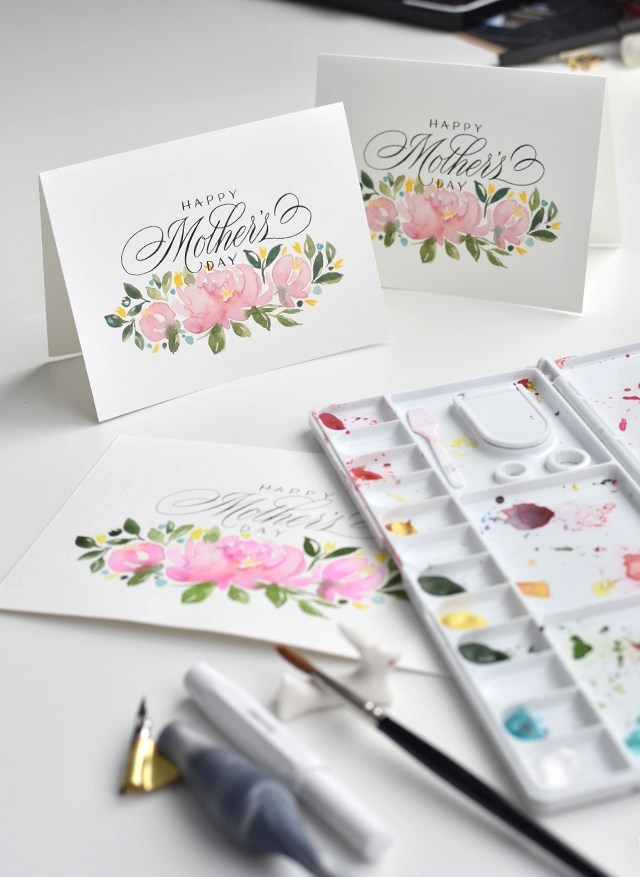
Coming at you super duper late, but late is better than never! I’ve been recently working on the 100 days project (follow along on Instagram right here), so I figured I’d rise to the occasion and add a watercolor floral element to this year’s card. Boy was it harder than I thought it would be! Maybe I’m just in a little bit of a slump (even though I’m only 1/4th of the way done). But I did it. And it’s done. And you can download it for FREEEEEEEEEE. Just for you. Or your mom. Or for you to give to your significant other to then write a note in and give to you.
I don’t necessarily go for gifts on Mother’s Day, but I must get a note from Chris. When I don’t, I get a bit sour about it. A little heart-felt thanks goes such a long way; afterall, momming is so freaking hard!!
I thought I’d take a different approach and walk you through the process of making this card. I made a few minor tweaks in Illustrator with the text and layout, but basically I scanned in the image and brightened the background for printing. Inspirations for this layout came from Natalie Malan & Esther Peck.
I really hope you’ll use this download! Check out even more Mother’s Day printables below:
This freebie is for personal use only, redistribution, remixing, or reselling is prohibited. If you’d like to use this for commercial purposes, please email me at melissa@melissaesplin.com.
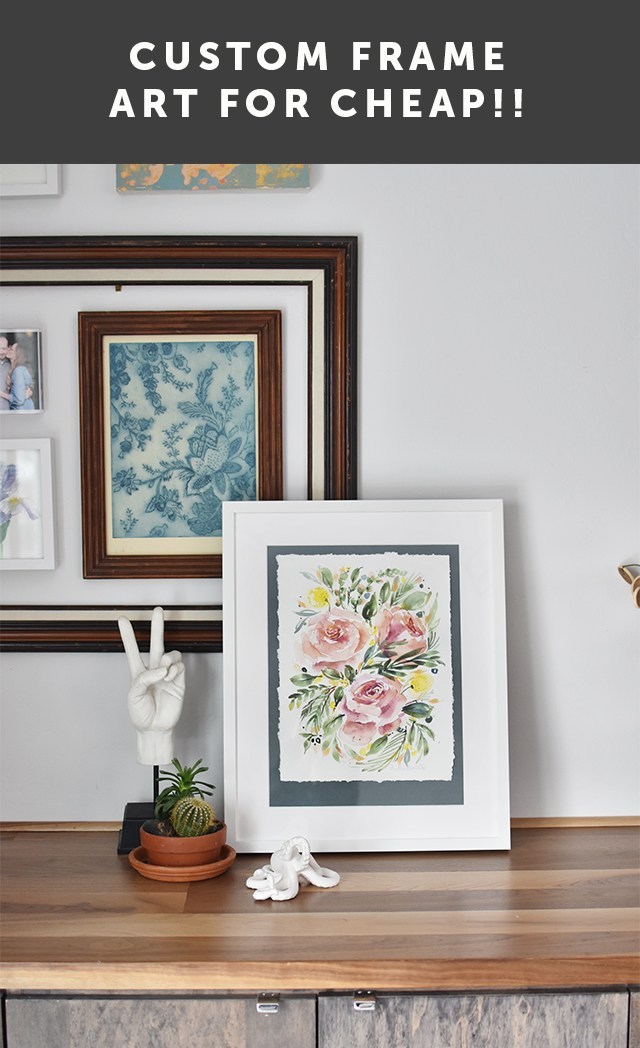
This may be a silly post, but I often get asked about where I get the artwork I’ve collected in my home and where I get them framed. Sure I’ve had some special pieces (investment pieces) custom framed. And it was worth every penny. But I personally love a mixture of high-low. Also, custom framing every. single. piece of art gets expensive!! Especially if the piece has more seasonality to it.
Back in my college days, I took a framing class down in the basement of the BYU Museum of Art. It was a thrilling experience to be in the same room as original Van Goghs and Monets and Picassos and Maxxes. Brigham Young University has one of the largest private art collections in the United states. IT’S AMAZING!!! But that’s beside the point. I had the awesome chance to learn how to properly frame pieces myself to add to my home. During this experience I learned the “right way”, but also that there’s a “good enough” way. So I’m going to share with you the “good enough” way to do a floating frame with artwork with a deckled edge. And how to create a deckled edge on any of your prints or pieces. As long as it’s paper, it can deckle!
Pencil for marking out the outline of the large backer paper
Scissors for trimming down the backer paper
I strongly recommend just watching the video above for the step-by-step. But if you’re the speed-reading type see below for directions:
Get your frame and artwork and measure how much you need to reduce the size of your artwork to fit it into the frame nicely. I would personally recommend making the artwork around 1/2 inch smaller than the mat opening on each side (if you’re using a frame without a mat, make it 1/2 inch smaller than the frame opening on each side. Depending upon what sizes your art and frame are, this may take some math. You may notice in the video above, I just eyeballed it. You can eyeball your measurements a little bit with deckled edges because it adds to the charm of the deckle. That said, I’m also pretty darn good at eyeballing square measurements (humble brag ;)).
Lay your metal ruler over the artwork just shy of what you want to remove.
Press down on the ruler to keep it secure, you don’t want it wiggling around!!
Starting from the top, slowly rip off the excess paper all the way down the side.
Repeat on all 4 sides. You don’t want to remove less than 1/2 inch of paper for a deckle, mostly because it’s a pain in the fingers to do that!! (see video)
Lay the mat over the backer paper and trace over the exterior perimeter with pencil.
Cut excess paper with scissors (these lines don’t have to be perfect). If you’re not using a mat in your frame, cut the backer paper down to fit the full size of the frame.
Place the mat back on the backer paper, lining the corners up nicely.
Put Tombow Sticky Tabs on the backside of the artwork along the corners and sides. Remove the double sided covers of the sticky tape
Gently center the artwork within the mat area and press into place.
Place all pieces (mat, art with backer and frame backer board) back into the frame and hang!
I really love the effect of the rich-colored backer paper. White would have looked fine, but I like how the deckled edge becomes more pronounced with the accent color of the backer paper.
For very little time and very little money, you’ll have a framed piece that looks like a million bucks! Let me know if you end up using this tutorial. I hope it was helpful. Tag me on instagram @melissapher if you use this technique!
This tutorial and accompanying printable is free for personal use. Feel free to share, but link with love.
Affiliate links are used to help support my crafting addiction. Your support and purchasing through these links doesn’t affect your final price, but helps me make more content like this. All thoughts and opinions are my own.


