Posts Tagged ‘crafts’

Sewn Paper Boxes

15 Comments

I always find that I don’t have any boxes when I need them most. I hardly ever keep boxes or buy boxes just because they tend to take up so much space. And I can never seem to keep the right sized gift boxes in stock! It’s especially the pits when I’m looking for some adorable packaging for a gift. It’s such a pain to run those errands with two kids. I’d much rather make do with what I’ve got at home. Since that’s the case, I’ve found two adorable packaging options with items I always have on hand.

My friend just had a baby girl a few weeks ago & I’ve had a few goodies lying around the house waiting to go to her. Since we were going to be visiting her yesterday, I thought it was high time I wrapped up her gift.

Isn’t that cardigan just so sweet?!? I found the sweater, it was hand crocheted (?) I’m assuming and I made the little onesie. I think they’re just adorable together. I needed a little box for it all so I whipped up the above box lickety split. I thought I’d share with you how I did it! This technique is perfect for little treats & gifts! Hope you enjoy the tutorial!

• S U P P L I E S •

  • card stock or heavy paper. I’ve doubled up two sheets of regular paper before with great success, too!
  • ruler
  • bone folder or scorer
  • paper cutter or ruler & X-acto
  • sewing machine

First, you want to figure out the size of your desired box. I usually just wing it when it comes to these measurements. If you want your side wall to be two inches, you’ll want to measure two inches in from each edge. Makes sense? See diagram below for measurements.

Score along each line. Crease each fold, then match up each corner score. You’ll need to box out the bottom & then crease out to the corner. It’s sort of hard to explain, but in the process of matching the two perpendicular score lines, you create a 45º from the score corner to the corner of the page.

Keep those two score lines together & sew down that score line using your widest stitch. Make sure you test out your thread tension beforehand to make sure it’s tight enough, otherwise you’ll have some loosey goosey stitches in the back of each seam. It’s not pretty. Also, I used a zipper foot in order to sew this seam. I just need a straight stitch & I needed the foot to be as small as possible to get a straighter line.

Trim the excess with pinking shears. Another method which I find a bit cleaner, is to sew the flaps to the sidewall with only a few stitches on each side. The measuring for this is a bit trickier. You have to make sure those two flaps are long enough to overlap in order to sew. So you make sure in your measurements that the sidewall is longer than 1/2 of the length (plus 1/4 inch) of one of the bottom measurements. Example: If I want the box to be 4 inches by 5 inches, I need to make sure the wall is at least 2 1/4 inches tall so the flaps can be sewn together. Make sense?

Check out the video ABOVE to see how I did this.

A big thanks to American Crafts for sending me their CUTUP trimmer. It’s fantastic! Check out the video above to see all of its bells & whistles.

Leather Cuff Wallet Tutorial

18 Comments

Last month when Jill & I were brainstorming together, she mentioned that she wanted to make a wallet for her husband’s birthday. Immediately I thought of a wallet I’d been thinking of making for some time. It was gosh probably over a year ago, I went to Tandy with Susan & the guy helping us wanted to show us a picture & pulled off his cuff to reveal his wallet was the cuff! I just remember thinking 1) that’s rad & 2) why haven’t I thought of that?

Click here to see the full outfit

Jill & I spent an afternoon working out the pattern & shooting this tutorial a few weeks ago & it’s high time I share the how-to with you. This project is a perfect handmade man gift that looks super cool, is super functional & easy to make. I’m sure I’m going to find myself making a bunch of these for the men in my family for Christmas.

This tutorial includes patterns for both men’s & women’s sizing. I’m loving my cuff, by the way. It’s perfect for going to shows or out dancing when all you need is some cash and an ID. ALSO, I fully plan on sporting one of these at the Sewing Summit in a few weeks. It’s the perfect place to stash business cards.

(more…)

A Sneak Peek

18 Comments

I’m officially DONE decorating Felix & Penelope’s bedroom. Well, I lied. I have to print a photo of Felix (how do I not have any printed photos of my 7 month old?!?) & frame it next to a photo of Penelope. Over the weekend, Chris and I were busy cleaning & organizing the house. It’s like I’m 8 1/2 months pregnant again – minus the 30 pounds. I think it’s because we’ve decided we’re going to live in our place for at least another 6 months. No moving just before the holidays! YAY!

Yesterday, Penelope & I had fun cutting out shapes with felt. She just massacred her felt (had a good time doing it, too) and I cut out fish silhouettes & circles (bubbles). I’ve been so close to sharing Felix & Penelope’s shared room with you, but it was missing something. A mobile. I made a little mobile to go over Felix’s bed.

I wanted to keep with the orange & yellow theme, so I grabbed a  bunch of felt in that same color family & went to town cutting shapes. I sewed the circles all in a line to make the bubbles and draped them over the embroidery hoop (much like Susan’s chandelier). I cut two of each fish & sewed the two together in skewed lines to add weight and interest. I assembled it all together using a million and a half square knots, industrial embroidery floss and embroidery hoops. Let me know if you’re interested in a tutorial.

Overall I’m really happy how this turned out. Also, it cost nothing to make. If I were to itemize it out, it’d be under 50¢ and that would be between the embroidery floss & the embroidery hoops. The felt was free from my mom, the hoops were 6 for $1 and the floss was $3 for a million yards.

It’s masculine, and fits within the theme of the room. That has been my biggest challenge with decorating Penelope & Felix’s room – being gender neutral. Thankfully I started out with a mostly yellow/orange theme with Penelope’s room to begin with. All pink would’ve been much harder to make masculine.

Granny Vest Before & After

19 Comments

What is up with me & granny stuff lately? I found this in Phoenix a couple of months ago, I even refashioned it about a month ago & haven’t worn it (until yesterday) or shared it with you. I don’t know what about this vest that attracted me to it. Perhaps it was the delicate eyelet lace & the eyelet pinstripes down the front. Who knows. For some reason I had a very Ruche-worthy vision in my head at the time I bought it.

I didn’t do much besides take in the sides about 2 inches. It’s a much needed improvement, but I think most of the transformation is in the styling.

I haven’t worn it mostly because it’s been too darned hot to wear more layers than necessary. Since it was cooler yesterday, I had to give it a go.

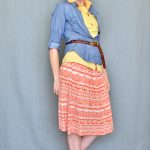
I don’t think I’ll be pairing this baby without the belt anytime soon, but I like it for some strange reason. I feel like when paired with the cowl, it adds a lot more volume to my bust – not necessarily a bad thing for a girl of my proportions.

I am tempted to make the back more of a racer-back rather than keeping it plain jane sleeveless. I think that might add a bit more style to the piece. What do you think? Should I make it a racerback?

Twisted Pony Holder Tutorial

8 Comments

If I had a dog, I’d buy this leash in a heartbeat. I don’t remember how I came across it, but isn’t it just so lovely? I wanted to incorporate the twisted leather technique into a project & instantly a pony holder came to mind. I’ve made a few now – they really take less than 5 minutes, hardly any supplies & are super stylish. I feel like I’ve put my hair in a pony every day this summer, so it’s a fun way to make the pony less blah.

• S U P P L I E S • 

  • 2-4 oz. leather scrap
  • X-acto knife
  • printed pattern (see download below)
  • hole punch smallest setting
  • elastic cording
  • scissors
  • hammer (not pictured)
  • double stick tape (not pictured, optional)

Print & trim the pattern & place pattern on top of leather. I used double stick tape to secure it in place, but that’s totally optional. Cut out leather. Click the “read more” button below to continue.

(more…)

mobile site