Posts Tagged ‘design’

Handmade: Letterpress Business Cards + Motivators

8 Comments

I had the opportunity to participate in this year’s summer Alt Summit, and boy did it sneak up on me! I barely had the chance to recover from January’s conference.

melissaesplin-business-cards-calligraphy-letterpress-8

I wanted to do something completely different for this session’s business cards, but I ended up doing everything last-minute. And by last-minute, literally making business cards the night before the conference.

melissaesplin-business-cards-calligraphy-letterpress-9

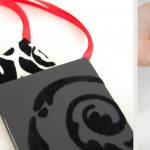
The cards have the same general vibe as they did previously, with a little motivator and acrylic stand, but I approached the printing and calligraphy differently.

melissaesplin-business-cards-calligraphy-letterpress-10

Instead of doing one kind of motivator (“You are awesomesauce”), I decided to switch things up and write out different adjectives. The monoline style is quite different from last time, too. I used watercolor paper and a sumi ink to create moody washes on the backs of all the papers to create a moody texture. Then lettered with white ink overtop. The texture of the black wash gives the card more depth, in my opinion.

melissaesplin-letterpress-business-cards-2

The printing was a little different as I was using a watercolor paper and not a thick letterpress paper. There’s still a deboss from the printing process, but it’s not as stark. I went with the watercolor so that the lettering on the back would be easier to create. Last time I had a heck of a time lettering on that soft letterpress paper.

melissaesplin-letterpress-business-cards-3

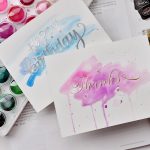
I also had a problem with the ink in the letterpress printing bleeding, making the hairlines a tad garbled. Above, you can see different experimentations on printing. The top right is using regular letterpress ink, you can’t tell a whole lot from the image, but it’s feathering a little bit on the paper. Then I tried various blind-deboss printing techniques, then applying ink afterward. That didn’t work quite like I had envisioned. Then the top left is when I discovered inking up my letterpress plates with a stamp pad. The stamp pad from Silhouette’s stamp kit is quite tacky and worked perfectly for inking up the plates. The printing was more crisp and the clean-up was a million times easier with the water-soluble ink. Major win! I’ll be using this method for printing with the L-Letterpress in the future.

Calligraphy: Eric & Margaret’s Invitations

5 Comments

Our family just expanded! My brother-in-law Eric got hitched last month to a really awesome gal. We’re so thrilled to add her to the family.

melissaesplin-calligraphy-design-margaret-eric-wedding-1

Since Eric and Margaret live pretty close to us (for about a year Eric lived with us), we’ve been able to get to know Margaret really well. But for some reason, I was coming up blank when it came to the design of the invitation. I think I started 3 different designs. None of them felt quite right. Too masculine, too formal, too boring.

melissaesplin-calligraphy-design-margaret-eric-wedding-2

The other limitation was the size. We went with an A2 envelope, which left us with basically a quarter sheet. With only that much space, I had to be creative to get information for both receptions on there without looking cramped or tiny. With relying on the personality of the type and going for a simple layout, I was able to make this happen.

In this case, bride and groom had varying amount of letters in their first and middle names. This made balancing out left to right a little complicated, but the extra flourishes to the right of ‘Eric’ did the job.

melissaesplin-calligraphy-design-margaret-eric-wedding-3

The colors were greens and bright yellows, which are perfect summer colors, but can get a little overwhelming if you have large fields of those colors. We opted for a bright white stock and green print with little details of yellow in the printing and with washi tape.

melissaesplin-calligraphy-design-margaret-eric-wedding-4

The design and assembly of the invitation was simple, but special. I’m thrilled how it all turned out. I’m also thrilled that they got hitched, too. :)

Download: Keep Moving Forward Desktop Wallpaper

11 Comments

I had the pleasure of working with Chelsea Costa on a new desktop wallpaper series for her blog. I met her at Alt Summit over two years ago and fell in love with her clean style and honest approach to writing and crafting. When she did a call for calligraphers, of course I was on board.

istillloveyou-calligraphy-melissaesplin-keep-moving-forward-quote-2

She gave me a few quotes to choose from, and about 2 weeks ago I felt like Walt Disney’s quote was the most appropriate for what I needed to hear internally. Sometimes life gets overwhelming. Work bogs you down. Kids can be so much work. And the house is never clean.

istillloveyou-calligraphy-melissaesplin-keep-moving-forward-quote-1

Sometimes when my to-do list gets too long for me to handle, I just stop. The mental load of having so much to do brings me to a screeching halt. I need to remind myself to keep moving forward. Because if I’m moving forward, I’m getting something done. And that’s an important feeling.

Check out Chelsea’s blog and download the wallpaper here.

Now if you want me to bore you with technical details, I used a #5 automatic pen and a #8 sable round brush to complete this work. I experimented with a Neuland variation and brush script. For pigments, I used Daniel Smith Phthalo Turquoise and Cobalt Teal Blue.

A Dream Collaboration: Hand-Lettered Hankies

14 Comments

We’re in full blown recovery mode around here. It’s taken just about all of my energy to get up and get dressed these days! Alt Summit was amazing, but so much work.

istillloveyou-calligraphy-houselarsbuilt-spoonflower-hankies-4

As part of the preparations and plans, I collaborated with Brittany from House that Lars Built and Spoonflower to make floral hankies as our takeaway for our Secret Garden mini party. We printed 200 of them, and they disappeared in about 15 minutes!

istillloveyou-calligraphy-houselarsbuilt-spoonflower-hankies-1

The lettering was fun to do, but I think the florals are the show stopper. We printed these babies on cotton voile. They’re crisp and vibrant in person.

istillloveyou-calligraphy-houselarsbuilt-spoonflower-hankies-2

I’m thinking I’m going to frame one (or both!) design on the wall, or back it with a thicker cotton and make a pillow case.

Did you miss out on getting one? Head over to Instagram and enter our little giveaway! We’ll be picking a winner tomorrow morning.


Lettered & Designed: Alt Summit Business Cards

11 Comments

An extra dose of crazy hit my house when I was thinking up this year’s business card.

150 business cards with hand-calligraphed art and stands.

Check me into the loony bin. I spent 12 hours on my cards this year. At least.

I wanted to make them amazing and showcase my calligraphy prowess. Originally I  wanted to design my own line of washi tape and hand out rolls of tape with words like “radical”, “awesomesauce” and “groovy” calligraphed all over. But a $3000 minimum buy for business cards seemed a little steep. I’m still thinking I want to design a line of washi tape. So if you’re reading this and you have strings you can pull. EMAIL ME. I WANT TO MAKE THIS HAPPEN. 

youareawesomesauce-businesscard-melissaesplin-1

Since that wasn’t an option, plan b was set in motion. I wanted to create some artwork to remind attendees at Alt that they’re amazing. Last year’s Alt Summit was inspiring, but I still left the conference with this sense of serious doubt and overwhelm.

I don’t want others to leave with that same sense of anxiety, so I made a little reminder that they’re awesomesauce.

youareawesomesauce-businesscard-melissaesplin-2

I designed new cards to include IStillLoveCalligraphy.com and my new logo (notice it yet?). I worked with We R Memory Keepers for the letterpress cards and paper (I’m one of their project boggers) to make custom plates. I printed the cards in about half the time it took to stamp the same amount of cards last year. I messed up here and there with the ink on the plates, but I didn’t want to stress myself out over perfection because I’m sure people would be understanding if I letterpressed them myself.

I designed and had a local company cut the easels. they’re clear acrylic easels that can hold artwork or even an iphone (sideways). Equal parts useful and decorative!

youareawesomesauce-businesscard-melissaesplin-3

Then I used the leftover letterpress paper to letter out “You are awesomesauce”. Calligraphy on letterpress paper was not fun. The weave and texture of the paper made the going really slow. I found that the Esterbrook 356 and 357 with iron gall ink worked best (minimal feathering) on this paper. I had origionally started with Dr. Martin’s gold ink, but it was a little unruly and took about 3x longer than with the iron gall ink. I love this old world iron gall ink as it’s slightly transparent, but moody. It destroyed both of my prized vintage nibs, though.

Here is the cost breakdown of each business card:

  • easel: $1.20
  • lettering: $2.50
  • envelope: $.09
  • washi tape: free
  • letterpress printing: $1.12 (time, not supplies*)

Total: $3.82

Most of the cost was in time designing, printing and lettering. Since these are fairly expensive (for business cards), I have the fancy ones and plain ones. I plan on asking people which one they want in case they’d rather not go home with more trinkets.

I hope I have enough cards for Alt!! I plan on bringing my stamping stuff in case I have to make up a few last-minute cards.

*Plates and paper provided by WRM.


mobile site