Posts Tagged ‘download’

Last Minute Gift: Double Wrap Bracelet

4 Comments

These last couple of weeks have been chock full of gift swaps & holiday parties! I also participated in a snail mail Holiday Gift Swap (hosted by Kersey & Susan). With all of these festivities I needed to make a thoughtful gift (10 of them, actually) that expressed what I like to do, but didn’t take a million years to make. When I found out that I had an unexpected connection to a laser cutter, it somehow just dawned on me that I needed to  make a patterned leather bracelet. Not just any old bracelet, though. A double-wrapped one. Those are far more fun, anyway.

I didn’t get around to laser cutting the bracelets before my first gift exchange, so I cut 5 of them by hand. I did 5 in under 2 hours (while watching TV). So you can tell that these things are easy to make! There are only 4 days left until Christmas, but that’s more than enough time to head to your local leather shop & make matching leather bracelets for all of your girlfriends (and their pets).
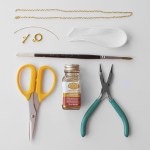
• S U P P L I E S •

  • 2-4oz leather or industrial felt
  • pattern piece
  • 1/2 inch buckle
  • scissors
  • hole punch
  • hammer
  • needle
  • coarse thread or sinew
  • packing tape

• I N S T R U C T I O N S •

Print & cut out and assemble the pattern (see the download button below).

Lay pattern flat on a piece of leather or felt. Tape pattern down with packing tape or equivalent. Punch holes, THEN cut out outline.

Thread the flat end through the buckle. Insert the oblong hole through the filange of the buckle. Sew the end onto the buckle with your needle & thread, tying a square knot to secure ends.

Wrap around your wrist twice & buckle!

If you’re a pet owner or have a friend who is, these bracelets could double as a cat/dog collar. Just add a D-ring & a doggie tag! Also, if you’d like to win one of the lasered bracelets, click here.

Wasn’t that easy? Click the download button below to download a printable version of the instructions, supplies & the pattern.

This tutorial/freebie is free for personal use and should not be distributed/republished without my consent. Altering the file NOT ALLOWED. If you would like to use this tutorial for commercial purposes, please email me. Thanks!

Boy Dino Party Suite Download

6 Comments

As promised, but a week late, I give you the boy version of Penelope’s dino party suite.

I changed a few minor details, the color, the script font is now my handwriting & the heart in the middle is now a star. This is definitely more suitable for a boy than my pink invitation suite, but It could still totally work for a girl. Hope someone out there gets some use out of this freebie! Send me pics if you ever end up using any of my downloads! I’d love to see how you use them!

This tutorial/freebie is free for personal use and should not be distributed/republished without my consent. Altering the file NOT ALLOWED. If you would like to use this tutorial for commercial purposes, please email me. Thanks!

Styled. Issue #2 – Party Suite

15 Comments

Jill & I have been on pins & needles waiting for the second issue of Styled. magazine to come out! We were asked to contribute with a printable or DIY for fall merrimaking, so Jill & I collaborated. This is the product of a whole lot of work. Seriously HOURS. We designed all of the party elements from scratch: invitations, RSVP cards, place cards, paper garland, thank yous, menu cards, favors – this suite has everything. We also did all of the styling, photography & production work.

Head over to A Subtle Revelry to see the second issue & download the artwork (we’re DIY 6). A huge thanks to Tai Pan for letting us use their decor at our disposal and Ruby Snap for the cookies in the favor shot. My only regret was that we didn’t make the shoot an actual party. We totally should’ve invited people. Next time, right?

So if you’re planning on a little get-together or a party this fall, please use our printables, k? Also – I recommend you hire Jill to do some design work for you. Her work is the shizzzz.

Jill designed the place cards, menu & banner. I did the invite, RSVP, favor, thank you.

• A L S O •

I’ll be speaking in Provo tomorrow at the Creative Collaborative meeting alongside CJane. It’ll be good times. You should come if you’re around! AND. . . as per your request, I scheduled another calligraphy class (the 24th), I’ve not publicized this yet, but there are still a couple of spots left if you’re interested in attending. Go here to sign up.

Penelope’s Would-be Birthday Invitation

35 Comments

Pingg and the telephone were a great back-up plan for Penelope’s invitations, but I just still was a little sad that I didn’t have the time to make her a more personalized invitation. But if I had time, here’s what it would’ve looked like. . .

Penelope's free fill-in-the-blank Invitation

These invitations were inspired by the square petal envelopes at Paper Source (I’m in love, seriously–Paper Source is my favorite). Well, I didn’t have a chance to use these invitations, but if you have something coming up, Penelope’s fill-in-the-blank invitation is available for download, right here!! For free*.

click to download the invitation

Click to download the note version

download the envelope

*Design and design elements are Free for personal use ONLY.

Thanks to How About Orange for linking to this post! If you’re new to IS•LY, welcome, welcome! Feel free to look around and as always, comments are encouraged!

Simple Glass Etching Tutorial

43 Comments

I know there are loads of tutorials around the internets showcasing etching glass, but thought I’d add my own point of view on the matter.

I’ve had this large glass serving platter for 6 months or so, and don’t really have much motivation to use it, mostly because it’s plain and boring. Now it’s a little more exciting, but in an oh-so-subtle way. Glass etching is also very practical for marking your glass serving ware for pot-lucks and parties. You’re less likely to end up sans dishes when they have your name on them.

_dsc2870sm

Click here for the FREE printable glass etching tutorial! or read below for the step-by-step instructions.

Glass Etching Tutorial

Supplies:

  • Roll of Contact Paper
  • Glassware
  • Junk Brush
  • Bonefolder or credit card
  • X-Acto Knife
  • Pencil
  • Armour Etch Acid
  • RUBBER GLOVES!!!!

Clean your glassware and dry thoroughly. Apply contact paper to the outside of the glass. Smooth out bubbles with a bonefolder or credit card.

With a pencil or sharpie marker, make your marks. *If you don’t want to hand draw the image, print out the desired design on regular paper and tape image onto contact paper.

With an X-acto knife or scalpal, cut and remove contact paper for etching.

In a well ventilated room, generously apply armour etch acid with a junk brush. Wait 10-20 minutes for acid to etch the glass.

If you’ve applied a load of etching acid, you can scoop the excess back into the bottle for later. Rinse and wash glass, brush and your hands thoroughly with soap. Remove contact paper, dry and enjoy.

Many thanks to How About Orange and Apartment Therapy for featuring this tutorial!

To print out a template of the above design, click here.

mobile site