*Use code Melissa15% for 15% off your purchase at myprimaplace.com!
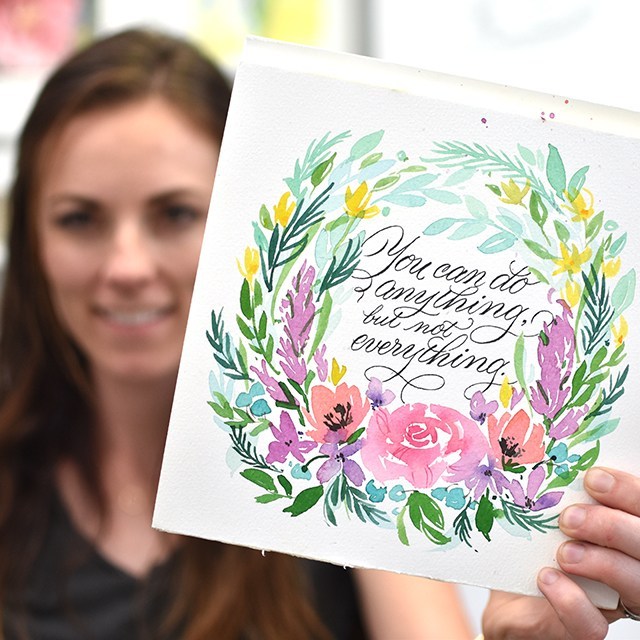
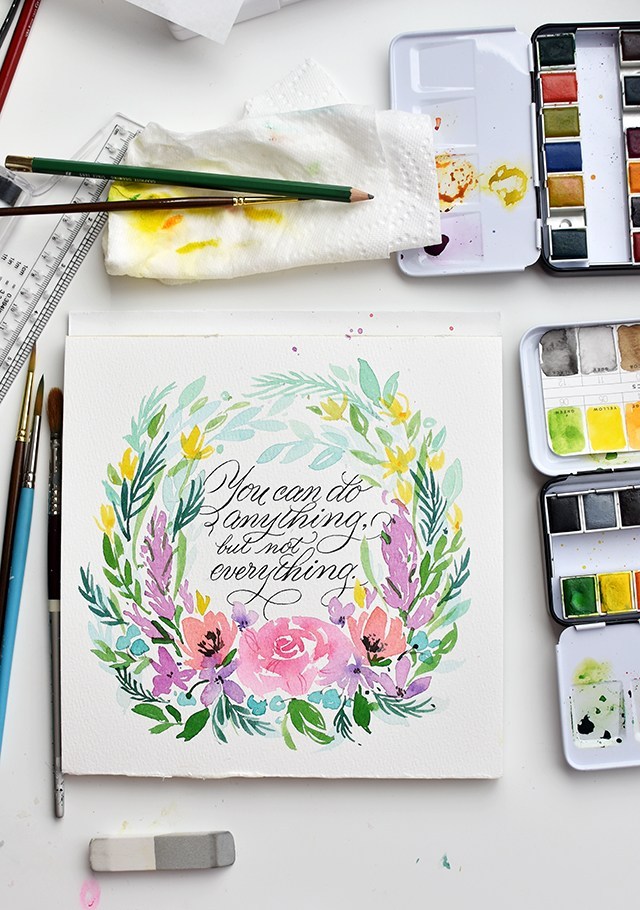
This quote has been rolling around in my head all week. I’m thinking of doing a mental/physical inventory of my life and let go of the things that I don’t need to hold on to. I don’t need to hold onto the idea of making a line of women’s swimsuits, or writing a hymn, or learning how to cobble shoes. I can let go of all of those things. So this is just a reminder of that. I plan on framing it sometime soon and hanging it in my studio as a reminder to stay focused and to really dive deep into what it is I want to do with my life. Like seriously, I got asked this week what I wanted to do and I was like… uhhhhh……
I should probably figure out what my end goal is here so I can actually run towards it.
So click play on the video above if you want to hear more about the materials I used, why, what was going on in my head at the time of illustrating it out. I want to let you know, Natalie Malan was a huge inspiration (her classes are the best) for the style of florals for this piece.
And if you want to learn brush lettering, I’m teaching a local workshop in utah. REGISTRATION IS HERE. And there’s always my online class which includes personal coaching, right here.
Affiliate links are used, your purchases support additional videos on this channel. Thank you!
Another YouTube video coming at you this week! It’s taken me forever to get this post out, the end of school stuff just took so much out of my week last week. So here we are posting late. If you want to stay up-to-date on new videos, subscribe over on YouTube! I’d love to see you over there. You can expect to see product reviews, art tutorials and time-lapse/real-time calligraphy work.
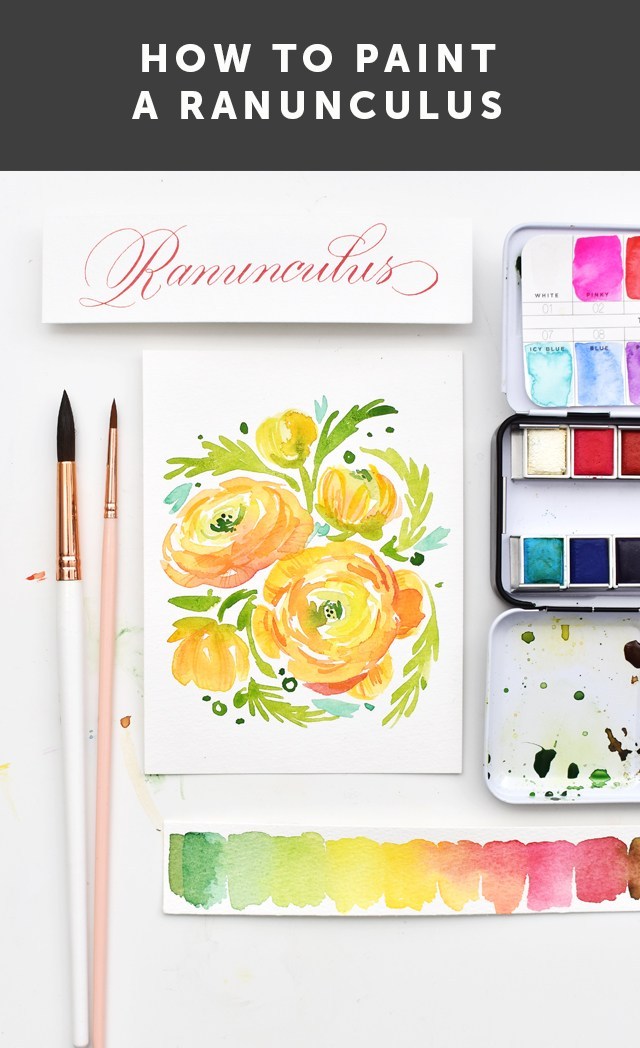
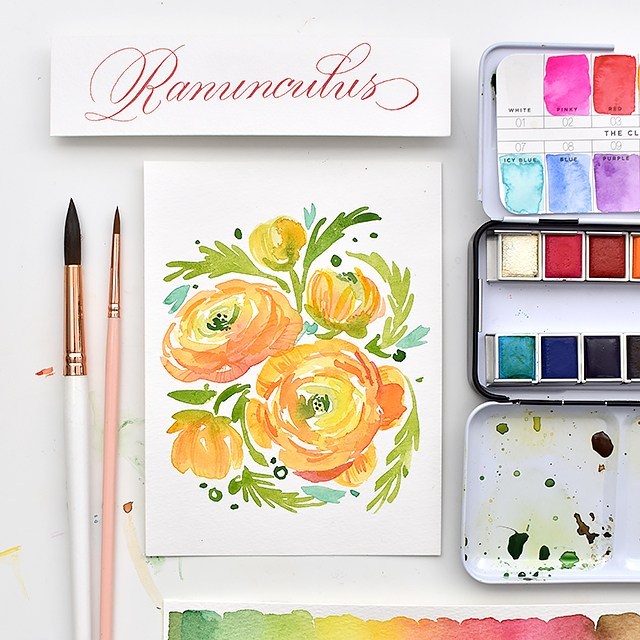
I’m giving you a peek into my process with my 100 days project (follow along here!). It’s a fun but crazy challenge to attack so many of these flowers. And ultimately I’ve come to grips with the fact that I won’t be able to finish them all in 100 days. I’m so far behind. But I’m determined to see this series through, no matter how long it takes!! Here’s what you’ll need (these are the exact materials I used):
HEY!! Use code Melissa15% at myprimaplace.com for 15% off your order. I tried the Prima Watercolor Confections for the first time with this flower set and I’m loving how the colors blend, lay down, dry and mix. They’re just lovely. And aren’t these little tins just the cutest things ever?!?
Here are the steps broken down. But I HIGHLY recommend watching the video. I give far more detail in the video. To do:
Start by using your largest brush and mix a light yellow green, bright yellow, and yellow orange. You’ll want all three colors mixed before you start.
Lay down brush marks in a circle with the light yellow green. As you make a larger circle (keep it uneven), start picking up the yellows, then as you get to the outside of the flower, move on to the yellow orange.
Allow the colors to melt into each other creating a subtle gradation from green to yellow to orange.
Let your flower dry fully
Next, use the size 6 brush and a darker version of your orange to create smaller concentric circles around, creating the shadows.
While you’re waiting for the flower to dry, add the foliage. Work and frame your flower by branching the foliage back into the flower.
Now get the liner brush with the same color, or just slightly darker (not by much) and add the details to the petals and darken up the concentric lines and the greenery in the middle.
Add any other decorative bits and you’re done!
Try changing up your perspective for a full bouquet of ranunculus! I hope you give this tutorial a try. I’d love to see your work if you do! Tag me (@melissapher) on Instagram or message me here if you end up trying this technique out!
This tutorial is free for personal use. Affiliate links are used to products I actually use and have. Your support here makes more content possible. Thank you!
Hello friends! If you’re here from Studio 5, welcome! I hope you take a look around at my printables and tutorials. If you’d like to sign up for one of my local workshops, click here (or the image below). If you’d like to take calligraphy online, check out my offerings here.
On to the tutorial, shall we?
Many months ago, I made these versatile coffee filter flowers with friends. Elsa brought all the supplies and we made tons. I made enough to decorate Penelope’s birthday party and my Christmas tree. With very little effort. I believe in all, my collection of flowers took 4-5 hours to make. When you batch it with friends, you can make even more! The great thing about these is once they’re made, they last forever and you can use them for just about any occasion. Add some fresh foliage from the yard and you’re good to go!
Or stick them in a pot with succulents for a little added color. Here’s how you do it:
Coffee Filter Paper Flowers DIY
First, let’s grab materials to dye the coffee filters. Since you’re not really laundering the flowers, you can dye them with anything. Dye with Rit, watercolor, heck I’m sure you could use food coloring. I like how permanent my results with Rit were. If you want more granulation and variation in the dye, use powdered dye.
I love using those hospital bed pans. They’re easy to come by and it doesn’t matter if you stain them with your dye. Also, the hotter the water, the faster the dye process.
Fill the basin about 1-2″ deep, you don’t need it super deep, with the hottest water you can get from the tap. Add dye. If you want a muted color, add about 1 tablespoon of dye. If you want it more saturated, add more! Pull off a section of 20 or so coffee filters. If you want more color variation, use larger chunks of filters in the dye bath. Dip in and pull out. The longer you soak them, the more consistent the color will be from filter to filter. So I like to pull them after soaking for about a minute. Separate filters and place on a towel to try. For quicker dry times, you can put them on your heater vents (if it’s winter), or out in the sun (if it’s summer).
Fold your filters in half. Then in half. Then in half. THEN in half again! Cut a round or pointy end. Then halfway down, do it again. These two pieces will be for flower steps 1 and 2.
Cut the second filter the same way. Add feathering if you’d like with multiple cuts on one or all of the pieces. More feathering, more volume it will have. Cut to the center on one side.
Grab the smallest piece and add glue to one side of the slit. Roll it around your wire stem and hold in place. Bring the rest of the petals around and glue securely.
Grab the second largest piece and glue one edge. Hold in place to allow glue to set. You’ll gather and pinch the bottoms of this layer together as you glue to add more fullness to the flower.
See the difference between the steps? It progressively gets more full. IF you want more volume, add even more layers!
For the last step, complete like the first. Add glue to the center portion of the coffee filter along the slit. Attach to the flower and wrap around. Glue as you go to secure in place.
Fluff out and add glue drops to the edges for dew drops!
Here’s a video detailing each of the glue steps:
There you go! Enjoy!
*This tutorial is free for personal use and should not be distributed/republished without my consent. If you would like to use this tutorial for commercial purposes, please email me. Thanks!
I’m thoroughly enjoying the recent surge of springy weather we’ve been having and therefore shirking in the blog posting department. :( I’ve had these flowers in my drawing book for some time (since my Idaho weekend), and haven’t scanned them in, thanks to living out of a suitcase.
Tomorrow Chris and I are heading down to Arizona to spend some time with the Esplin family, and I’m greatly looking forward to crafting with my in-laws, and hopefully get in some painting and drawing time with the sisters-in-law, too.
I think the drawings might make for some interesting paintings. Hopefully I’ll get around to painting soon.
[side note: I think I’ve told Chris 99 times today that I’m apartment/house hungry–it especially manifest itself this weekend when I went thrifting with my cousin’s wife, and nearly bought a set of fiberglass chairs for the home I don’t live in. Thanks, Natalie, for oogling over vintage home treasures with me!]
[other side note: I’ve had some stellar luck with some great second-hand finds, I found a cool wool coat for $5 (pictured above) and a metal cafeteria tray for $1 and a stellar stainless steel breadbox for $10–talked down from $12. The breadbox was a particularly awesome find because about 15 minutes later I found another one selling for $50!]