Posts Tagged ‘learn calligraphy’

Baby Calligraphy

0 Comments

Some time ago, a calligraphy friend of mine had a sweet baby girl, so a bunch of us sent her artwork of her daughter’s name. I’m so happy with how my contribution turned out. 

I went with an upright, modern style with a meandering baseline. I loved adding florals as decor on there, florals I learned from the one and only Heather Held

Materials used: 

Creative things like this where I’m let loose to my own devices is so freeing. It was fun to go to town on this little piece. 

Lately I’ve been telling a lot of people how calligraphy is the perfect creative outlet. It truly is! It’s mobile, you can do it anywhere, you can start with even the simplest of supplies and it’s something that doesn’t require an artistic bone in your body. Because letters and rules are involved, it’s a fantastic left-brained art activity. It’s so meditative and calming for me. When life gets chaotic (which it is that almost entirely right now), I can pop into my studio, or pull out paper while my kids are drawing and draw letters alongside them. It’s so fantastic. 

If you’d like to learn how, definitely check out my online class at Calligraphy.org. It includes great content and personal coaching, so if something goes wrong, you’ve got someone to help you troubleshoot. I’m also available for in-person workshops and private classes. Feel free to drop me a line if you have any questions! 

Winter Wedding Invitations

0 Comments

I had the joy to design invitations for a friend of mine and her now husband. When I asked her what she wanted, she basically said, she wanted reds and winter greens. She left me to figure out the rest. I love getting let loose on designs. It’s fun. :) 

I lettered the names and painted the foliage, then scanned and designed. I didn’t have a whole lot of time to budget for these invitations so I kept them simple. I wanted something a little more visually impactful than center-justified text, so I designed the text on a slant. 

If I had had more time, I think I would have refined things just a little bit more, but I’m happy with the end result. Happy enough to post them here, right? ;)

I enjoyed adding more dimension to the art by including watercolor details to the artwork. I used techniques from a watercolor class I took from Natalie Malan in the fall. We’re going to be team-teaching a workshop! Learn calligraphy and watercolor on March 4th! Register here. Looking for more workshops? See the 2017 schedule for updates. 

2017 Calligraphy Workshops

10 Comments

I’m still working on fleshing out the rest of the year, but I’m excited to announce upcoming teaching gigs!! I’m so excited for this year, it’s going to be great. More workshops to come, be sure to come back and check out the updates. 

Flourishing Workshop

Thursday, April 20 | 6-9pm | Salt Lake City, Utah

Visit me at The Write Image on April 20th from  6-9 for an intermediate workshop on flourishing. We’ll spend the night working on oval drills, flourish essentials and how to apply that to your own individual style. Limited to 10 spots. CLICK HERE TO REGISTER

Watercolor Calligraphy at Salt & Honey Market

May 6 | 10am | Salt Lake City, Utah

This will be my second workshop hosted by Salt & Honey Market. I’m excited to be presenting watercolor techniques as applied to calligraphy and creative lettering! Workshop includes breakfast, treats, all class materials, handouts and 2 hours of instruction. CLICK HERE TO REGISTER.

Digitizing Calligraphy at LetterWorks

June 24-July 1 | 2.5 day workshop | Ogden, Utah

I’m pleased as punch to be presenting at the 36th International Lettering Arts Conference, LetterWorks. I’m teaching alongside my calligraphy IDOLS! The conference is geared towards all skill levels. I’m teaching a 2.5 day workshop on digitizing calligraphy. We will be using both Photoshop and Illustrator. Geared towards beginning/intermediate computer users. CLICK HERE TO REGISTER.

Stay tuned by signing up for the newsletter! Fill out info below: 

Stay up-to-date on deals & local workshops!

* indicates required


And hey, if you can’t make any of my in-person classes, there’s always online at calligraphy.org

Brush Lettering Workshop | Lehi, UT

0 Comments

LAST CHANCE to sign up for this Thursday’s upcoming calligraphy workshop. We’re covering brush lettering and making customized tags for this season’s gift-giving. CLICK HERE TO REGISTER

melissaesplin-brushlettering-calligraphy-workshop

This class is going to be jam-packed full of great info, and tasty treats. For $80, you get:

  • materials (marker, pencil, paper, tags, ribbon, exemplar sheets)
  • treats
  • 2 hours of instruction

The instruction is hands-on. I’ll demonstrate the basic strokes, alphabet and walk around and help attendees with orientation, positioning and grip. Lefties, beginners and intermediate letterers are welcome! I demonstrate left-handed for left-handed guests, so no one gets left out.

Can’t make it to Paper Crush for the event? Take the online brush class HERE or sign up for our newsletter below.

melissaesplin-tinyprints-envelope-template-printable-8

Subscribe to our mailing list

* indicates required


Email Format

The Right Calligraphy Materials

0 Comments

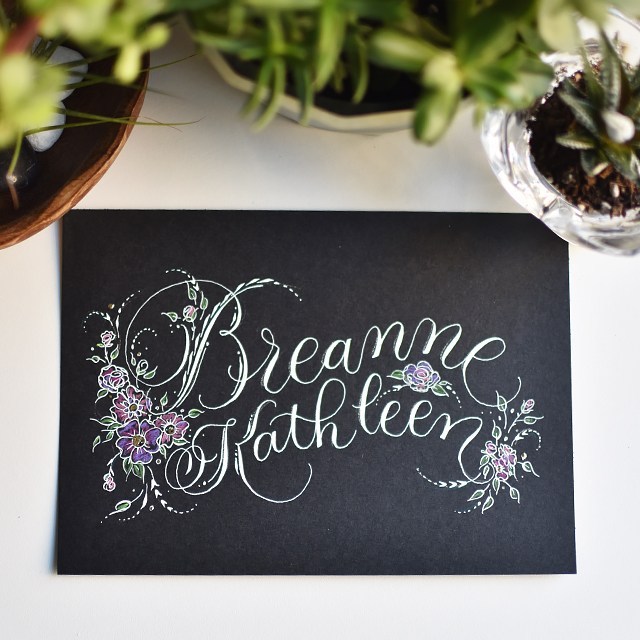
One of the many draws to calligraphy as a hobby is that it’s a desktop craft. It can take up as much space as a simple shoe box. Or it can take up several rooms. But the shoebox is where it starts. It’s not like skiing where you have to get the skis, and the boots and the bindings, and the pants and the jacket and the gloves and the poles and the goggles and… and… and…

learn-calligraphy-pen

Getting into calligraphy can be as simple and cheap or as expensive and elaborate as your budget allows. There are fabulous materials in every price range. Let’s break it down into 3 price ranges, shall we? This post has been created with affiliate links, but I strongly recommend ordering through Paper & Ink Arts regardless. They have fabulous customer service and tons of amazing calligraphy-related products.

ON THE CHEAP

You really can get great materials without spending a pretty penny. But there are a couple of caveats that go with going bargain-basement. Once you understand the limitations, you can better enjoy the cheap-o supplies.


Ticonderoga pencils are smooth and cheap. Easy to find as well. But you have to sharpen them by hand. That’s a bit of a bummer.

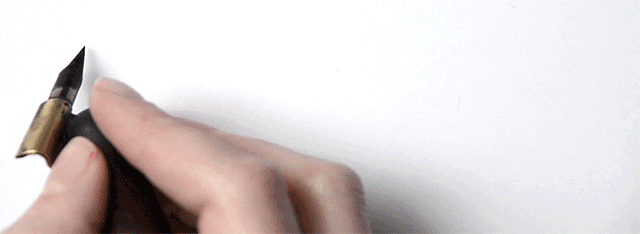
The bargain nibs listed are wonderful! However, one or all may not be ideal for your particular style or touch (nibs are like boyfriends, you might not like some and that’s okay). These nibs listed are guaranteed to be easily found at most art stores and will fit your Speedball Universal Holder. The Zebra G, Nikko G and Tachikawa G are great beginner nibs, but do not fit in the universal holder. You may be able to make it sort of work, but the orientation isn’t going to give you stable results.

I use the lacquered straight holder quite frequently. It’s great, but DO NOT get wet or the wood will split. The pen is still functional after the wood has split, it’s just less comfortable.

Higgins Eternal is a great ink! The consistency right out of the bottle is easy to work with and it’s not terribly corrosive to the nibs (just a teeny bit corrosive). The bottle is prone to leaking (don’t let the bottle freeze or it definitely will leak) and the ink doesn’t work on all paper types.

You may see some feathering and bleeding with Higgins on the Hammermill paper. You can still get great practice in regardless of the feathering ink, but if you see yourself being bothered by the feathering, try a different paper (see other paper options below). The Hammermill paper is great for beginners as you can easily print out guidelines directly on top of the paper and you can buy in reams for those heaps and heaps of initial practice.

melissaesplin-waterproof-calligraphy-inks-2

Mid-range investment

If you’re in a spot to splurge a little more, get the mid-range materials and the bargain basement materials (like the nibs, ink and paper).

Canson Marker Layout Paper is semi-transparent and handles ink well. I like to print out my guidelines and slip them underneath the paper. It handles all inks well.

Using a mechanical pencil is convenient since you don’t have to sharpen the lead, it’s great for practicing in pencil and laying out compositions.

Peerless oblique holders are a little more expensive than the Speedball Oblique, but you can get them fitted to the larger nibs listed above. Those larger nibs are great for beginners and heavier hands, with the exception of the Leonardt Principal, it’s just a great nib to try.

The straight holder is going to be a little more water/ink resistant since it’s made with a slightly harder wood.

Sumi ink is super black, so you get nice stark lines. It takes forever to dry so I like to mix it with water, Higgins Eternal or Walnut Ink to dilute it.

melissaesplin-christmas-calligraphy-workshop-online-learning-3

 Highish-end Investment

I say highish-end because this isn’t the highest end. If you want to go all-out, you’re getting everything on all these lists list, gold inks, a custom turned holder and on and on. The sky is truly the limit on what you can spend on calligraphy materials. But that’s a different post (here is a gift guide for splurging) for a different time. But when it comes to just starting out, these materials listed are going to get you there with the least amount of frustration. But you may notice, there’s not a huge difference price-wise between the cost of materials in the budget end and the highish-end.

Rhodia paper handles all kinds of inks. I use gridded paper because guidelines are already printed on there. The walnut ink is silky and smooth (it also ships well because it comes in crystal form that you dilute with water) and gives you just a little bit of transparency and fast drying times.

The copperplate sampler is a wide range of nibs you can try out every one and see what suits you best. The adjustable oblique will fit any of those nibs. The mahogany straight holder is made out of a hard wood (obviously) that does well for pointed pen work. It’s also gorgeous.

So there you have it. You want to get started with calligraphy? Stock up on any of these things.

Want it all done for you? Purchase the Calligraphy.org kit. And heck! While you’re at it get the calligraphy class, too. The class includes lifetime access to the content (which gets new content annually) along with 30 days of instructor feedback. And it’s not just “great job” or “awesome”. We tell you what’s working well, what you can improve and give you bonus materials to help you keep going and troubleshoot.


mobile site