Posts Tagged ‘tutorial’

Watercolor Pencil Ranunculus Tutorial

0 Comments

I’ve had this thing in the queue too long! It’s no secret that I’m a materials hoarder. When I got the chance to score a set of General’s Kimberly Watercolor Pencils, I jumped at the chance. I tried watercolor pencils a long, long time ago (before I really even knew a thing about watercolor painting in general), and didn’t really do well with them. I needed to make up for lost time. 

I really loved how these watercolor pencils turned out. They’re smooth, vibrant, juicy, and blendable. BUT… they aren’t watercolor paints! There’s a real distinction between the two… See? 

I love how I can get very gestural strokes with the watercolor pencils. It adds a lot of movement to the paper. I filmed a quick little tutorial on how to make your own ranunculus in the video below. I do hope you enjoy! 


Add your own calligraphy to your florals, and you’ve got a VA-VA-VOOM piece that your friends and family will love! Don’t know calligraphy yet? Consider taking my online class. It’s THE BEST (if I do say so myself. ;)). 

Watercolor Poppies Video

0 Comments

After publishing the tutorial here, I figured a video would be helpful. I hope you enjoy painting poppies this spring! 


Let me know if you end up painting some. I’d love to see how yours turn out!

DIY: The Lazy Girl’s Pillow Case

5 Comments

My in-laws have this oxford shirting sheet set that had me thinking that I (a) need that sheet set and (b) I could probably whip up a pillow to match asap with an old oxford shirt.

melissaesplin-sewing-buttonup-pillow-1

I haven’t taken the plunge for the sheet set (our kids are so gross, I’m sure it’d be stained with licorice goo or something within the first five minutes), but it’s on my radar. The pillow was a no-brainer. And took the equivalent in time to make (and photograph for this easy-peasy tutorial).

melissaesplin-sewing-buttonup-pillow-2

Grab a pillow, if you have an old cover you’re replacing, use that as your guide. If I don’t have to bust out the rulers, it’s a win in my opinion. Rulers just slow these Edward-scissorhands digits down. ;)

Materials:

  • A large old Oxford shirt (I found mine at a local thrift store)
  • Pillow form
  • Old pillow cover as a template (or a ruler)
  • Oversized washers
  • Scissors/rotary cutter
  • Cutting mat
  • Sewing machine

melissaesplin-sewing-buttonup-pillow-3

Be sure to wash and iron the shirt beforehand for best results.

Lay the shirt on your cutting mat. Flatten out any pleats so you get two flat layers. Pin the old pillowcase down with washers. If you don’t have an old cover to work from, Measure a 19″ square with your ruler for a standard 18″ pillow.

Place the cover off-centered over the front buttons. By placing it off-center, you have less puckering/bulging at the opening. And it looks cool.

melissaesplin-sewing-buttonup-pillow-4

Cut out your square, leaving about a 1/2″ seam allowance on all sides. Eyeballing is a-okay.

melissaesplin-sewing-buttonup-pillow-5

melissaesplin-sewing-buttonup-pillow-6

Turn right sides towards each other, pin and sew all four sides together.

melissaesplin-sewing-buttonup-pillow-7

Un-do the buttons and turn right-side out. Iron out the corners.

melissaesplin-sewing-buttonup-pillow-8

Place the pillow form inside, fluff and done!

melissaesplin-sewing-buttonup-pillow-9

Super easy. No worries about enclosures, no hemming, nothing. This is the easiest thing you’ll do all week. Promise.


DIY: Having Fun with Plain Wrapping Paper

0 Comments

I don’t have giant stashes of gorgeous wrapping paper. I have rolls of white, black and kraft butcher paper. And the occasional roll of gift wrap. But it doesn’t always match my mood or occasion, so here’s a fun little DIY I did to dress up my gifts this year.

melissaesplin-sakura-decorating-gift-wrap-1

Santa doesn’t have this much creativity when it comes to his gift wrap. That would take him way too long.

melissaesplin-sakura-decorating-gift-wrap-6

The key to this whole operation is in the marker. Some time ago Sakura sent me their Pigma Professional brush series. I use them for everything. Heck, they’re even in our brush lettering kits that I send out to all of my beginning brush students. These brushes come in 3 sizes: fine, medium and BOLD. I use the fine brush for small detailed work and little illustrations. I’ll use the medium in cases where my x-height letters are about 3/4″ tall. The bold I’ll use for everything else.

The bold brush is pretty stiff so you still get very fine hairlines even though you can get a ton of drama out of the side of the marker.

melissaesplin-sakura-decorating-gift-wrap-2

And when mine dry out, I’ll use them on textured paper for a more organic look (like above). Want to learn how to make these easy-peasy holly berries? Watch the video below.

Supplies

  • Pigma Professional BB Brush
  • Large sheet of white or kraft paper
  • Sakura Koi red marker (optional)

I love the BB brush, but you can get similar results from even a crayola marker. Granted, if you want this kind of drama to scale, you’ll need to make smaller holly berries and leaves.

Basic jist: get a piece of paper and spread it out on the floor or table. Draw out the berries first in random clusters of 3. Then draw in the center of the leaves, coming out from the berries with a light touch. A fine line helps. Then fill in the remainder of the leaves with two mountains and meeting just beyond the tip of the center line of the leaf. Fill in any awkward blank spaces with leaves. Messy is usually better in this case.

melissaesplin-sakura-decorating-gift-wrap-3

If you want to go for a more ornamental approach, draw out a berry grouping on cardstock. Watercolor paper is going to give your cluster more texture and depth. Punch a hole near the cluster of berries.

melissaesplin-sakura-decorating-gift-wrap-4

With your scissors, cut around the cluster leaving a 1/4″-1/2″ border. Thread through ribbon or string and use as a decoration on your gift.

melissaesplin-sakura-decorating-gift-wrap-5

Easy? Brainless? Awesome? Yes to all three. Happy last-minute gift-giving and wrapping!!

Sewing Style: Floral Two-toned Shift Dress

4 Comments

I live in this dress. It’s comfortable enough to throw on and chase the kids all day, but it’s nice enough for a date night out.

View More: http://piersonphotocompany.pass.us/melissaoutfits

I originally bought this fabric (Mood!) like 3 years ago on a girls’ weekend to L.A. fabric district. We each bought a yard of this gorgeous fabric to see what we would do with it. I was so nervous to cut into the fabric, I ended up tying it around my waist and joking with a “no sew” tutorial. To see what everyone else did with the fabric, click here.

View More: http://piersonphotocompany.pass.us/melissaoutfits

Just before leaving for Hawaii back in May, I decided it was time to do something about that yard. I didn’t have enough yardage to make a dress knee length, so I got creative and color blocked the top to give me a little extra room at the hem. I didn’t want it to look like I just pieced a top and a bottom there. I sliced and diced Megan Nielsen’s Briar tee pattern. I raised the neckline a touch and pieced the front and back. Piecing isn’t as hard as you might think. Especially if it’s in straight lines. It’s easiest if you have some tracing paper. I like to use large sheets of tracing paper from a roll (you can get them in 24″, 36″ and 48″ widths). See below for the full tutorial.

View More: http://piersonphotocompany.pass.us/melissaoutfits

melissaesplin-how-to-color-block-dress

We had so fun at the photo shoot that I forgot to get a straight on back shot of the dress so here’s one flat from my studio.

View More: http://piersonphotocompany.pass.us/melissaoutfits

Sewing the ‘v’ together was a little tricky since I didn’t want any puckering to occur (go slow!), but I tell you, using two knit fabrics for piecing like this is a lot easier than piecing two woven fabrics together. There’s a lot more wiggle room. Literally.

how to color block-01

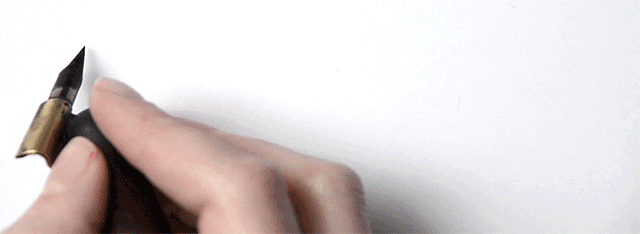
First things first, you’ll need:

For this, I used a pattern piece from the Briar Sweater pattern. This technique works on any pattern piece.


how to color block-02

Draw a line where you want your color blocking to happen. Drawing directly on the flat pattern how you want the pattern piece to look and where you want the seam to fall.

Then slip the pattern piece under the tracing paper and trace each section carefully. Transfer markings and information.

THEN ADD SEAM ALLOWANCE. You’ll add the same seam allowance to your color blocking lines as the pattern calls for. Write those seam allowances on the pattern pieces.

how to color block-03

Cut your fabric pieces out and align right sides together from the top corner to the middle. Pin at the pivot point.

Sew up to the pivot point and release your presser foot while keeping the needle in the fabric. Align the remaining fabric pieces and pin. Continue your line.

how to color block-04

Here’s the key: press your seam and top stitch the seam allowance to that side. I chose to stitch the seam allowance pointing upwards because of the fabric choices it just looked better.

melissaesplin-how-to-color-block-dress

Now sew your pieces together as directed in the sewing pattern. DONE!
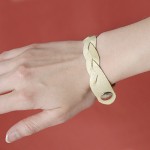
View More: http://piersonphotocompany.pass.us/melissaoutfits
View More: http://piersonphotocompany.pass.us/melissaoutfitsOutfit details:

  • hat and bracelets: c/o Tai Pan Trading
  • necklace: handmade (tutorial)
  • dress: handmade by me! using Briar tee pattern
  • shoes: Toms
*This tutorial is free for personal use and should not be distributed/republished without my consent. Altering any files is NOT ALLOWED. If you would like to use this freebie for commercial purposes, please email me. Thanks!
mobile site