Posts Tagged ‘weddings’

Calligraphy: Handmade Wedding Invitations

0 Comments

Check it out! I made it on Oh So Beautiful Paper!

Stretching my limitations and challenging my capacity is one way to describe this wedding suite. I usually calligraph and PRINT wedding invitations. This one was all hand calligraphed.

melissaesplin-hand-written-original-wedding-invitation-1

About the bride: Lynsey is an UBER classy girl from our neighborhood. Her and her sister run Alder & Tweed an interior design firm based out of Park City, Utah. And when I say classy, I mean basically every outfit is sartorial street-style straight out of Manhattan.

melissaesplin-hand-written-original-wedding-invitation-2

She’s my dream client. However, I only had 14 days to complete the invitations before the wedding. This means I had about 2-4 days tops to complete invitations and envelopes so guests could get their invitations! Most of the invitations were delivered by hand, so mailing wasn’t too much of an issue. There were a couple of invitations that were mailed outside of Utah, which made me nervous, but because it was such an intimate event every guest had the date saved.

melissaesplin-hand-written-original-wedding-invitation-5

The invitations themselves were classic. I worked on flourishing the names and did a slightly flourished running script for the main text. I hesitate to call this real Spencerian, because it’s fairly casual and doesn’t have the classic Spencerian shades. I opted out of that for the text because of the paper. The felt-finish paper caused some issues with keeping fine, smooth hairlines. Overall, I feel like it worked because of the rustic venue for the event.

For the finest hairlines, I used a Nikko G nib (it works best on those rough papers) and Old World iron gall ink. The Iron Gall ate about 3 of my nibs through the course of the 30 invitations and envelopes, but it was worth it.

melissaesplin-hand-written-original-wedding-invitation-3

melissaesplin-hand-written-original-wedding-invitation-4

melissaesplin-hand-written-original-wedding-invitation-6

The lightbox was my BFF for this project. I created the design on layout paper, drew in the text with a dark micron pen and taped it onto the light box. I used light adhesive washi tape to tape each paper in place while I lettered. It took about 8 1/2 minutes for me to write out each invitation.

melissaesplin-hand-written-original-wedding-invitation-7

The bride and family were over-the-moon to see their names ornately flourished. I really had fun with the addresses. I got in a groove and just flourished these names to bits!

melissaesplin-hand-written-original-wedding-invitation-8

The wedding was stunning. See snippets here and here. And here.

Want to learn calligraphy? Take my online class! Learn with videos, images, text and personal coaching (like real comments from real professionals). Purchase the pointed pen kit right here.

learn-calligraphy-pen

Design: Emily and Taylor Wedding

0 Comments

My sister got remarried! I’m so excited for her. As a gift to them, I designed their wedding invitations. She was the easiest to please bride I’ve ever worked with. All she wanted was something casual, but nice. I decided to go with some brush work with the design.

melissaesplin-emily-and-taylor-wedding-watercolor-invitation-calligraphy-1

I used a more formal brush hand, but kept it in the casual zone by varying the letter sizing just a touch and pairing it with a simple sans serif. My favorite sans serif at the moment: Museo Sans 300. I swear I use this for everything. It’s like the denim jeans of fonts for me. It’s more round than Helvetica Neue, so a tad more casual, but so classic.

I created and scanned in a teal watercolor wash. I used Daniel Smith Cobalt Teal Blue and Daniel Smith Phalo Turquoise for the gorgeous colored washes. They’re incredible watercolors!

melissaesplin-emily-and-taylor-wedding-watercolor-invitation-calligraphy-2

Em wanted them really simple, but I felt like they were too plain as-is. Since she was only doing a few dozen, I bought some white vellum and cut out overlays with a heart goign around their names. It’s really hard to photograph, but if you look closely you can see.

I didn’t cut them by hand. I used the design as a reference to create the heart-shaped overlay in Illustrator then I cut using my Silhouette.

melissaesplin-emily-and-taylor-wedding-watercolor-invitation-calligraphy-3

melissaesplin-emily-and-taylor-wedding-watercolor-invitation-calligraphy-4

I bought teal envelopes to coordinate with the watercolor washes and addressed the envelopes in a more formal brush for the names and a casual print for the addresses.

saltybooth-tay-and-em

Pic c/o SaltyBooth

I love how this mini wedding suite turned out, but most of all I’m glad to see my sister found a great guy.


Calligraphy: McKenzie and Andrew Wedding

8 Comments

I’ve promised myself to not take on anything until February of next year, but somehow this project was too interesting for me to pass up.

A local wedding planner approached me with the idea that her bride wanted some kind of timeline of the couple’s courtship to display at the wedding along with watercolored signage for the event.

istilllovecalligraphy-melissaesplin-calligraphy-mckenzie-andrew-love-timeline-1

She had found an example of what she wanted on etsy, a simple sans serif print in colorful blocks (can’t seem to find the link), but it didn’t go with her wedding’s decor, so I went a little more whimsical and romantic with the design.

istilllovecalligraphy-melissaesplin-calligraphy-mckenzie-andrew-love-timeline-2

I used watercolor for their names and gold ink for the rest of the information. It’s a very subtle warm gold which plays well with the slight changes in color the watercolor offers.

istilllovecalligraphy-melissaesplin-calligraphy-mckenzie-andrew-love-timeline-3

This piece is 11 x 14. The tricky part was laying out the large field of text in an interesting, whimsical way while still keeping style, scale and composition consistent. I ended up laying it out on a separate sheet of paper before transferring it to the watercolor paper.

istilllovecalligraphy-melissaesplin-calligraphy-mckenzie-andrew-love-timeline-4

At each of the 18 tables for the event, there are little question/answer cards. The bride’s response on one side and the groom’s on the other. Another fun little design element that helps you get to know the couple in addition to the courtship timeline.

istilllovecalligraphy-melissaesplin-calligraphy-mckenzie-andrew-love-timeline-6

They had four food stations that needed signage, so I made 8×10 artwork for that. Again, mixing the watercolor and gold ink for more dimension.

istilllovecalligraphy-melissaesplin-calligraphy-mckenzie-andrew-love-timeline-8

Then I labeled the food with small table tents, mixing script and caps print for easy readability and composition.

It was a fun project, but I have to admit, I underbid the amount of time it took me to do this. The small signage came in just as predicted, but the timeline took at least three times as long to make. Lesson learned!

Part of me wants to take on more of this kind of work, but there’s just not enough time for it. And honestly, I’d much rather teach a bride how to do it herself. Feed a man a fish. . . right?

It’s Hard to Find Black Dresses for Girls

26 Comments

I’m sure if I shopped long enough and spent enough money I’d be able to find an adorable black dress for Penelope, but I just didn’t want to! My sister’s colors were baby blue and black and she wanted all of the bridesmaids and girls to wear black dresses. I was originally planning on dressing her up in her charcoal and white striped dress from Easter, but that wouldn’t be nearly as much fun as wearing something new or new-ish.

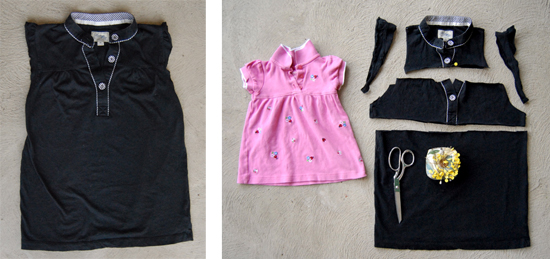
before-1T-shirt Before and During

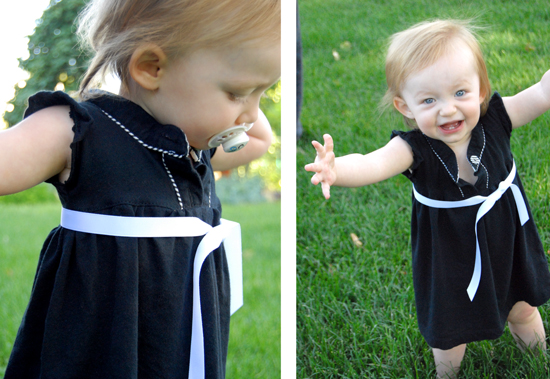
Christopher, who is all too often my muse, had dressed Penelope in one of my shirts (pictured above) about a week or two before the wedding.  While the shirt nearly ate Penelope, I got thinking that hacking it up wouldn’t be that hard to do. After all, it would just be a snip here and a seam there, right? Iused one of Penelope’s little polo dresses to serve as my guide and I just cut away! I discarded the middle section, but reused the sleeves, collar and bottom of the shirt. All I really had to do was re-attach the sleeves, gather the bottom part, stitch and top-stitch it all. My first attempt at attaching the skirt was really messy and as a result I spent a good hour fixing my mistake, but besides that the dress was a snap to construct.

after-1Penelope's T-shirt Dress

While this dress wasn’t nearly as formal/wedding appropriate as Nathan’s nieces dresses were (they were wearing the most adorable shiny poufy dresses!), it was perfect for her. She’s a messy little girl, so I didn’t have to worry about stains or spills. Best of all, this shirt has had more use in the last 2 weeks than it had in the last year.

mobile site