Posts Tagged ‘design’

John & Anna Wedding | Watercolor Wash DIY

0 Comments

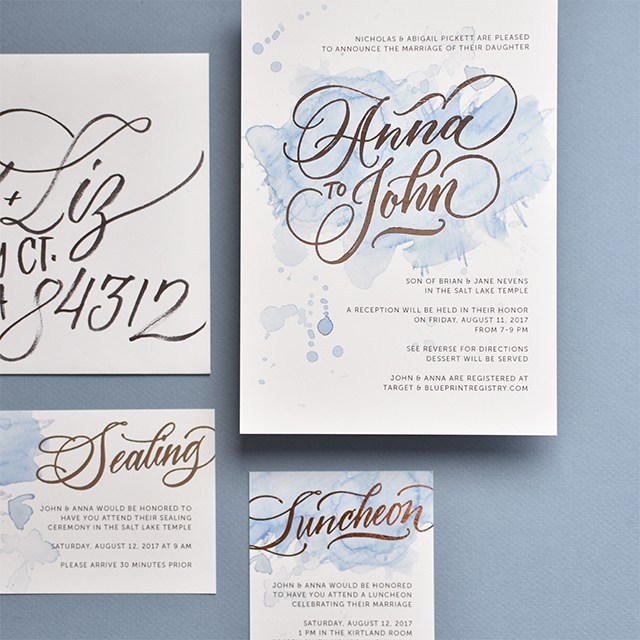
I had the joy to design and letter the wedding invitations for one of my cousins this last August. They were dream clients, too. Both have amazing taste and trusted my expertise and let me play with some fun, new techniques. 


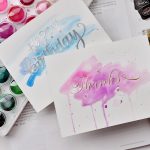
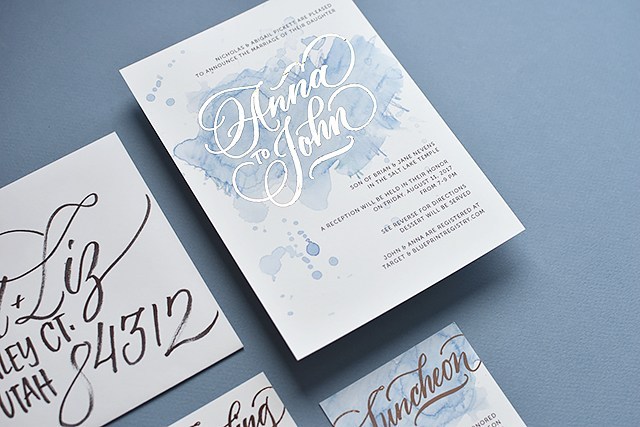
I’ve really enjoyed playing around with watercolor pencils and the playfulness and depth they provide to a simple watercolor wash, so I mixed a few colors to get their wedding colors in the wash and went to town. See the below video for an in-depth explanation of how to get that wash. I love the energy that explodes from the background with those washes. 

Check out the tutorial below and subscribe to my YouTube channel for more tutorials like this in the future! 

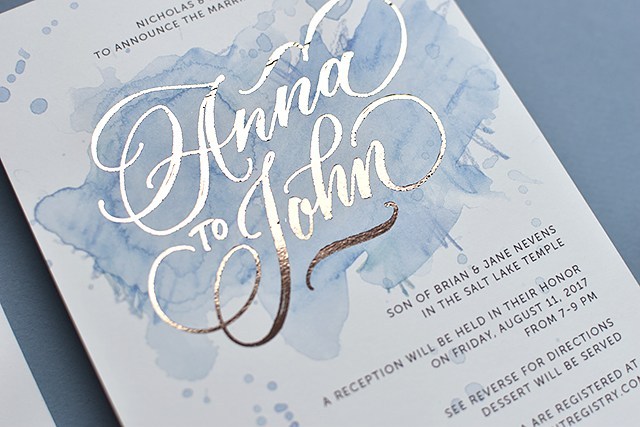
We went with copper foil printing for the names on the invitation. Part of me wanted to do copper foil for all of the text, but I didn’t want readability to be an issue. We did digital printing with digital foil through a wholesale printer I have an account with, so it was quite affordable, too!

Man, foil is so hard to capture with a camera! It has a lovely rosy, rusty tone to it, it’s hard to see that in the images. But it popped nicely against the watercolor background. 

For the design, I used my go-to font Museo Sans and my own hand-lettering. I lettered the names and titles of cards with my iPad Pro using Procreate and Brush #4 from Fabian Fischer’s ultimate calligraphy brush set. I really liked the texture and functionality of that brush more than any other brush I’ve found around. If you’ve found other good ones, let me know!  

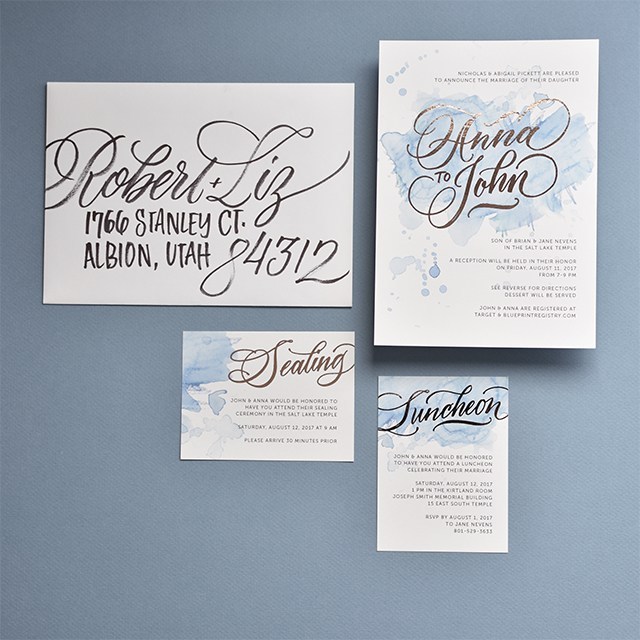
I ended up addressing all of the envelopes for the invitations as well. The couple gave me 100% creative freedom to pen them however worked best. I ended up doing a large-scale script for the names with an all caps for the address. I used the Cocoiro Brush Type marker (if you’re purchasing one for the first time, don’t forget to get a pen body to go with it). The markers lasted me about 75 invitations before it ran out of ink. I ended up doing between 500-600 envelopes. It was a project for sure, but I was THRILLED with the end result. 

I’ve recreated the invitations using my ink-jet printer and laser printer and foil laminator so you can see some of the spots where the foil didn’t adhere. All details have been changed for privacy purposes.

Winter Wedding Invitations

0 Comments

I had the joy to design invitations for a friend of mine and her now husband. When I asked her what she wanted, she basically said, she wanted reds and winter greens. She left me to figure out the rest. I love getting let loose on designs. It’s fun. :) 

I lettered the names and painted the foliage, then scanned and designed. I didn’t have a whole lot of time to budget for these invitations so I kept them simple. I wanted something a little more visually impactful than center-justified text, so I designed the text on a slant. 

If I had had more time, I think I would have refined things just a little bit more, but I’m happy with the end result. Happy enough to post them here, right? ;)

I enjoyed adding more dimension to the art by including watercolor details to the artwork. I used techniques from a watercolor class I took from Natalie Malan in the fall. We’re going to be team-teaching a workshop! Learn calligraphy and watercolor on March 4th! Register here. Looking for more workshops? See the 2017 schedule for updates. 

Logo Design for Krisle Photography

0 Comments

You know those times when you mesh perfectly with clients? Like you just get their vibe? This was it. Caitlyn and I had a little bit of back and forth about her style and aesthetic before I set to work on her logo. 

She wanted the lettering to be elegant, but not too elegant. Which is exactly how I roll. Perfect for wedding and lifestyle photography. 

For the design, I made a horizontal version of her logo (see it in action on her website) and a monogram for Instagram, favicon and watermarks.

As far as the process went, I sketched it out beforehand, lettered it on my favorite paper with my go-to markers, scanned and digitized. Want to learn more about the digitization process? I’ll be teaching a digital class at Letter Works this summer!

All Kids Are Artists with the Silhouette Mint

3 Comments

A couple of months ago, I did a video interview for Silhouette for their Mint. It’s now up on my YouTube channel. Check it out here or the embedded video below.

melissaesplin-allkidsareartists-silhouette-mint

In the video I mention that anyone can be an artist with the Silhouette Mint. It’s so true! I volunteer as a youth leader for 8-12 year old girls in our congregation. We meet twice a month to talk about spiritual doctrine, learn new skills, socialize and do fun activities. As a learning activity, I taught them about the design process and had them come up with their own stamp designs. I was so impressed with the skill and focus of each of these girls! A few of them had me help them with their word art. I was a little reluctant to do that because I wanted them to have full ownership, so I made them trace and add their own personal touches to do that.

This was perhaps one of my favorite activities as their leader. Seeing them thoughtfully come up with a design, draft and draw it out was so satisfying. For best results when making your own stamps:

  • Use the brightest paper you can find. Premium laser paper is smooth and solid white.
  • Use a black, black marker. I love Pigma Professional markers for this.
  • Draw graphic at a larger scale.
  • Scan your work at 300 DPI or snap a photo under natural light.
  • Adjust your image to make your blacks blacker and your whites whiter. I adjust in my photos setting, or use your favorite image editor.
  • Open into Silhouette Mint software & make!

If you’d like to get your own Mint, now is definitely the time!! Right now they’re only $49.99 (down from $129.99)!!! That’s a steal. With Christmas around the corner, I think it’s a no-brainer.

PRINTABLE: Parent Motivator Post Cards

2 Comments

lilyjade

This post is in partnership with Lily Jade. Their bags are insanely awesome for motherhood and adventuring.

I’ve fallen head-over-heels for the MEGGAN bag, it doubles as a backpack and has like a zillion pockets with a removable insert that can be easily washed. Connect with Lily Jade on Instagram, Twitter, Facebook and Pinterest.

post-separator

Parenting can be rough. I’ve found a few things have helped my journey, among them are: my Lily Jade bag (I can hide ALL the food, diapers and calligraphy supplies in those 27 pockets and still have room for more) and the encouragement of random strangers. Some of the most impactful moments as a mother have been when someone was there to lift, give comforting advice, share a laugh and saying that it’s all going to be okay.

melissaesplin-calligraphy-parenting-cards-6


melissaesplin-calligraphy-parenting-cards-3
When I first became a mother, I found myself the center of a lot of scrutiny. It seemed to drown out any encouragement I got. As time went on, I listened to the encouragement more and more. It has helped those wounds heal. So I’d like to pay all of that kindness forward in a small way.

melissaesplin-calligraphy-parenting-cards-4

Last month when I flew to Charlotte with the kids, there was a child on the plane that had a terribly hard time with the flight. My heart just ached for his parents, who were likely stressed out by the situation. I heard snide comments about that child by the passengers near me. UGH! I understand that no one wants to hear a screaming kid on a plan, but good grief, I don’t think anyone on that plane was more tortured than the child’s parents. A little bit of understanding goes a long way, in my opinion.

melissaesplin-calligraphy-parenting-cards-1

Oh how I wish I had had a card with an encouraging word to pass along to that family. So I’ve made these so I’m not so unprepared the next time I see a parent who needs a laugh or a bit of encouragement. I thought I would make these available to you as well. You can print them double-sided as postcards for easy mailing or keep the backs blank for a flat notecard or a simple pass-along card.

melissaesplin-ed-asner-parenting-quote-calligraphy

(more…)

mobile site