Posts Tagged ‘how-to’

How to Paint Ranunculus Watercolor

2 Comments

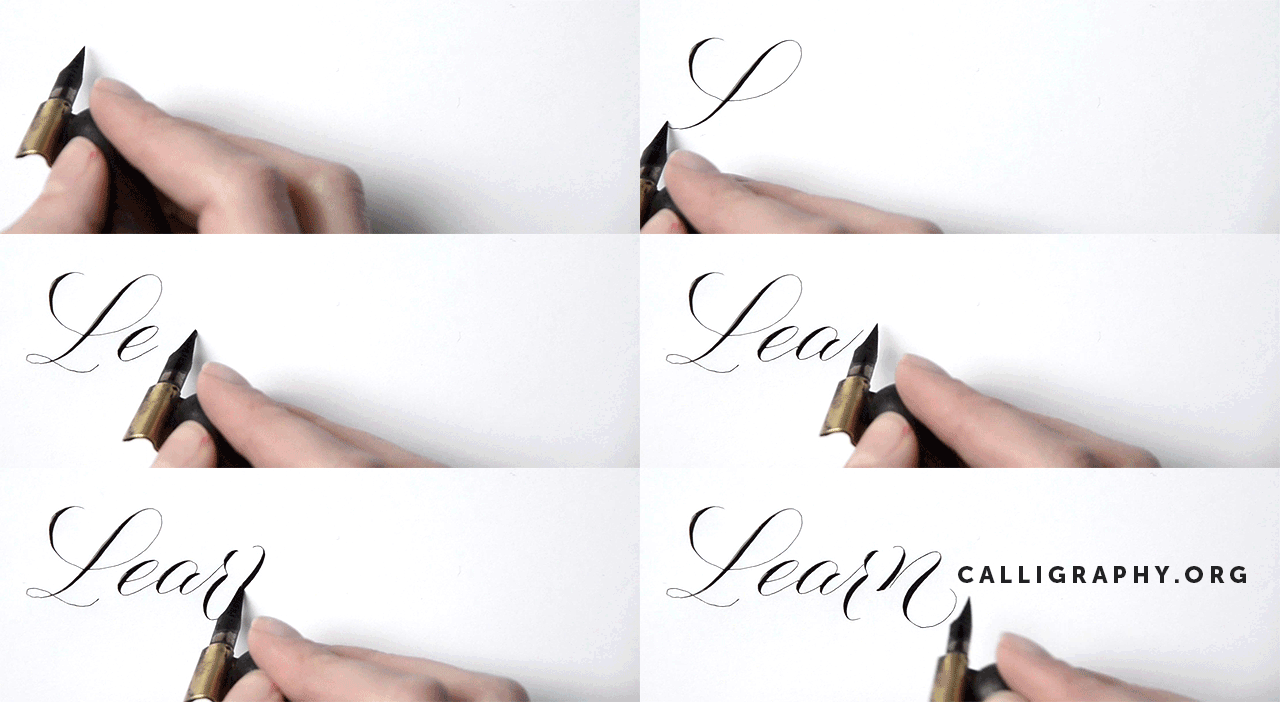
Another YouTube video coming at you this week! It’s taken me forever to get this post out, the end of school stuff just took so much out of my week last week. So here we are posting late. If you want to stay up-to-date on new videos, subscribe over on YouTube! I’d love to see you over there. You can expect to see product reviews, art tutorials and time-lapse/real-time calligraphy work. 
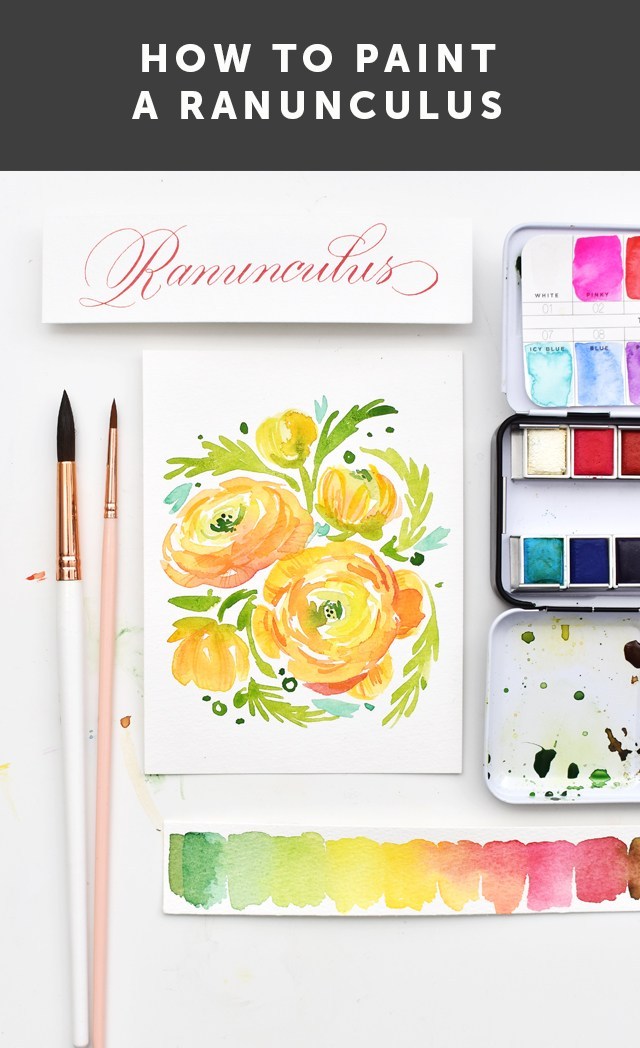
I’m giving you a peek into my process with my 100 days project (follow along here!). It’s a fun but crazy challenge to attack so many of these flowers. And ultimately I’ve come to grips with the fact that I won’t be able to finish them all in 100 days. I’m so far behind. But I’m determined to see this series through, no matter how long it takes!! Here’s what you’ll need (these are the exact materials I used): 

HEY!! Use code Melissa15% at myprimaplace.com for 15% off your order. I tried the Prima Watercolor Confections for the first time with this flower set and I’m loving how the colors blend, lay down, dry and mix. They’re just lovely. And aren’t these little tins just the cutest things ever?!? 

Here are the steps broken down. But I HIGHLY recommend watching the video. I give far more detail in the video. To do: 

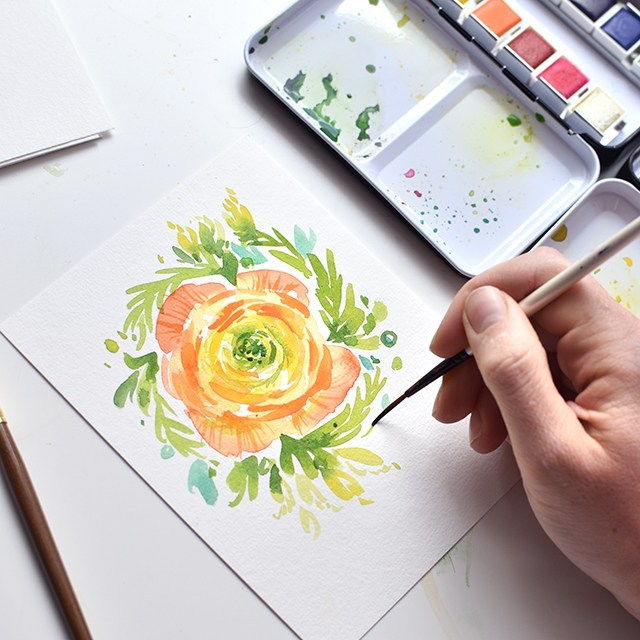
  • Start by using your largest brush and mix a light yellow green, bright yellow, and yellow orange. You’ll want all three colors mixed before you start. 
  • Lay down brush marks in a circle with the light yellow green. As you make a larger circle (keep it uneven), start picking up the yellows, then as you get to the outside of the flower, move on to the yellow orange. 
  • Allow the colors to melt into each other creating a subtle gradation from green to yellow to orange. 
  • Let your flower dry fully
  • Next, use the size 6 brush and a darker version of your orange to create smaller concentric circles around, creating the shadows. 
  • While you’re waiting for the flower to dry, add the foliage. Work and frame your flower by branching the foliage back into the flower. 
  • Now get the liner brush with the same color, or just slightly darker (not by much) and add the details to the petals and darken up the concentric lines and the greenery in the middle. 
  • Add any other decorative bits and you’re done!
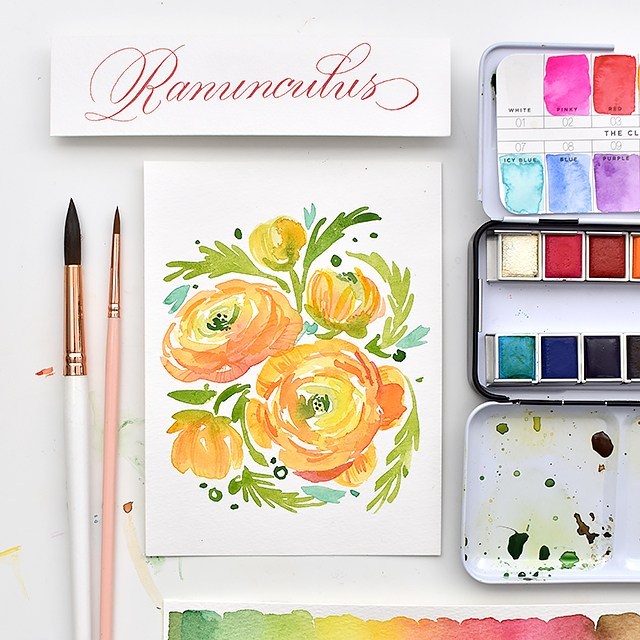
 

Try changing up your perspective for a full bouquet of ranunculus! I hope you give this tutorial a try. I’d love to see your work if you do! Tag me (@melissapher) on Instagram or message me here if you end up trying this technique out!
This tutorial is free for personal use. Affiliate links are used to products I actually use and have. Your support here makes more content possible. Thank you!

Embossing Hand-Lettering & Calligraphy

0 Comments

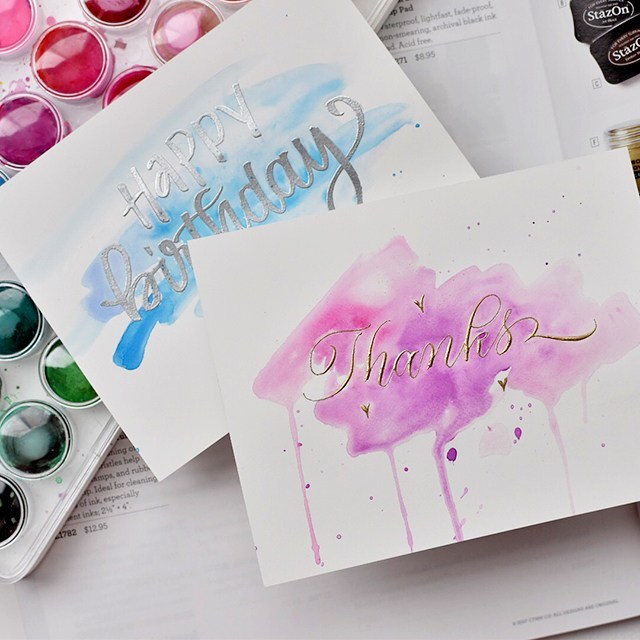
Close To My Heart sent me a sweet care package of embossing goodies to try with calligraphy. I’ve had a blast ever since they showed up on my doorstep! It’s been so fun to make cards and address envelopes with my new gadgets. And now I want every color under the sun to use for embossing! The raised texture is fantastic. And I’ve been able to get reliable results time after time with my pointed pen and my pointed brushes. It’s definitely a worth-while investment. 

Materials used: 
Gillott 404 Nib 
Oblique Holder 
Strathmore Bristol Paper
Size 2 Liner Brush
CTMH Embossing Powder
CTMH Heat Tool
CTMH Watercolors
Glycerine

I found that the Versamark liquid (for refilling stamp pads) was too sticky to use as ink, so I opted for glycerine. I’m glad I was able to find a suitable substitute as the glycerine doesn’t gum up my nibs or brushes. That said, I do like to use my cheaper nibs and brushes for this particular activity. I don’t want to be destroying my sable hair brushes in the process! 

Check out the video or read through the post details to find out how to emboss your own lettering!


  1. Dilute 1 part glycerine and 1 part water to make your ink. It helps to use a pipette to dilute with water so you have good control. 
  2. Pen or brush your words/phrase/name on the paper. Use a nice quality paper so the glycerine doesn’t bleed. Before lettering, make sure to scrape or drip off excess “ink” so you’re not laying down too much glycerine. It can affect how the embossing happens. 
  3. Place your paper over a scrap sheet, I like using a thin sheet of paper so that I can easily clean up excess embossing powder. 
  4. Pour a generous amount of embossing powder over your design. Tap excess off the paper onto the scrap sheet. Set project aside and funnel excess powder back into the embossing powder jar. 
  5. Heat your design with a heat tool. Keep the tool 2-4 inches away from  your work and move the tool as the powder melts. 
  6. Optional: Add a watercolor wash over your work. 
  7. For best results, the watercolor wash should happen after. The watercolor resists the embossed work, so no need to do it prior. If you do happen to do it beforehand, you may find the glycerine bleeds over the wash and your lines will get fuzzy. 

Products from Close To My Heart (CTMH) were provided for this video. All thoughts and opinions are my own. The affiliate links used help support this blog and the tools used for making more tutorials, reviews and content. Thanks for your support!

SLC Craft & Calligraphy Workshop

2 Comments

This Thursday (September 15, 2016) I’m holding a craft night at The Write Image! Click here for more info.

melissaesplin-harry-potter-diy-mug-design-1-felix-felicis

We’re going to be exploring flourished brush calligraphy and we’ll be decorating mugs with our fancy skills. Materials and dinner provided.

REGISTER HERE

Sponsored: 6+ Ways to Address an Envelope

7 Comments

This post is sponsored by Tiny Prints. They provide excellent quality printing and amazing printing options to make your holiday cards stand out this year.

I’ve got 6+ easy ways to embellish your envelopes this year. Don’t get stuck with boring print labels or chicken scratch! Make your snail mail pop with a few tips that require little to no technique. :)

If you want to get some technique under your belt, check out 5 Easy Steps for Improving Your Handwriting, or take my calligraphy class!

melissaesplin-tinyprints-6-ways-to-address-an-envelope-8

Getting fun snail mail is possibly one of my favorite aspects of this time of year. I love getting something other than business offers and bills! Colored envelopes will certainly help make those invites pop.

I went through Tiny Prints for my Christmas cards this year and got one of their laser-cut designs (See all of their offerings here). It’s unique, well designed and I didn’t have to spend a million hours getting it squared away. Major win! I’m dedicated to having enough time to enjoy the holidays this year. No chicken with her head cut off over here, please!

I’m incredibly partial to Kraft envelopes (greengrocer kraft is fabulous). They work well with both light and dark pens and they stand out in a pile of mail. The envelopes featured in this tutorial are from Tiny Prints. I’ve been incredibly impressed how well they handle ink and how easily I can write on them with my super sharp calligraphy nibs.

melissaesplin-tinyprints-6-ways-to-address-an-envelope-7

Next up, gather all random scrapbook supplies you own. Heck, head over to Walmart and browse their crafty section. You’ll find some great stuff for next to nothing.

melissaesplin-tinyprints-6-ways-to-address-an-envelope-6

To do the techniques seen above, you’ll want to collect a few things:

You’ll want a few different patterns of washi tape, and perhaps a few different widths, too. When in doubt, collect all the black, white, gold and silver washi tape you can get your hands on. It goes with practically everything and every season.

You can use any kind of pen for these techniques. I used dip pen and ink for many of these samples, but just use any kind of pen you have. Ballpoint pens, however? NO. Throw all of those out of your house right now. They’re terrible. Shame on you for having them around. :)

Learn how to use a pointed pen with my online calligraphy class: IStillLoveCalligraphy.com. I’m happy to teach you! Side note: our kit makes for the perfect gift. 

So let’s get going, shall we?

melissaesplin-tinyprints-6-ways-to-address-an-envelope-1

When doing your addresses on a straight line, use the chalk pencil and the clear ruler to mark out those lines. Otherwise:

DECORATIVE GUIDELINES

Use washi tape as a decorative way to keep your lines straight.

Tape a vertical and horizontal strip and write in the bottom right section OR use it to slant your baseline. Layer multiple strips of tape for more depth.

melissaesplin-tinyprints-6-ways-to-address-an-envelope-2

RANSOME NOTE

Use alphabet stickers to draw attention to different letters.

For a cursive style, use block letter stickers for the first letter of each name. For block style writing, replace a random letter with a sticker.

I found these stickers at Walmart for about $1-2 each. I’m sure you can find them at just about any craft supply store as well.

melissaesplin-tinyprints-6-ways-to-address-an-envelope-3

AROUND AND AROUND

Use circular sticker labels (I used Avery 2 1/2″ labels) to structure your envelope’s layout.

Print or letter just the address within the label (this is great if you want a hand-lettered touch, but you have LOADS of addresses to do) and write the name outside the sticker.

In the top version, I used the border of the label as a baseline and wrote the name around the diameter. It looked a little empty so I drew a little holly berry illustration on there. You could draw something there, or keep it simple and stick the circle in the center of the envelope.

Wrap the label around the back and write the name on a large scale all the way across the envelope.

melissaesplin-tinyprints-6-ways-to-address-an-envelope-4

GLITTER GLUE DETAILS

Glitter glue is my best friend. It’s all the sparkle of glitter without the mess of loose glitter everywhere (I swear that stuff multiplies). My favorite brand is Stickles. Sparkliest of them all.

Pipe out a wavy line in glitter glue. Use that line as your guide for the baseline of the recipient’s name.

Or Letter out your address and use glitter glue to add accents on hairlines and at the terminals of each line.


melissaesplin-tinyprints-6-ways-to-address-an-envelope-5

LARGE-SCALE NAME

Grab a marker and go to town! Write out the first name as large as the envelope will allow. Cursive styles work best. I used a Tombow dual brush marker here. You can use a casual, grungy style nicely. Then letter the rest of the address in a normal style, save for the ZIP. Make the ZIP huge.

ADD SOME BLING

Letter the address as you would prefer then stick some rhinestones on it. Yup. Simple. But it’s so fun go get in the mail! I like to use PVA glue to fasten them on. It’s a strong glue that dries clear.

melissaesplin-tinyprints-6-ways-to-address-an-envelope-7

I hope you have some fun sending out mail this year!

*This DIY is free for personal use and should not be distributed/republished without my consent. Altering any files is NOT ALLOWED. If you would like to use this freebie for commercial purposes, please email me. Thanks!

learn-calligraphy-pen

Learn calligraphy online at istilllovecalligraphy.com. You’ll learn the basics of pointed pen, flourishing, addressing envelopes and developing your own style. The course comes complete with a beginner kit of supplies and personal coaching from calligraphy experts Melissa Esplin and Erika Paulsen. Click here to find out more.

How to Organize Sewing Patterns

14 Comments

The silence over here has been killing me! It’s been a crazy couple of weeks around our house. Chris got the renovation bug not too long ago and we’ve been working our tails off on completing the last unfinished bedroom in our house (pics soon!) and updating all closets. The new closets are heavenly!

melissaesplin-istillloveyou-organizing-sewing-patterns-1

While in spring cleaning/nesting mode, I’ve taken the opportunity to re-organize my sewing patterns. They’re out of control. I’ve drafted about as many patterns as I’ve bought, so coming up with a good system for easy storage was necessary.

In the past, I’ve bought envelopes the same size as as standard pattern envelopes and tried to stuff drafted patterns into those. It’s not terribly effective for me, since most of my pattern envelopes end up sitting on my desk for weeks simply because I’m too annoyed with the thought of putting them away.

melissaesplin-istillloveyou-organizing-sewing-patterns-3

A few fellow sewers mentioned to me how they organize patterns in clear sleeves in three-ring binders. Genius. Wanting them to look polished in my new closets, I went for leather binders*. They’re gorgeous. So far I’ve only separated out tops and bottoms. I’m filling these binders fast, so I’ll likely need to branch out to more categories. Here’s how I’ve done it (and you can too):

Supplies:

  • binders, either 8 1/2 x 11 or 12 x 12
  • clear sheet protectors
  • large labels
  • fun marker or pen

Step 1:

I never cut into store bought patterns. They always remain intact, I simply trace the appropriate size on tracing paper and make adjustments there. I bought a giant roll of 36″ wide x 50 yard tracing paper at a local art supply store for somewhere around $20. If you sew, it’s a worthwhile investment. Store bought patterns stay in their envelopes and those envelopes get stored in a box. Pattern tracings, PDF patterns and self-drafted patterns get stored in binders for easy-access.

Step 2:

Pack the sheet protectors with your pattern (one pattern per protector).

Step 3:

Label the protector. I labeled it with the pattern maker (i.e. Megan Nielsen, Hey June, Self-drafted), pattern name or description and traced size or estimated draft size at the bottom.

Step 4:

Sort. Alphabetical order, style, preferred fabric type, etc. Figure out a system to easily find your patterns and your done!

melissaesplin-istillloveyou-organizing-sewing-patterns-2

I had a lot of fun busting out my brush markers and washi tapes to fancy-up the labels for each pattern. The lettering is far from perfect, but it was great practice.

melissaesplin-istillloveyou-organizing-sewing-patterns-4

Let’s end on a keeping-it-real note. This is how awesome my studio looks at the moment. I’ve got a lot of organizing ahead of me, but with binders, cute boxes and new shelving I feel unstoppable!! WEEEEE!!

How do you organize your sewing patterns? Do share in the comments below!

*Binders and sheet protectors provided by Lifestyle Crafts.
mobile site