Archive for the ‘home’ Category

How to “Custom Frame” on an IKEA Budget

3 Comments

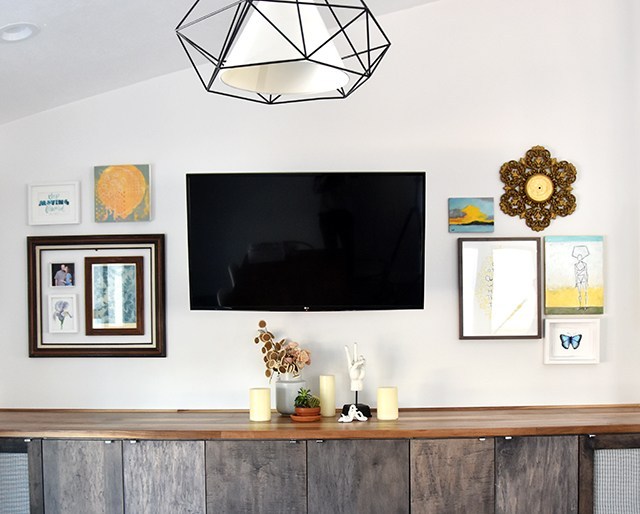
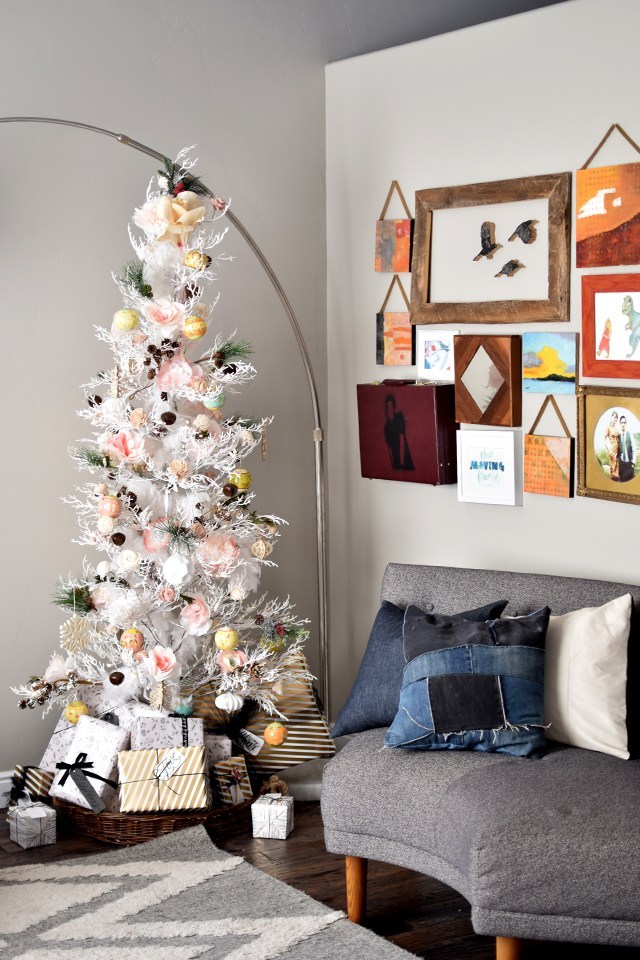
This may be a silly post, but I often get asked about where I get the artwork I’ve collected in my home and where I get them framed. Sure I’ve had some special pieces (investment pieces) custom framed. And it was worth every penny. But I personally love a mixture of high-low. Also, custom framing every. single. piece of art gets expensive!! Especially if the piece has more seasonality to it. 

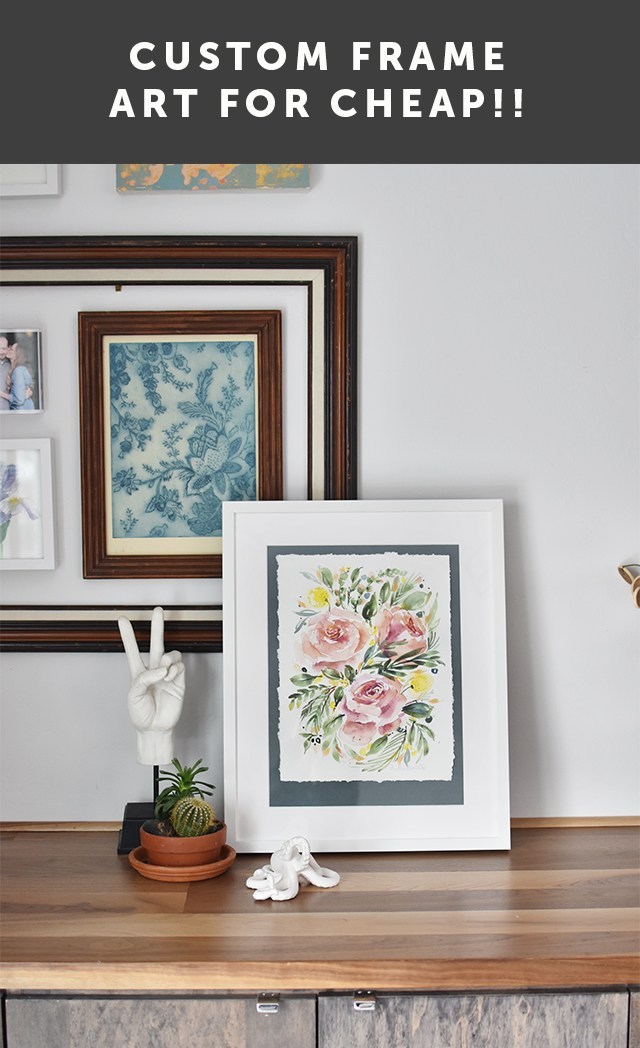
Back in my college days, I took a framing class down in the basement of the BYU Museum of Art. It was a thrilling experience to be in the same room as original Van Goghs and Monets and Picassos and Maxxes. Brigham Young University has one of the largest private art collections in the United states. IT’S AMAZING!!! But that’s beside the point. I had the awesome chance to learn how to properly frame pieces myself to add to my home. During this experience I learned the “right way”, but also that there’s a “good enough” way. So I’m going to share with you the “good enough” way to do a floating frame with artwork with a deckled edge. And how to create a deckled edge on any of your prints or pieces. As long as it’s paper, it can deckle!

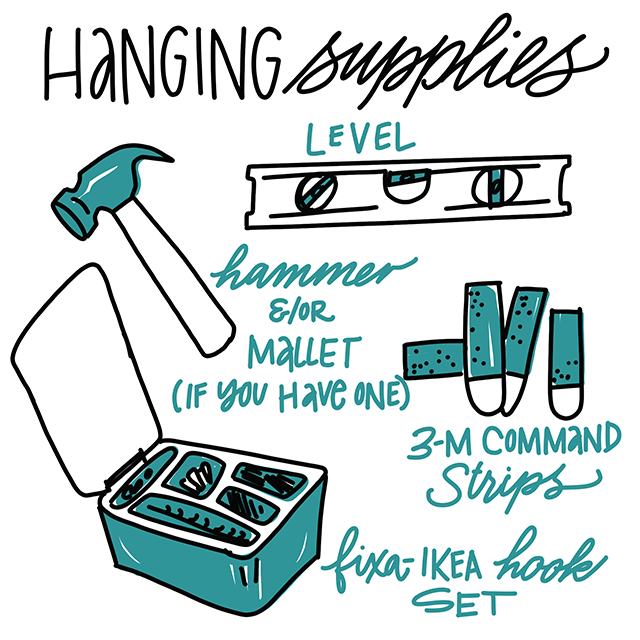
Here’s what you’ll need:

I strongly recommend just watching the video above for the step-by-step. But if you’re the speed-reading type see below for directions: 

  • Get your frame and artwork and measure how much you need to reduce the size of your artwork to fit it into the frame nicely. I would personally recommend making the artwork around 1/2 inch smaller than the mat opening on each side (if you’re using a frame without a mat, make it 1/2 inch smaller than the frame opening on each side. Depending upon what sizes your art and frame are, this may take some math. You may notice in the video above, I just eyeballed it. You can eyeball your measurements a little bit with deckled edges because it adds to the charm of the deckle. That said, I’m also pretty darn good at eyeballing square measurements (humble brag ;)).
  • Lay your metal ruler over the artwork just shy of what you want to remove. 
  • Press down on the ruler to keep it secure, you don’t want it wiggling around!!
  • Starting from the top, slowly rip off the excess paper all the way down the side. 
  • Repeat on all 4 sides. You don’t want to remove less than 1/2 inch of paper for a deckle, mostly because it’s a pain in the fingers to do that!! (see video)
  • Lay the mat over the backer paper and trace over the exterior perimeter with pencil. 
  • Cut excess paper with scissors (these lines don’t have to be perfect). If you’re not using a mat in your frame, cut the backer paper down to fit the full size of the frame. 
  • Place the mat back on the backer paper, lining the corners up nicely.
  • Put Tombow Sticky Tabs on the backside of the artwork along the corners and sides. Remove the double sided covers of the sticky tape
  • Gently center the artwork within the mat area and press into place. 
  • Place all pieces (mat, art with backer and frame backer board) back into the frame and hang! 


I really love the effect of the rich-colored backer paper. White would have looked fine, but I like how the deckled edge becomes more pronounced with the accent color of the backer paper. 

For very little time and very little money, you’ll have a framed piece that looks like a million bucks! Let me know if you end up using this tutorial. I hope it was helpful. Tag me on instagram @melissapher if you use this technique!

This tutorial and accompanying printable is free for personal use. Feel free to share, but link with love. 

Affiliate links are used to help support my crafting addiction. Your support and purchasing through these links doesn’t affect your final price, but helps me make more content like this. All thoughts and opinions are my own. 

How to Hang a Gallery Wall Vignette

0 Comments

I’ve wanted to share this with you for some time now. Creating gallery wall vignettes with a wide variety of artwork and found objects is what my house is made of. Just a couple weeks ago, Hayley and I set out to hang artwork on the walls of our entertainment space in the new kitchen. Over the next few months, I’m going to share with you the updates that we’ve made over the course of the last year (still ongoing :/). So to kick it off, I’m sharing with you the process I use for hanging artwork on the walls. 

I love taking medium to small sized blank walls and create little galleries with a wide range of artwork and objects. I hope this can serve as inspiration and motivation to get your creative side going and hanging some artwork!! 

As an introduction, this space is quite the multi-functional spot. We dine and craft and relax in this space. We have no formal dining area, so I wanted to tone down the gigantic black box in the middle with some lively artwork and clean up the bar from the artwork I had piled on there so we could use it as a buffet when company comes over. Getting the art from the counter to the walls really cleaned up the space so much. So let me take you through the space….

So let’s get on to hanging artwork! 

These are my must-have tools for hanging art work. 

I really love the above hangers. They’re really stable and great for heavy pieces, especially if you’re not hammering into a stud. You can find these at home depot, but they’re in various sizes in the Fixa set. Seriously, $5 very well spent there. I’ve had that little set for a couple of years, and it’s well worth it. It’s self-contained which makes it easy to keep from the children “playing” with the materials.  

Finding ways to unify pieces is great. Sometimes if you have a variety of styles that you want to bring together (like, for example, family portraits in a wide range of eras and styles). But hanging artwork on every wall in your house in the exact same frames gets really stale. So start collecting art and objects in a wide variety of sizes, shapes and frames! This is where being a little scatter-brained and ADHD comes in handy. 

Collecting a variety of prints, original art, found objects gives you lots of variety, texture and depth. But by having a variety, you need to find ways to bring back unity. 

Grouping pieces together that have similar color schemes and making sure that art is spaced evenly brings in consistency that the eye enjoys. 

HOT TIP: if you stand back from your grouping (whether on the wall or the floor as a mock-up), defocus your eye. You’ll see what spots are visually more heavy and where to add pieces. 

Gallery walls don’t need to fit into a tight rectangular shape. As you’ll see from the grouping on the top right hand side, that it peeks out of the rectangle, but it takes up roughly the same negative space as the tighter grouping on the left. 

So what do you think? Will you be hanging art vignettes on your walls any time soon? 

Silk Flower Christmas Tree

0 Comment

Happy holidays friends! It’s been a whirlwind year this year and I can’t believe we’re less than a week away from Christmas! We’ve really been enjoying our holiday season so far. And I got my tree up in plenty of time to enjoy it!! I wanted to share with you a round two of my Christmas tree (round 1 is here).

Not a whole lot has changed besides the fact that I’ve added more flowers from Commercial Silk. They approached me to see if I wanted to review some florals for them, and I gladly obliged. I need more tree filler to take my sparse and twiggy try to the next level.  

I used ranunculus and dusty miller to add more depth to my branches. And I think I could have used even more than I got, but I really like the depth it added to the tree as it is. I left the stems on the dusty miller, but not on the ranunculus. I cut those off and glued the excess leaves from the stems onto the backs of each bud. I just placed the ranunculus atop each branch. 

It’s simple, but I really like how it looks. And I can use these decorations year-round for different holidays and events! So that’s a win. I’ve never been much for seasonal decorating, but using durable items like artificial plants really makes it worthwhile. They store nicely and they look fresh year-round!

The next thing on my list is to make a wood stump base for the tree to stand in. I’ve got the stump on my front porch, I just have to sand the underside and drill the hole. Think I can get that done by Christmas? :) Wish me luck! 

RESOURCES: 

  • Ranunculus/Dusty Miller: CommercialSilk c/o
  • Wood flowers: Eco Flower c/0
  • 12 days of Christmas: Land of Nod c/o
  • Pink wrapping paper: Tiny Prints
  • Gold wrapping paper: Tai Pan Trading
  • Basket: Tai Pan Trading
  • Picks: Tai Pan Trading & Walmart
  • Paper flowers: handmade

*Product was provided for this post, but all opinions are my own. 

Bohemian Meets Minimalist Christmas Tree

0 Comment

This year marks the first in 7 years that I haven’t booked my ticket to Alt Summit. As a result, I’ve decorated for Christmas. And I’ve had fun doing it, too! I’ve been slowly growing my collection of decor items, and I’m at a happy place this year with a grown-up tree that’s dressed to my liking. 

I have a few personal hang-ups with holiday decor. One being that it’s impossible to store the other 12 months of the year and the other is that it takes up too much living space while out that everything feels cramped. 

I found our white, pre-lit, minimalist tree a couple of years ago at Walmart for $80. The closest I could find is this one. But I fell in love with the realistic texture of the branches and the tiny box footprint it takes up when in storage. The problem: it’s really sparse. So I got creative.

I don’t like the look of seeing the metallic pole down the center, so I bought a couple of feather boas and wrapped the center of the tree with them. The feathers added richness and weight to the tree that was lacking. 

Many of the ornaments I’ve had in the past are white and silver, but with the white tree, I felt like it’s too cold to have silver details. So I opted for warmer white and soft pink details with pops of green and dark browns. Since the tree is so obviously fake, I thought some realistic tree picks with flocked pine cones added a nice touch. And the flowers. The flowers really did it for me. 

Eco Flower sent me a wood flower bouquet for styling with my calligraphy work. As a quick shout-out, I wish they’d been around when Chris and I got married. They’re beautiful and last forever!

Chris helped me deconstruct the bouquet and add the beautiful blooms to our tree. Since they’re on wire stems, it was easy to wrap them around the branches and affix in place. In fact, most of the decor is firmly stuck to the tree so it’s quite kid-friendly. The only issue I’ve had with the decorations so far is that Junie likes to open up the presents when I’m not looking. She’s having fun and it’s no big deal to re-wrap those boxes.

In addition to the wood flowers, I got out the bunch of paper flowers I made months back out of coffee filters as a craft night with friends. The bigger, fluffier blossoms fill out the tree nicely, too. 

In lieu of a tree skirt, I got a basket from Tai Pan trading to fit the tree. I still have to cover the ugly stand with presents, but that’s a good excuse to get my gift-game on early to cover it all up. At some point, I hope to DIY a wooden stump into a stand. Maybe next year? There’s always next year. 

I’m just so thrilled with how it all turned out. I’m slowly figuring out my personal style when it comes to holiday decor, and I’m enjoying the process. 

RESOURCES: 

  • Wood flowers: Eco Flower c/0
  • 12 days of Christmas: Land of Nod c/o
  • Pink wrapping paper: Tiny Prints
  • Gold wrapping paper: Tai Pan Trading
  • Basket: Tai Pan Trading
  • Picks: Tai Pan Trading & Walmart
  • Paper flowers: handmade


Before & After: Basic Leather Chair

2 Comments

New-Leather-Hide-Store-logo-8-25-13

This post is sponsored by Leather Hide Store. Find a massive variety of high quality upholstery-weight leather at a great price.

Connect with Leather Hide store on Facebook, Twitter and YouTube. See their upholstery guide here.

post-separator

I’ve had this seat for gosh nearly 3 years. It’s been patiently awaiting a loving touch in the corner of my studio. For the life of me I can’t find a before picture, but it’s not too terribly hard to imagine: dark oak legs and a 70s poo brown tweed cover over the seat cushions. It’s a simple silhouette. And for being so old and well-used (it was formerly a chair on BYU campus), it was in fabulous condition. A few scuffs and scrapes on the legs and a whole lot of dust.

melissaesplin-livingroom-reupholstered-leather-chair-6

Sitting on it was a dusty, scratchy experience. I felt like it could be easily elevated out of its sad state with a little bit of paint and leather. Unfortunately for everyone, it took a year to attack the upholstery once I started to take it apart.

melissaesplin-livingroom-reupholstered-leather-chair-13

It wasn’t that the upholstery work was terribly difficult. In fact, once I started the job, it wasn’t hard at all. The square shape of the upholstery made drafting up a pattern for the new cover super easy. And it didn’t take up a ton of material either. I don’t think I had more than 1/4th of a hide here and I had just enough to cover the entire thing.

melissaesplin-livingroom-reupholstered-leather-chair-2

The hardest part about the upholstery job was that Felix put a bolt inside one of the holes sideways (how he got it in there, I have no idea) so I spent a good hour working on getting it out.
melissaesplin-livingroom-reupholstered-leather-chair-3

I split a small part of the wood getting the legs on (see the above pic), but overall, it came together quite nicely. Putting the back panel of leather on was the most terrifying thing because I had to measure so precisely, account for the stretch of leather and use the most deadly upholstery tacks to nail into the frame so there are no raw edges. I’m sure those tacks were meant to go only through fabric, so it was a bit tough to get them to go through 2, sometimes 4, layers of 2 oz. leather.

melissaesplin-livingroom-reupholstered-leather-chair-4

Overall, I’m pleased with how it turned out. I think it looks nicely finished, and guests aren’t afraid to sit in the chair anymore! It also adds a lot of lightness to that corner of our living/family room. The old chair blended right in to the dark wood flooring.

melissaesplin-livingroom-reupholstered-leather-chair-5

Materials used:

Here’s a run-down of the process:

I took off the legs, measured the seat and drafted up flat paper patterns of the seat. I used a 5/8 seam allowance and made sure to write out the SA on every pattern piece.

After the patterns were done and checked against the existing chair, I cut out the leather. Since there were a lot of squares, each pattern piece was labeled and the leather was clipped to the pattern pieces until I sewed them so I could leave and come back to the project and know what pieces were sewed together and where.

From there, I got a bit freaked out about the sewing aspect of it all and switched to finishing the legs.

I used BB Frösch chalk paint for the legs, which was a huge time saver. No sanding or priming required. Just paint and go! The matte finish is pretty great, too. It makes me wish this had been around when we did our rocking chair eeons ago!

After I got the legs done, I (with the help of my intern last year) removed the prior upholstery. I wish we had done this outside because dust, old fabric fibers and countless number of staples just sprinkled my studio floor for weeks. Even now I still find a random staple. This chair had hundreds of hundreds of staples keeping the material on the frame! The dusty fabric made my studio smell horribly for days.

I sewed up the seams on the sides of each section (the top and bottom cushions are two separate pieces) and fit the leather on. I didn’t have to make any adjustments to the fit, thankfully, but I realized I needed to reinforce the ends of the seams so that they wouldn’t come undone. I grabbed my waxed linen thread for that and sewed up those ends for strength. Once I got the top and bottom cushions done, I affixed the legs, attached the back portion and then covered the bottom. I cleaned everything up and conditioned with leather conditioner and voila! It took me several months to complete it, but if I had worked continuously on the project, it wouldn’t have taken me longer than a Saturday morning and afternoon. I just got nervous about each step so I would take long breaks.

melissaesplin-livingroom-reupholstered-leather-chair-11


So there you have it! Read more for details on the living room!

(more…)

mobile site