30 Minute Jersey Sheath

52 Comments

Last Saturday I decided I needed something new in my wardrobe. I’ve had about two yards of this wood grain fabric in my stash for the last couple of months & have been meaning to do something with it, but I wasn’t sure if I wanted to make a top or a skirt. So I basically made both: a sheath dress.
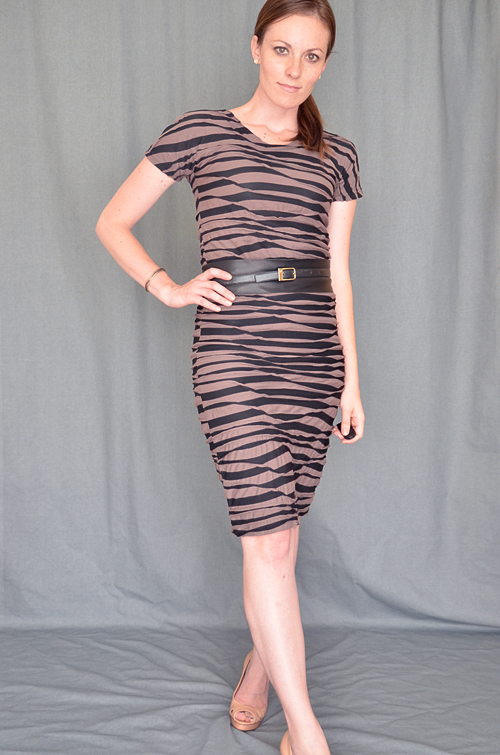
This fabric is light-weight, stretchy, but with a surprising amount of “body” to it. The rolled details add a lot of visual interest as well as wiggle room. Wiggle room for imperfect seams. Jersey can sure be a pain in the neck to sew if you don’t have a surger. Which I obviously don’t have. Here’s how I made this little number and how you can make one of your own:
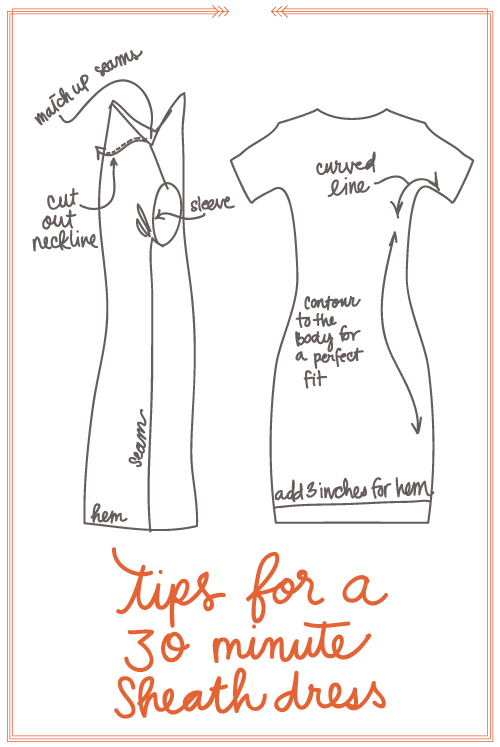
  1. Fold the fabric in half right sides together. Smooth out.
  2. Lay down a dress (or fitted tee & pencil skirt) that has the cut you want. Be sure to lay the garment(s) & fabric perfectly flat. Wrinkles will mess you up.
  3. Cut out the fabric including seam allowances. I did a 1/2 inch seam allowance all the way around & 3 inches at the bottom. You can always cut it if it’s too long.
  4. If you’re adding a sleeve, make the transition from the body of the dress to the sleeve a curve.
  5. Cut the back & front necklines to be the same. You’ll adjust the neckline at the end.
  6. My template dress was more of an a-line, so I trimmed down the fabric to go straight down instead – for more of a sheath look.
  7. Sew the shoulders, and sides using a 1/2 inch seam allowance.
  8. Try the garment on. Make adjustments in the fit & mark the center point of where you want your front neckline to hit.
  9. Take garment off & line up seams together (basically fold the front half of the dress in half). Find your marking & cut out the neckline
  10. Hem the bottom, sleeves and neck as desired.
  11. See the above illustration for additional info
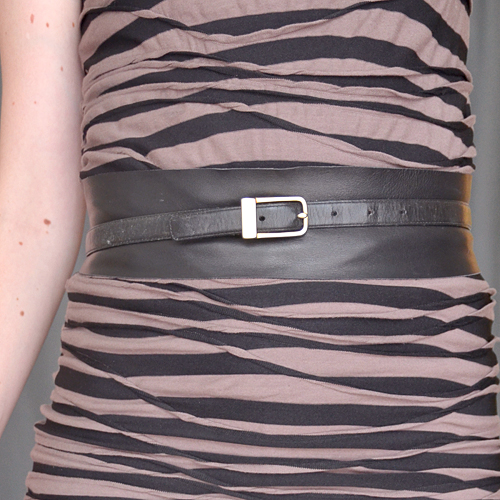
This fabric doesn’t fray so you don’t need to hem it; but I did, because I liked the look better. I’ll soon be hand-hemming the neckline to mimic the rolled woodgrain texture for a more finished look.
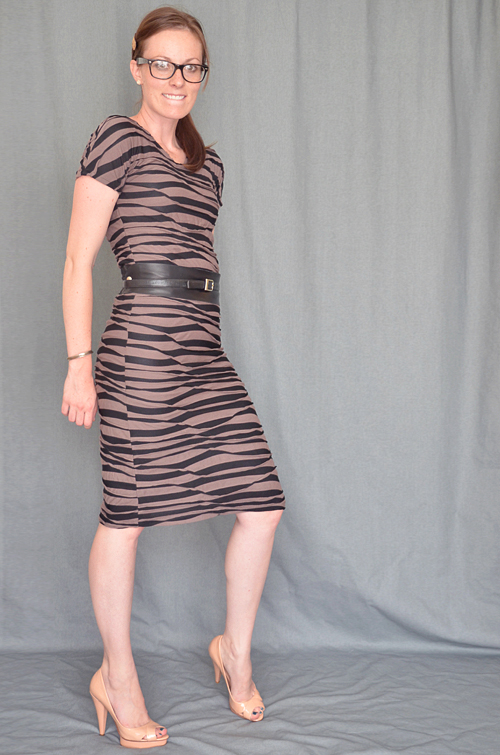
I love how this fabric hides everything I want concealed but shows off my curves (I know they’re little – so they need to be accentuated!). I LOVE my new dress! I think it’ll make the perfect transition into fall, too. Oh yeah, I had two yards of the woodgrain fabric (it’s $17 per yard), but it took just about a yard to make the dress. If you want a longer dress than 36 inches from the shoulder, you’ll need more yardage.

fabric courtesy of rufflefabric.com

view or add a comment
  1. […] handmade, fabric c/o Ruffled […]

    • Christine says:

      This is a great dress and I will be making this one soon and looking out for any more great idea you wish to share, many thanks to you.

    • Ellen says:

      The dress looks great BUT requires that you have a perfectly fitting pencil skirt and stretch top to make it look right. I don’t have that!

    • Peggy thomas says:

      I Love the look of this dress but if I made it I would probably add some for extra loosness, since I don’t have much of a waterline anymore!

  2. Anne says:

    So fabulous – you look great in it. Coincidentally, I just saw a dress at Target with super similar fabric – so you are so in! :)
    But yours is way better because (a) it’s handmade and (b) it’s a wearable length for someone over 15, unlike theirs…

  3. Wow, this is adorable!! I love the fabric, and that shape looks great on you! Unfortunately, I’m not so good with the sewing machine (despite my mom being a home ec teacher), but maybe I could give this a try! Thanks for the inspiration! Xo, Katie

  4. i LOVE!! you look like a million bucks!!

  5. That dress is AMAZING!!!

    I want one, but my sewing skills are lackluster.

    xo teresa

  6. Marissa says:

    so awesome – you look great in it!

  7. Diana Smith says:

    THIS IS SOOOO CUTE! The fit is perfect on your body!

  8. merrick says:

    I am so in love with this dress. You look FAB. I just pinned it so I remember to make it asap!

  9. Bmerry says:

    You need a babylock.

  10. genius girl!!! love it!
    ~selina

  11. Anna says:

    That dress looks fantastic on you!!!

  12. So what’s your trick to sewing jersey fabric without a serger? I broke two needles attempting to do so and never was able to finish bringing in the sides of a sweater . . .

    • Station44025 says:

      Use a round-tip needle. Also, I use one of the specialty pressure feet (meant for making spaghettis or something) that came with my Singer because the plastic is slipperier than the metal foot, and it prevents knits from bunching up as much. I feel like you have to pull the top layer through with your hand to make sure it stays even with the bottom layer. Play with the tension and stitch length on scraps of the same fabric and get it working well before you attack your piece. Washable fuse-tape makes everything 100% easier too.

  13. Bellesme says:

    I think it looks amazing on you!! LOve it!
    Bellesme

    • Barbara Humphrey says:

      If your machine has a stretch stitch you should be able to sew the jersey knit with no problems. I read an article the other day on this same thing and right now I can’t recall it. It mean something about adjusting the stitch length as well as using tissue paper to prevent the fabric from slipping if you do not have a serger.

  14. Bridget says:

    I agree with the others – the dress is amazing and looks great on you. I would like to make one for my reed-thin daughter.

    I don’t have much sewing experience, but based the above, I think I can handle this. However, in the close-up, the fabric looks “shirred” (not sure if this is the correct term). Does Jersey do this naturally? Or, does the fact that I’m asking this question indicate that I really don’t have the skills to pull this off?

  15. […] left: re-pinned by Craftsy on Pinterest — source: Simple Simon and Company right: pinned by Just Plain Lovely — source: ISLY / Melissa Esplin […]

  16. autumn says:

    Awesome dress! It looks fabulous on you.

    I have made a few similar little dresses and they are so easy! My shape is a little (okay, a lot!) more lumpy and bumpy than yours though, so I’ve shied away from making them too fitting.

    That fabric would be perfect though for hiding what I want to hide! Looks like it’s thin striped knit with irregular seams to create the pattern. May try that with some thrifted knit fabric an dsee how it works.

  17. Beth says:

    You did a really great job with your dress. Very creative, great fabric for your pattern, and the dress looks very well on you.

    I really look forward to seeing more of your ideas!

  18. Beth says:

    I just wanted to add a comment about the “wrinkling” that some have noted.

    This happens when the grain of the fabric isn’t straight before cutting and sewing. If you look at the photo where she is standing sideways, notice the pattern on the fabric is not matching at the side seam. The grain isn’t matched.

    Usually this problem goes back to the fabric cutter at the store who didn’t get the grain straight before measuring and cutting what you want to buy. What happens is it just gets rewound on the bolt and nobody ever checks the grain.

    Very experienced professional fabric cutters have trouble with this type of fabric, as do the professional sewing shops.

    The problems can be minimized by keeping the grain straight, always sew the seams in the same direction (don’t flip the fabric over to do this — keep the same side of the fabric facing up as you sew), and don’t pull and stretch the seams when you sew. We also used ballpoint needles for sewing jersey and the feed dog on the machine was also lowered (on single needle)and was burr free.

    But keep in mind, doing all of this will still produce some “wrinkles”. It’s just the nature of the fabric, even when using a serger.

    Happy sewing everyone! And again, great job on that dress!

  19. I can hardly wait to try this. I’ve been sewing since i was 9ys old. Now 76. This one of the easiest patterns,

    This my first 7th grade sewing project that I would like to share. Take a yd of cotton fabric and sew seam. Fold over 11/2 inch waistband casing. measure your waist and drawstring elastic thru casing. sew shut. Next wet fabric and wrap around a broomstick and let dry. Remove and you have a broonstick skirt.

  20. Marie says:

    Looks very chic! Great job!

  21. Carol Siepka says:

    This is a very cute classy dress. Many of the clothes on the All Sewing website are, in my opinion, very ugly. Please keep giving us more great patterns.

  22. dt says:

    this is beautiful. thanks for sharing this.

  23. Dianne says:

    absolutely gorgeous – can u give me advise on how i can change the neckline u have done to an off the shoulder banding – where do i cut – strait across the entire dress i have already made in lace? This is for my sons wedding in about 6 weeks – made the dress like yours with 3/4 sleeves included and it is too matronly so want to modernise it with an off the shoulder banding with stretch. Can anyone give me some advice PLEASE???

  24. Beverly says:

    truly stunning!

  25. Bec says:

    Thank you so much for this tutorial. I loved having a go at this dress. The sleeves didn’t quite work out for me, but I’m going to have another go at it. I have blogged about it here with a link to your tutorial http://make-it-funky.blogspot.com.au/2013/03/easy-sheath-dress.html Thanks again!

  26. Bec says:

    I made another one! Loving this so much and think everyone should give it a go. I managed the sleeves and a better neckline this time. Thanks so much! http://make-it-funky.blogspot.com.au/2013/03/my-practise-dress.html

  27. Barbara carter says:

    Very flattering style will make one soon

  28. Rocky says:

    love this! however, it wont print out. i tried it several times :((

  29. foibe says:

    love the dress,you just showd me how making a dress could b easy.thnx alt

  30. Twilla Hill says:

    Great pattern. Cant wait to use it!!!!

  31. Althea says:

    This is a beautiful dress you made its good to know how to sew I will make this pattern and make me one thanks for the idea

  32. Jan says:

    I am trying to figure out how to do a jewel neckline with the new soft knits that are out there. The best way to make it look professional.

  33. Jennifer says:

    fantastic idea and dress. Patterns are so expensive now, you are just as cheap to buy a dress, if you can find what your looking for. Thanks for the idea, definitely going to make one.

  34. Claire says:

    So cool! I always love seeing sewing projects that involve using your own clothes as patterns. It seems to save so much time for the project. I’ll definitely give this a try!

  35. Donna says:

    How much fabric shall I purchase I have a Joanns fabrics coupon to use for fabric sales and hobbylobby.

  36. BettyLou says:

    I may have missed it because I am old and have problems seeing as well as I used to, but I did not notice that you mentioned this is for a knit fabric. I knew because I have sewn for many years but new seamstress may not know. Good tutorial. Love the dress. When I was younger I wore many like this. Thanks for inspiring younger people. I love to sew and have many grands that are in 30s who would love this dress and great grands that are growing up too fast for me. Thanks again.

  37. Pam Gilmore says:

    This is genious I will make this for sure but using your same methiod I will make it with a flaired skirt (this is for older women who do not want to show figures) I sew but this is too easy not to try. Thanks for being so cool

  38. marisa renn says:

    I would love this pattern, I don’t see where I need to click to print it. Help!!!!

mobile site