Posts Tagged ‘crafts’

Sponsored: Leather Folio Tutorial

0 Comments

jo-totes

This tutorial is sponsored by Jo Totes. They have a wide selection of fashionable camera bags in both genuine and vegan leather. My favorite of all is the Siena bag – an italian leather bag that ages beautifully. I use it as my every day bag. It fits all of the essentials! The structured body allows me to easily find all of my purse’s contents quickly.

Stay up to date with Jo Totes on Instagram, Pinterest and Facebook.

My purse essentials (beyond baby stuff): my instax camera, a notebook, pen, chapstick and gum.

melissaesplin-leather-notebook-folio-tutorial-1

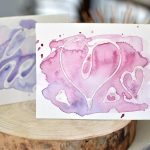
For a while I had my notebook just floating around my purse naked. The problem with this was that the top page would frequently break off, wrinkle and just get disgusting. To remedy the problem, I hand-bound a folio where I can just insert the notebook I’m using and protect it from the contents of my purse. I’m constantly ripping out pages and tossing them, so it’s nice to have something reusable instead of having to bind a new journal every time I run through my pages.

melissaesplin-leather-notebook-folio-tutorial-2

The original version I bound was a traditional 3/4 rounded back bind with cutouts and pockets. I thought about sharing how to make this, but as I broke down each step, I realized that I had very specific bookbinding tools and the steps would take 5+ hours to photograph and explain. I ditched that idea for a simpler sewn version. It’s not as rigid, but it’s still quite sturdy and can be completed in well under an hour. You could opt out of real leather and use an industrial felt instead. I’m not sure I would recommend a vegan leather as it doesn’t tend to wear well over time.

melissaesplin-leather-notebook-folio-tutorial-3

This would be a great gift for a guy or gal. Christmas gift perhaps? It’s just over 2 months away, so time to start planning! I’ve already taken care of a couple of Christmas gifts already. I feel way more on top of things this year. Don’t worry though, I have plenty of time to procrastinate and get behind on my gift-giving.

So would you like to make one with me? It’ll take you about 20-30 minutes. If you’re making a bunch all at once (which I would totally recommend!) it’d take less than that for each one.

melissaesplin-leather-notebook-folio-tutorial-4

Supplies:

  • ruler
  • rotary cutter (and mat)
  • bulldog clips
  • thread
  • leather needle (or topstitch needle)
  • elastic
  • button
  • hand-sewing needle
  • x-acto knife
  • pen
  • bonefolder
  • leather
  • sturdy canvas or a fabric wallpaper*
  • notebook**

* I used fabric wallpaper for this. I scored some years ago from design centers in SF. Just ask an interior design company if they have any wallpaper samples that are being discontinued that you can have. Alternatively you can fuse any kind of fabric to Ultra Hold Heat ‘n Bond with regular copy paper.

** My favorite paper is the Rhodia pad or Clairefontaine Triomphe paper. They come in plain, grid, dot grid and lined.

Read more for the full tutorial.

(more…)

DIY: Gold and Leather Bolo Necklace

5 Comments

I’m hating the silence over here. We’ve been busy packing up Black Friday orders, driving 700 miles, nursing some serious head colds and doing laundry. Anxious to get some creative time under my belt this week, I made a couple necklaces with Penelope. She rummaged through my jewelry stuff and strung any kind of pendant and bead onto a leather string. I played around with some leather and metal and came up with this. I love how my new necklace turned out. It’s reminiscent of a bolo tie because of the length and windsor knot-like shape of the leather piece.

istillloveyou-diy-jewelry-leather-gold-1

I found this laser cut scale leather in a scrap bin at Michael Levine back in May when I went to LA. It’s such a small piece. It’s so nice to be able to use small scraps for things like this, I feel like there’s no waste that way!

istillloveyou-diy-jewelry-leather-gold-9

Make one with me!

Leather Gold-Dipped Bolo Necklace Tutorial

istillloveyou-diy-jewelry-leather-gold-2

Supplies

  • gold chain 11-18 inches
  • 20 guage gold wire
  • 4 jump rings
  • closure
  • leather strip, 8 x .5 inches
  • scissors
  • jewelry pliers
  • liquid gold or gold foil
  • junk brush

If you’re going the vegan route, go for felt instead of faux leather. Felt will wear and look better over time than faux leather.

Click below to read the rest of the instructions!

(more…)

Hand-Cut Playhouse Silhouette Promo

9 Comments

Anything in miniature is just irrisistable, is it not? Penelope and I found these little miniature plastic toys at the toy store a couple weeks ago. They’re no taller than half an inch, making them the perfect travel play buddies.

istillloveyou-handmade-silhouette-playhouse-trees-1

I’m always trying to find appropriate quiet toys for Penelope and Felix to play with during our church services on Sundays. They can be the hardest 3 hours of the week if I don’t come prepared with ample toys and snacks. Problem is, often times they get bored with the toys they typically play with. The idea struck for Sunday-only toys when I found these little cuties.

They were great last week, but we were missing scenery. The little pouch my friend made is perfect for housing all of the animals and any coordinating accessories so my mind set to work to make something collapsible that would fit inside the little pouch (isn’t it too cute?!?).

istillloveyou-handmade-silhouette-playhouse-trees-2

Making little cut-outs with Silhouette’s chipboard did the trick! Designing the scenery was a breeze, too. It was a fun little mommy-daughter activity for us to decorate the scenery together.

I’m not sure I’ve seen this kind of excitement from her in a while.

istillloveyou-handmade-silhouette-playhouse-trees-3

Now my only hope is that I can hide these little goodies during the week. She wants to play with her toy scene all the time!

istillloveyou-handmade-silhouette-playhouse-trees-4-animated

Yesterday started a huge promotion over at Silhouette. They’re offering huge discounts on not only the machines, but a whole pack of goodies. If you don’t have a machine yet, I advise you get one with this promo. You’ll get so many fun starter goodies you’ll be crafting well into the thick of winter.

Use promo code MELISSA at checkout for this exclusive deal.

Specialty media plus a Silhouette CAMEO® for $269.99 (savings over $120 from retail cost $383.90)

  • 1 cardstock essentials pack (new product)
  • 1 pack printable adhesive kraft paper (new product)
  • 1 pack printable clear sticker paper
  • 1 pack temporary tattoo paper
  • 1 pack printable cotton canvas (new product)
  • 1 pack chipboard
  • 1 pack printable silver foil
  • 1 pack printable magnet paper
  • 1 pack double-sided adhesive

Specialty media plus a Silhouette Portrait™ for $129.99 (savings over $110 from retail cost $263.90)

  • 1 cardstock essentials pack (new product)
  • 1 pack printable adhesive kraft paper (new product)
  • 1 pack printable clear sticker paper
  • 1 pack temporary tattoo paper
  • 1 pack printable cotton canvas (new product)
  • 1 pack chipboard
  • 1 pack printable silver foil
  • 1 pack printable magnet paper
  • 1 pack double-sided adhesive

30% off on all specialty media

specialty-media-blogger-promo

I am a Silhouette affiliate. I wouldn’t blog about their products unless I really loved them. And I do. I receive a portion of sales made with the promotional code MELISSA, so thank you for your support!!


Cutting my Own Stamps & Silhouette Promo

5 Comments

You know I’m obsessed with making custom stamps. I’ve made countless business card stamps, return address stamps for others (and finally myself). They’re fun and satisfying to reprint the same thing over and over with just a small gesture.

Silhouette just came out with a stamp material you can cut with their machines (or X-acto knives – low-tech is okay, too!).

Unfortunately the material isn’t optimized for the small details needed in return address stamps (narrowest recommended line is 1/16th inch), but that’s no matter. It’s still incredibly fun to play with. Think of it as your own lineocut material you don’t have to cut by hand.

istillloveyou-crafting-silhouette-stamp-material-1

I cut out about 15 miniature hearts and arranged them as a repeat on the stamp block for a fun detail for a thank you note. It took me under 5 minutes to design cut and stamp. Love the instant gratification here!

istillloveyou-crafting-silhouette-stamp-material-3

Miriam made a little tag for her daughter’s outerwear. Can we all collectively Oooh! and Aaah! over the amazing blazer and name tag she just made? Come on Miriam. You’ve out-done yourself.

Penelope needs her name on the inside of her outerwear, too. So in true Melissa fashion, I’m copying. I would hate for this 12 hour sewing project to get lost!

istillloveyou-crafting-silhouette-stamp-material-2

Penelope was over the moon about her new stamp. She’s been chomping at the bit to use it. Finally I affixed it semi-permanently to a block. What did she do? She stamped up business cards for herself. She’s been handing them out all morning. Like mother, like daughter.

I know I’ll be using this material a lot in the future, so look out. Silhouette is showcasing this material for the month’s promotion. Get it for 20% off or with a cutter at a steeper discount. Use code MELISSA at checkout to redeem the offer.

blogger-promo-sept-2013

I’ve had a few people ask about my candid thoughts about the product, so here’s more information:

  • It didn’t cut all the way through the material at first. But I forgot to ratchet up the blade to the correct depth (duh moment for me), but customer service was incredibly helpful.
  • There’s no need to reverse designs. The material is reversible.
  • The ink pad that comes with the kit is really tacky. Not my favorite, but it seems to print alright. I was pleased with the results with my dye ink pads.
  • The blocks don’t curve up on the corners so it’s pretty easy to mis-print. Simply wipe excess ink from the corners before stamping.
  • Overall: I’m a huge fan.
I am a Silhouette affiliate. I wouldn’t blog about their products unless I really loved them. And I do. I receive a portion of sales made with the promotional code MELISSA, so thank you for your support!!


DIY Leather Cuff Tutorial with Ruche

2 Comments

I’m over on Ruche’s Youtube Channel sharing how to make a simple (seriously crazy simple) leather cuff. You’ll have one whipped up in no time. Miriam and I are both sharing DIY videos from our visit to Ruche headquarters a few weeks ago. Be sure to check out her sailboat pendant DIY as well (it’s genius and adorable).

And it’s likely you have all of those materials on-hand.

istillloveyou-leather-cuff-diy-tutorial-1

Supplies:

  • 2-4 oz leather
  • glue
  • scissors
  • paint (watercolor or fabric paint)
  • brushes

Read more below to see the rest of the step-by-step photos.

(more…)

mobile site