Posts Tagged ‘diy’

Sponsored: 6+ Ways to Address an Envelope

7 Comments

This post is sponsored by Tiny Prints. They provide excellent quality printing and amazing printing options to make your holiday cards stand out this year.

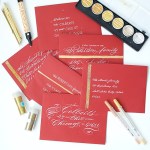
I’ve got 6+ easy ways to embellish your envelopes this year. Don’t get stuck with boring print labels or chicken scratch! Make your snail mail pop with a few tips that require little to no technique. :)

If you want to get some technique under your belt, check out 5 Easy Steps for Improving Your Handwriting, or take my calligraphy class!

melissaesplin-tinyprints-6-ways-to-address-an-envelope-8

Getting fun snail mail is possibly one of my favorite aspects of this time of year. I love getting something other than business offers and bills! Colored envelopes will certainly help make those invites pop.

I went through Tiny Prints for my Christmas cards this year and got one of their laser-cut designs (See all of their offerings here). It’s unique, well designed and I didn’t have to spend a million hours getting it squared away. Major win! I’m dedicated to having enough time to enjoy the holidays this year. No chicken with her head cut off over here, please!

I’m incredibly partial to Kraft envelopes (greengrocer kraft is fabulous). They work well with both light and dark pens and they stand out in a pile of mail. The envelopes featured in this tutorial are from Tiny Prints. I’ve been incredibly impressed how well they handle ink and how easily I can write on them with my super sharp calligraphy nibs.

melissaesplin-tinyprints-6-ways-to-address-an-envelope-7

Next up, gather all random scrapbook supplies you own. Heck, head over to Walmart and browse their crafty section. You’ll find some great stuff for next to nothing.

melissaesplin-tinyprints-6-ways-to-address-an-envelope-6

To do the techniques seen above, you’ll want to collect a few things:

You’ll want a few different patterns of washi tape, and perhaps a few different widths, too. When in doubt, collect all the black, white, gold and silver washi tape you can get your hands on. It goes with practically everything and every season.

You can use any kind of pen for these techniques. I used dip pen and ink for many of these samples, but just use any kind of pen you have. Ballpoint pens, however? NO. Throw all of those out of your house right now. They’re terrible. Shame on you for having them around. :)

Learn how to use a pointed pen with my online calligraphy class: IStillLoveCalligraphy.com. I’m happy to teach you! Side note: our kit makes for the perfect gift. 

So let’s get going, shall we?

melissaesplin-tinyprints-6-ways-to-address-an-envelope-1

When doing your addresses on a straight line, use the chalk pencil and the clear ruler to mark out those lines. Otherwise:

DECORATIVE GUIDELINES

Use washi tape as a decorative way to keep your lines straight.

Tape a vertical and horizontal strip and write in the bottom right section OR use it to slant your baseline. Layer multiple strips of tape for more depth.

melissaesplin-tinyprints-6-ways-to-address-an-envelope-2

RANSOME NOTE

Use alphabet stickers to draw attention to different letters.

For a cursive style, use block letter stickers for the first letter of each name. For block style writing, replace a random letter with a sticker.

I found these stickers at Walmart for about $1-2 each. I’m sure you can find them at just about any craft supply store as well.

melissaesplin-tinyprints-6-ways-to-address-an-envelope-3

AROUND AND AROUND

Use circular sticker labels (I used Avery 2 1/2″ labels) to structure your envelope’s layout.

Print or letter just the address within the label (this is great if you want a hand-lettered touch, but you have LOADS of addresses to do) and write the name outside the sticker.

In the top version, I used the border of the label as a baseline and wrote the name around the diameter. It looked a little empty so I drew a little holly berry illustration on there. You could draw something there, or keep it simple and stick the circle in the center of the envelope.

Wrap the label around the back and write the name on a large scale all the way across the envelope.

melissaesplin-tinyprints-6-ways-to-address-an-envelope-4

GLITTER GLUE DETAILS

Glitter glue is my best friend. It’s all the sparkle of glitter without the mess of loose glitter everywhere (I swear that stuff multiplies). My favorite brand is Stickles. Sparkliest of them all.

Pipe out a wavy line in glitter glue. Use that line as your guide for the baseline of the recipient’s name.

Or Letter out your address and use glitter glue to add accents on hairlines and at the terminals of each line.


melissaesplin-tinyprints-6-ways-to-address-an-envelope-5

LARGE-SCALE NAME

Grab a marker and go to town! Write out the first name as large as the envelope will allow. Cursive styles work best. I used a Tombow dual brush marker here. You can use a casual, grungy style nicely. Then letter the rest of the address in a normal style, save for the ZIP. Make the ZIP huge.

ADD SOME BLING

Letter the address as you would prefer then stick some rhinestones on it. Yup. Simple. But it’s so fun go get in the mail! I like to use PVA glue to fasten them on. It’s a strong glue that dries clear.

melissaesplin-tinyprints-6-ways-to-address-an-envelope-7

I hope you have some fun sending out mail this year!

*This DIY is free for personal use and should not be distributed/republished without my consent. Altering any files is NOT ALLOWED. If you would like to use this freebie for commercial purposes, please email me. Thanks!

learn-calligraphy-pen

Learn calligraphy online at istilllovecalligraphy.com. You’ll learn the basics of pointed pen, flourishing, addressing envelopes and developing your own style. The course comes complete with a beginner kit of supplies and personal coaching from calligraphy experts Melissa Esplin and Erika Paulsen. Click here to find out more.

Sponsored: Nesting with The Honest Company

4 Comments


honest-company-logo
This post is sponsored by the Honest Company. They’re a fabulous resource for safer home products such as cleaning supplies, personal care and baby essentials. They’ll even deliver all that awesomeness to your doorstep through their bundle and save subscriptions.

Also, how cute are their diapers?


Has anyone ever asked you the question: Would you rather have a cleaning service or a landscaper?

I was thinking about this the other day, I’d much rather have a landscaper. I can’t stand all the weeds in our yard and I have no idea what to do to make our yard look pretty. It’s been a source of internal contention for some time. I can’t seem to keep the real plants alive and the morning glory seems to love whatever it is I’m doing wrong.

And the truth is, I don’t mind cleaning. Doing the floors and dishes aren’t my cup of tea (Chris does those, thank heavens), but I get strange satisfaction out of cleaning bathrooms.

melissaesplin-honest-company-bathroom-nesting-2

After some reflection, I think I know why:

  • The bathroom is a small finite space (unlike floors which go on FOREVER).
  • You know when it’s clean because of how it smells when you walk in.
  • A clean bathroom seems like a much brighter, open space.
  • It’s easier to keep a bathroom relatively clean/tidy for a longer period of time than to keep the kitchen sink tidy (unless you just never cook).

I’ve slacked off in my bathroom duties with this pregnancy because of the tight spaces, little air circulation and how those two play into basically suffocating me when cleaning out the toilet with bleach. I’m sure What to Expect When You’re Expecting has some warning about cleaning agents alongside with germophobic warnings as well. Let it go on the record that I absolutely hate that worthless book. I read it once while I was pregnant with Penelope. It induced moderate to severe paranoia about everything I came into contact. Worthless.  I digress.

melissaesplin-honest-company-bathroom-nesting-1

See my slacking duties? You can see smears on the mirror and all of my junk out with no particular purpose. Honest Company sent me a bunch of cleaning supplies which were just the motivation I needed to get cleaning and jazz up my bathroom a little bit.

Did I mention these cleaning supplies didn’t send my lungs into a panic? The eucalyptis mint bathroom cleaner works as nicely to remove bathroom grime as it smells. And it smells soooo good.

melissaesplin-honest-company-bathroom-nesting-3

Taaa Daaaa!!! Look at that transformation!! This is no amazing before and after. Quite pathetic really, but Chris noted a very dramatic change when he first stepped foot into my bathroom.

At some point, we’re going to demolish this bathroom and give it the finish it deserves (or should I say I deserve?). We want to replace the vanity with double sinks (so Chris can actually use this bathroom, he’s currently stuck with the one down the hall). I want to tear down the wall to the “toilet closet”, who needs a 3′ x 8′ closet for a toilet? Open that floor up, baby!! I also want to tear down the wall to the linen closet and have open teak shelving there. Add subway tiles along the floor and walls and a giant soaking tub and I’ll be a happy woman.

Until that happens (cough, $$, cough), I’ll be happy with my minute upgrades. :)

melissaesplin-honest-company-bathroom-nesting-2

I started out by designing and cutting out vinyl decals of random geometric outlines to add some fun texture to the wall. I organized my nail polishes on the little rack to keep them away from Penelope and around for frequent use. This is a spice rack I scored from Ikea for $4. Chris originally put one in his bathroom so I copied the idea. It’s perfect for storing bathroom stuff up high.

melissaesplin-honest-company-bathroom-nesting-4

I end up taking my cosmetics around the corner to the bedroom mirror and work on applying my face while sitting on the floor. It’s much easier than trying to manage my giant belly around the counter top to get close enough to the mirror to curl my eyelashes. I was previously using a wire basket, which would frequently lose pencils because of the wire-y-ness of the basket. Switching to a real tray made a difference. It’s prettier, too.

melissaesplin-honest-company-bathroom-nesting-5

I decanted my hand soap to a pretty dispenser and bought mis-matched containers for my toothbrush, tumbler and plant.

The light in this bathroom really stinks, so the plant is now happily living in our bright master bedroom instead. I miss the greenery in my bathroom, though.

melissaesplin-honest-company-bathroom-nesting-7

I got a new curtain that allows a little more light in and has more of a neutral spin to it. The geometric pattern plays well with all of the different textures.

A while back we were using regular towel rods, my towels never seemed to migrate off the floor. Chris cut out some wood, stained it and added hooks to the wall instead. It’s much easier to hang towels when in a rush to get kids out the door in the morning.

melissaesplin-honest-company-bathroom-nesting-8

I created a little piece of artwork that reads, “Hello Gorgeous”. I already feel gross with this pregnancy and I know it’ll only get magnified when the postpartum body comes into play. I need a little reminder that I’m gorgeous no matter what my body may look like. It’s sad how media distorts perceptions of how our bodies are supposed to look like after a baby. I’m a believer in trying to maintain a healthy lifestyle, but a healthy outlook is also important.

Other than that, I haven’t done as much nesting as I would have liked. Next up is organizing artwork; making sure it’s all framed and hanging it on our bare walls. I’ve got 2 boxes and a pile about 5 inches tall of art that’s waiting to find a home on our walls. My mom will be in town next week to help with the baby, so maybe she’ll be able to help. :)

This post is sponsored, but all thoughts and opinions are my own. 

Sewing: Penelope’s Bridesmaid Dress

6 Comments

Instead of buying a dress, I figured I would make Penelope a dress for my brother-in-law’s wedding. I was already making my own, so I added hers to the docket as well. It was an incredibly quick sew, too. AND SHE LOVES IT. So much so that she’ll wear it while playing with the boys in our neighborhood. It’s adorable to see her hang with the boys in such a girly outfit. That’s my girly tomboy!

penelope-esplin-drop-waist-pleated-dress-1

I used the same printing technique with the front of her dress as I did with mine using a rose stamp borrowed from my friend Miriam. I hadn’t quite nailed down the ink consistency with the imprint, so some of the roses are much lighter than others. I figure she’s going to destroy this dress in a matter of a few wears anyway, so I’m choosing not to care a whole lot about it.

penelope-esplin-drop-waist-pleated-dress-2

I used the Recess Raglan (blogged here and here) as the base, then added a little extra length to the bodice (which I didn’t really need to) and a pleated skirt. I left the edges on the sleeves and hem raw, they’ve curled up nicely with wash and wear. For the pleats I cut a strip of fabric 2 1/2 times the width of her dress and eyeballed the pleats starting from the center front, working my way out; pinning them in place. Super easy, but some good eyeballing required.

penelope-esplin-drop-waist-pleated-dress-3

This girl cracks me up with her sassy posing. She loves being in front of the camera.

Handmade: Letterpress Business Cards + Motivators

8 Comments

I had the opportunity to participate in this year’s summer Alt Summit, and boy did it sneak up on me! I barely had the chance to recover from January’s conference.

melissaesplin-business-cards-calligraphy-letterpress-8

I wanted to do something completely different for this session’s business cards, but I ended up doing everything last-minute. And by last-minute, literally making business cards the night before the conference.

melissaesplin-business-cards-calligraphy-letterpress-9

The cards have the same general vibe as they did previously, with a little motivator and acrylic stand, but I approached the printing and calligraphy differently.

melissaesplin-business-cards-calligraphy-letterpress-10

Instead of doing one kind of motivator (“You are awesomesauce”), I decided to switch things up and write out different adjectives. The monoline style is quite different from last time, too. I used watercolor paper and a sumi ink to create moody washes on the backs of all the papers to create a moody texture. Then lettered with white ink overtop. The texture of the black wash gives the card more depth, in my opinion.

melissaesplin-letterpress-business-cards-2

The printing was a little different as I was using a watercolor paper and not a thick letterpress paper. There’s still a deboss from the printing process, but it’s not as stark. I went with the watercolor so that the lettering on the back would be easier to create. Last time I had a heck of a time lettering on that soft letterpress paper.

melissaesplin-letterpress-business-cards-3

I also had a problem with the ink in the letterpress printing bleeding, making the hairlines a tad garbled. Above, you can see different experimentations on printing. The top right is using regular letterpress ink, you can’t tell a whole lot from the image, but it’s feathering a little bit on the paper. Then I tried various blind-deboss printing techniques, then applying ink afterward. That didn’t work quite like I had envisioned. Then the top left is when I discovered inking up my letterpress plates with a stamp pad. The stamp pad from Silhouette’s stamp kit is quite tacky and worked perfectly for inking up the plates. The printing was more crisp and the clean-up was a million times easier with the water-soluble ink. Major win! I’ll be using this method for printing with the L-Letterpress in the future.

Sponsored: Easy Thanksgiving Decor

2 Comments
This post is sponsored by Way Basics – your source for eco-friendly, light-weight and strong organizational systems. Each of their products is designed for the world’s easiest assembly. 

We don’t have any holiday decor. Holiday decor isn’t something that can be purchased all at once like a couch, or bed linens. I feel like these things are collected over time. So this year I’m working on making and buying festive decor that will easily store and last for years to come. I’m hoping that my efforts this year will make a dent and make next year’s decorating for the holidays just a little bit easier.

istillloveyou-thanksgiving-waybasics-1a

Just before Halloween, I found a few of these paper mache pumpkins while at Michael’s. They’re not there any more, but I’ve since found them online here and here.

I love that they offer a blank slate. I had them out as-is, but recently decided to give them more of a Thanksgiving/Fall theme the other night.

istillloveyou-thanksgiving-waybasics-2a

Is it strange that I’m still making fall/Thanksgiving decor even though most people have already decorated their homes to the gills for Christmas? Sometimes I feel behind the times, but I remind myself, “NOOOOO!! I’m going to enjoy Thanksgiving FIRST.”

I simply grabbed a #2 liner brush, white ink and went to town on my little pumpkins. While “thanks giving” may lend itself most towards the holiday, it’s a great mantra to have in the house all autumn long. I think these little babies will be a permanent part of my fall decor.

istillloveyou-thanksgiving-waybasics-3a

On another note, this is the first wall shelf that I’ve mounted in our new house (besides the utilitarian ones in my studios). I love having parts in my home strictly for decor that can be “untouchable”!

istillloveyou-thanksgiving-waybasics-4a

I loved how easy Way Basics’s wall shelves were to mount. I actually mounted this during a late night, it was 3 in the morning and it was still easy to install in my sleep deprived state. Total win.

I was compensated for this post, but all thoughts and opinions are my own.

mobile site