Posts Tagged ‘diy’

DIY: Ikea Hack Photography Studio Lighting

30 Comments

Dear professional photographer friends, don’t hate me. I hope we can still be friends even with my ghetto lighting ways.

Sometimes I have to burn the midnight oil in order to get any blog posts up. We’ve been a busy family this fall! It’s nice to finally have a way to take decently lit photos without having to wait until the perfect time of day to shoot. Usually that perfect time of day lands during lunch time or mid-morning when I’m still in pajamas, sans makeup or shower.

istillloveyou-crappy-harem-pants-simplicity1887-1

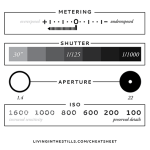
There are a few things that I do to allow for more photography time. I have the 35mm prime lens which allows for a 1.8 aperature. It’s slightly wider than the 50mm so it allows me to park my tripod only 8 feet away from me for a comfortable head-to-toe shot, without too much distortion. But a 1.8 aperature can only get me so far.

Let’s talk artificial lighting.

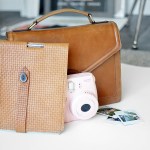
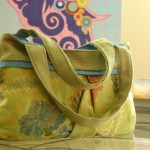
I took the above photo at midnight. I boosted up the ISO and lowered the aperature, but the light is still too harsh. That’s where lights come into play. Professional lighting systems can be expensive, so I made a hack to see if a pro lighting system was something that I should invest in. I’ve been asked by a few people what my solution is, so I figure I’d share it for all to see.

istillloveyou-ghetto-ikea-hack-studio-photography-lights-1

I’m using two Ikea LERSTA lamps. They’re cheap, portable and effective. I think I’d get a third lamp or a fourth if I were doing more night-time style shots, but the two lamps are great for small objects and for fill-light when the sun’s not doing what it’s supposed to.

Here’s how to do it:

istillloveyou-ghetto-ikea-hack-studio-photography-lights-2

Step 1

As you’re assembling the lamp, wrap the inner part of the lamp with tin foil. Make sure the foil is sort of crumpled so it will bounce more light around.

Step 2

Buy a daylight fluorescent bulb. They’re on sale at my local Home Depot. We’ve changed nearly all of our indoor lights with these. And they are awesome.

istillloveyou-ghetto-ikea-hack-studio-photography-lights-3

Step 3

Get a large bowl and cut out a circle from some white (like white, white) fabric. I’m using a white quilting cotton.

Step 4

Measure the circumference of your lamp’s opening, cut a length of thin elastic just shy of the circumference.

Step 5

With your sewing machine on zig zag stitch, stretch the elastic as you sew it onto the outer edge of the circle of fabric. It won’t be pretty, but it’ll look sort of like a shower cap.

istillloveyou-ghetto-ikea-hack-studio-photography-lights-4

Fit that over your lamp and done!

istillloveyou-ghetto-ikea-hack-studio-photography-lights-5

Now you can illuminate basically anything.

istillloveyou-sewing-silk-skirt-holiday-dress-3a

I used the two lamps and my room’s overhead light to light up the above outfit. Not bad for a 10:30 pm photoshoot, right? And since you’re using daylight bulbs to illuminate the room, there’s no need to adjust white balance. BOOYAH. Mic drop.

Was this DIY helpful? What will you light up?

DIY: Leather and Felt iPhone Case

5 Comments

Chris gets bored when he’s waiting for me to make the finishing touches to a garment I’m sewing. I love his company, though.

In his boredom a couple saturdays ago, he started asking me questions about drafting an iPhone case pattern. Reluctantly I helped him (Why is it always reluctantly?).

istillloveyou-handmade-iphonecase-1

About 15 minutes later, I found myself roped into making Chris a case. He drafted and cut while I sewed.

Save for one wrong measurement, everything went very smoothly.

istillloveyou-handmade-iphonecase-2

The case is a little loose around the sides, but otherwise fits perfectly. As the leather stretches to conform to the phone, I’m sure we’ll go back through and tighten up the gaps with more stitches. For now it works, though.

We used a 5mm industrial felt for the back to give it structure and to keep the case from slipping out of Chris’s pocket. A coral garment-weight calf skin was used for the inner layer and a lambskin was used for the wallet layer. The leathers were thin enough that my machine went through the three layers without any hiccups. Because of the thin and flexible nature of the leather, I turned down and hemmed the edges to give the leather a little more stability. It worked like a charm.

istillloveyou-handmade-iphonecase-3

We bought a ton of this industrial felt. It’s pretty neat. We’ve already made a laptop case and this phone case, but we have just shy of 3/4 of a yard left of the 40″ wide material. I’m thinking some catch-all baskets will be next.

Sponsored: Full-Coverage Wrap Skirt Tutorial

45 Comments

Inspired by this month’s style theme for the Fiesta Movement, I wonder what styles are out of your comfort zone? Bold patterns? Hats? Harem pants?

Have you seen those little challenges they post monthly? It’s cool what Fiesta Agents have been doing, taking on challenges outside their respective comfort zones. Last month I went outside my comfort zone and sewed up some harem pants, and I’d say they were a hit! I wear them at least once a week (which is tight rotation considering my closet).

I don’t do hats. Maybe that’s next. What clothing item would you like to find within your comfort zone?

istillloveyou-sewing-maxi-wrap-skirt-5

I love this skirt. I didn’t know how much I would wear it because of the bold pattern, but it gets just as much play as the other skirts in my wardrobe. It’s been amazing to wear this fall. My legs don’t freeze to Otter Pop status.

This skirt (as mentioned in the original post) has a super power. It’s a full-coverage wrap skirt. It’s not going to show off my lady bits with a small gust of wind. NO. It’s going to take 15+ mile an hour winds to achieve that.

When you’ve got winds that crazy, you don’t want to be wearing any kind of skirt anyway.

istillloveyou-sewing-maxi-wrap-skirt-2

Now let’s make ourselves a maxi wrap skirt that won’t give you a red-faced Marilyn moment, shall we?

Full-Coverage Maxi Wrap Skirt Tutorial

istillloveyou-a-line-maxi-wrap-skirt-sewing-diy-01

Supplies

  • 2 yards rayon challis
  • pins
  • scissors (paper and fabric)
  • seam ripper
  • ruler
  • measuring tape
  • pencil
  • paper
  • large roll of paper
  • sewing machine
  • coordinating thread
  • coordinating buttons
  • iron

You could get away with any drapey fabric. A knit, a silk georgette or a cotton lawn. Rayon challis is going to give you a lot of drape and it’s not terribly expensive.

If you don’t have a large roll of butcher paper on-hand, several small sheets taped together will do. You’ll still want a large-ish floor or table space to draft up your pattern.

Let’s get drafting!

(more…)

Leather Crafting: Sewing up iPhone Case

8 Comments

We didn’t need much evidence to see that my sister-in-law needed a new case for her phone. While she partied with us this weekend we put our heads together (I see a three-bodied, one-headed monster) to come up with a wallet/case for her. I have a pattern for a phone/wallet pattern and tutorial available for the iPhone 4, but we decided ad-libbing would be more fun for her slightly-different-dimensioned iPhone 5.

istillloveyou-brookes-leather-iphonecase-handmade-2

I didn’t make a pattern for her (I kinda wish I did, I love how it turned out). We ended up wrapping the leather around her phone and punching and sewing as we went.

istillloveyou-brookes-leather-iphonecase-handmade-3

We used a large leather scrap scored from an upholstery shop years ago. It’s thin, but stiff. Perfect for a durable case that will hopefully last years.

The rustic styling and minimal details play into Brooke’s style well.

istillloveyou-brookes-leather-iphonecase-handmade-1

I love the simplicity of this case.

istillloveyou-brookes-leather-iphonecase-handmade-5

And the one line of stitching down the side is a really neat detail, IMHO. ;)

istillloveyou-brookes-leather-iphonecase-handmade-6

Our little “experiment” was a total win. I couldn’t help but get even more excited and anxious to get my new phone and case!!

Easy Ink Transfers Tutorial

3 Comments

I was on Studio 5 yesterday sharing a few printmaking tutorials for easy Halloween DIYing with friends or kids! See the segment here.

As featured in the segment, here’s another printmaking idea for you perfect for the upcoming spooky season, or really any time of year.

istillloveyou-printmaking-ink-transfers-4

I love how these ink transfers are grainy, organic and grungy. The grunge is really fun for this season.

We used to make these kinds of prints all the time in college. I did basically an entire series with oil ink transfers. See my circle series circa 2005.

Grungy Ink Transfer Tutorial

istillloveyou-printmaking-ink-transfers-1

Supplies

  • ink (water soluble is best)
  • paper
  • pencil
  • brayer
  • acrylic printing plate

Note: you can use acrylic ink (the kinds that comes in tubes, not bottles) or oil paint for this technique!

(more…)

mobile site