Posts Tagged ‘easy’

Handmade Jersey Dress

13 Comments

A few things I’ve learned this last week:

  • I love working with Jersey
  • Jersey & the catch stitch = best friends for hemlines
  • I’ve fallen head-over-heels in love with Swedish Tracing Paper*
  • I’m totally sold on making cheap mock-ups when working on a pattern
  • I need to store my scissors WAAAAY higher than I have them currently

The plan was to make a knee-length knit jersey dress with dolman sleeves, the bodice on the bias, an elastic waistline (using method from P’s most recent refashion) with mid-length sleeves. My plan was hugely thwarted when Penelope found access (who knows how) to my scissors & massacred a good portion of my fabric. I knew the bias was completely out, but hopeful that I had enough room for a regular top. BARELY! I had to adjust the neckline & couldn’t get as long a sleeve all due to some poorly placed gashes. Now I know I need to store my scissors on a stand-alone shelf at least 7 feet off the ground. Currently they’re only 5 feet off the ground.

Also, I need to order more than one yard of fabric if I’m planning on making a dress. I’m sure I would have had I had the above vision when I bought the fabric.

With the restrictions I already had, I decided that I needed to be meticulous in my planning. Using my refashioned dolman top as a starting point, I traced the outline onto the Swedish Tracing Paper that Pamela gave me* at Sewing Summit. She told me that this stuff was awesome. It really is. I’ve used Glassine in the past, but this stuff is WAY better.

Once I got a pattern that I was pretty happy with, I was tempted to just get going on my dress, but I was smart & held back. I got out a similar jersey from my stash – I found this at JoAnn’s in their scraps pile for like $2 – and whipped up a top. Thank goodness I did! I found the sleeves were too tight for the look I wanted & the body was much too loose, too. I made the adjustments on the top (besides the arms) and then translated it onto a new pattern piece. Click here to see more of the above outfit.

From there I cut out my skirt & bodice pieces & sewed them together. I used the same technique for gathering & attaching the gathered skirt as I did with Penelope’s granny polo dress. It was perfect. Again! The waist is a bit loose for wearing without a belt, but I’m really happy with how it turned out. If you look closely you can tell that I hadn’t hemmed the sleeves or the bottom of the dress when I took this picture. Daylight was running out yesterday, so I thought I’d grab a quick pic. I spent last night vegging & hemming. I’m wearing this outfit today, so check out the fashion blog for the rest of the outfit details.

My new dress turned out fantastic! It’s definitely bright & cheery enough for Spring & Summer, but I think it’s also easily styled into a fall ensemble. Just add more browns & neutrals to the dress. It’s light & airy so I know this will become a staple in my wardrobe during those hot summer months!

*Swedish Tracing Paper was given to me as a gift from NearSea Naturals at Sewing Summit. I just so happened to love it!

Refashion: Sunset Ombre Button-Up

9 Comments

Last weekend I got together with a couple of creative ladies & got my hands messy in a bunch of dye baths! I’ll be recapping my experience as a whole with Rit Dye later this week, but I couldn’t wait to share with you this little update.

I’ve had the above button-up since before Chris & I were officially dating. Chris, a bunch of his super-hip buddies & I ventured up to Salt Lake (we were living 40 miles south at the time) and went thrift shopping. We had a great time. It was during this excursion that I scored this button up and this funky jacket – all in the boy’s department. I’ve had this fabulous oxford for over 6 years. It’s been through a lot. It started out with the pocket on the left side and long sleeves. The color has been looking a bit ratty recently, so when the ladies came over for a little dyeing fun, I added this one to the pile of things to dye.
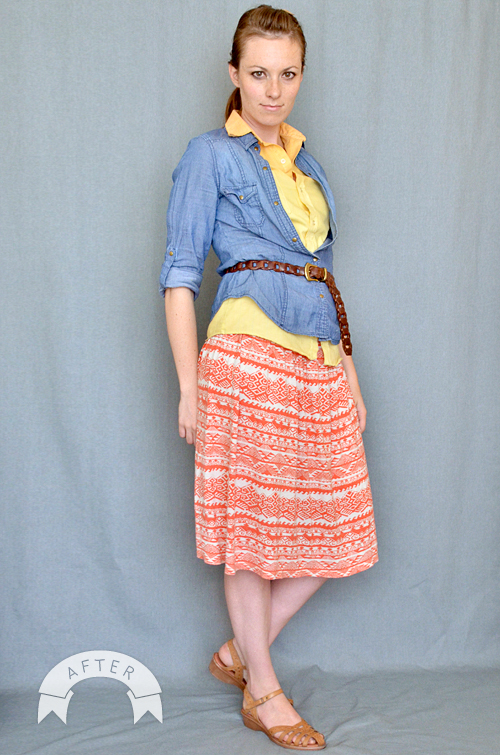
With everyone riding the ombre train, a big part of me wants to steer clear from it entirely. It’s beautiful, but I don’t want to be the kind of person to put a bird on something just because it’s the hip thing to do. I thought I’d do a different take on the ombre & do a few things differently. Most ombre dyes are light to dark. This is dark to light. Also, most ombre dyes are different saturations of the same tone. I kept within the same color family & gradated the yellow to a sunset orange. I love how the ombre effect woke up my shirt from its deep sleep.

Liz & Susan both have great tutorials on ombre dyeing, but I took a different approach on the method. I’ve never dyed before Saturday, but having a lot of experience with watercolor (and watercolor gradients), I took more of a watercolor approach. Here’s how I did it:

  1. start out with a weak dye bath (using liquid Rit Dye for the bath – powder wouldn’t work as well for this technique)
  2. dip the garment all the way in the bath for 10-30 seconds getting it completely wet and creating a base layer
  3. ring it out
  4. add more yellow dye to the bath & mix thoroughly
  5. place the garment in about half way through – Susan & Liz both measured their steps out, which is a good idea
  6. let the garment soak for 10 or so minutes bobbing the garment in and out of the bath to see how the color is coming along
  7. add tangerine dye to change the color of the saturated end
  8. take the garment out more. I clamped my shirt to the wall of the bath to keep it from sliding down
  9. soak the edges of the garment for another 10-15 minutes bobbing it in and out
  10. add dye as needed and lift the garment out even further
  11. keep repeating steps 8 & 9 until you’ve reached your desired result

I did this technique with a few other items & I can’t wait to share the rest with you later this week! Click here to see more pictures & outfit details.

Dye courtesy of Rit Dye.

Petal Box Download + Mother’s Day Thoughts

17 Comments

My current mantra is “Better late than never. Better late than never.” It took me over two weeks to get in touch with my sister to wish her a happy birthday, and my mom won’t be getting her Mother’s day gift for another couple of days because the post office isn’t open on Saturdays.

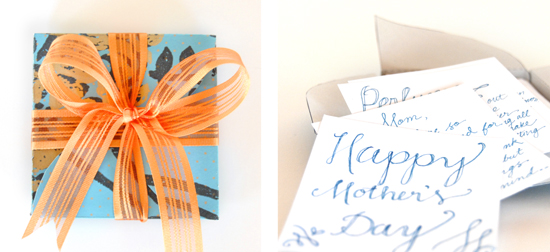
I really want to share with you what I did for my mom for Mother’s day/Birthday (they’re often the same day). My mom is really special. She has worked really REALLY hard at doing everything. When I say everything, I mean it. I hope that she knows that her efforts don’t go unnoticed. So for Mother’s day, I thought it would be fitting to give her the gift of memory. I hand wrote random memories that I have of my mom and the thoughtful things she has done for me. I think the next time I do it, I should start a year in advance, because I know I’ve only hit the tip of the iceberg.

Mom's Petal Box

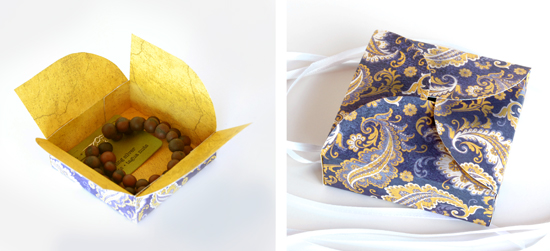
I cut out a bunch of 3″x3″ squares and hand wrote (with pen & ink) my memories. Then I packaged it all with a box version of the petal envelope. I made up the template and want to share it with you! The box template is 3″ x 3″ x 1″, super fast to make and perfect for packaging jewelry and other sweet little gifts.

_dsc0077sm

Click here for the free petal box template!

A Newly Improved Poopy Clutch Tutorial

43 Comments

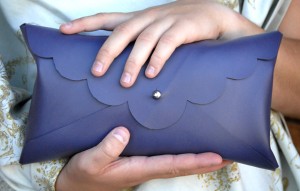
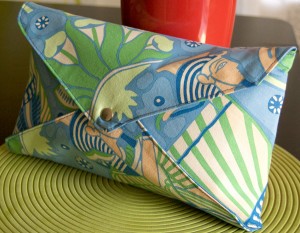
I had to make myself another poopy clutch (the old one was misplaced) and thought I could do much better than the tutorial/pattern I gave you last year. Without any further ado, I give you THREE versions of the old tutorial!! The new patterns are smaller and still fit up to 3 size 4 diapers plus a travel wipes case!! Very convenient for undercover diaper bags (aka purses).

_dsc0999sm-1

Materials Notes:

It might be useful to note where my supplies can be found. Button studs, Leather (you’ll want 2-3 ounce leather for this project) and hole punches can be found online at tandyleatherfactory.com, or check out their store locator for the store nearest you. (I sound like an advertisement, but seriously they have everything.)

As seen below, you can also use leather, vinyl or fused plastic. The folks at Etsy labs have a great tutorial on fusing plastic bags. I’ve seen some really cool fused bag projects.

•     •     •     •     •     •     •     •     •     •     •     •     •     •     •     •     •     •     •

Leather Poopy Clutch

The No-sew Version
Similar to last year’s pattern, this pattern is optimized for leather, vinyl or fused plastic. No sewing required!

Click here to download the Normal Poopy Clutch Instructions

•     •     •     •     •     •     •     •     •     •     •     •     •     •     •     •     •     •     •

_dsc0999sm-1

The No-Sew Version + SCALLOPED EDGE
This version is my personal favorite. It’s just like the first, it’s made for leather, vinyl or fused plastic, but with a decorative scalloped edge to add a little flirty flair to those messy diapering sessions. No sewing required.

Click here to download the Scalloped Edge Poopy Clutch Instructions

•     •     •     •     •     •     •     •     •     •     •     •     •     •     •     •     •     •     •

dsc_0596-1

Sewn Fabric Version
Can’t find leather or vinyl? Wanting to use up your ever-growing fabric stash?!? This pattern is for fabric, complete with instructions for two different edges.

Click here to download the Normal Poopy Clutch Sewing Instructions

A Feather Pretty is in My Hair + Tutorial

16 Comments

Sometimes I feel like a complete troll. I see some of the sweetest things on etsy and in my ultra cheapness I decide not to buy it but make it myself, and write a tutorial about it.

I’ve seen some stinking awesome feather headbands lurking around etsy, and I’ve made my own clippies with feathers on them, but the black-feather clippies didn’t really work in my short, dark hair. So I’m very excited to tell you that I’ve assembled a headband complete with feathers and fabric flower that doesn’t just blend in.

Feather Headband in my Hair

I’ve even made a FREE downloadable tutorial. Click here to download the Feather Headband Tutorial. If you’re having problems downloading, please comment and I’ll make sure to get it to you!

mobile site