Posts Tagged ‘holiday’

Bohemian Meets Minimalist Christmas Tree

0 Comment

This year marks the first in 7 years that I haven’t booked my ticket to Alt Summit. As a result, I’ve decorated for Christmas. And I’ve had fun doing it, too! I’ve been slowly growing my collection of decor items, and I’m at a happy place this year with a grown-up tree that’s dressed to my liking. 

I have a few personal hang-ups with holiday decor. One being that it’s impossible to store the other 12 months of the year and the other is that it takes up too much living space while out that everything feels cramped. 

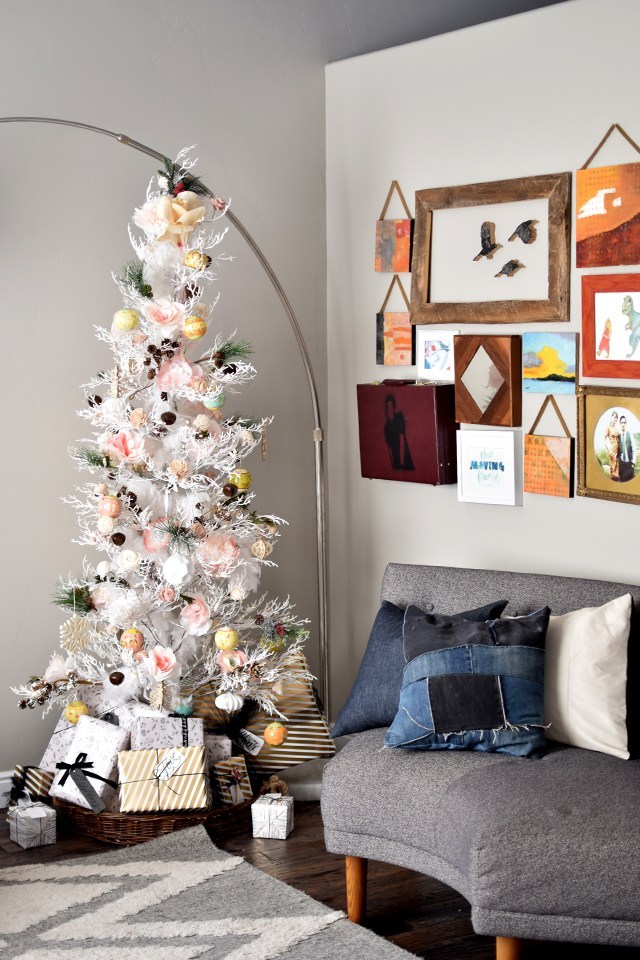
I found our white, pre-lit, minimalist tree a couple of years ago at Walmart for $80. The closest I could find is this one. But I fell in love with the realistic texture of the branches and the tiny box footprint it takes up when in storage. The problem: it’s really sparse. So I got creative.

I don’t like the look of seeing the metallic pole down the center, so I bought a couple of feather boas and wrapped the center of the tree with them. The feathers added richness and weight to the tree that was lacking. 

Many of the ornaments I’ve had in the past are white and silver, but with the white tree, I felt like it’s too cold to have silver details. So I opted for warmer white and soft pink details with pops of green and dark browns. Since the tree is so obviously fake, I thought some realistic tree picks with flocked pine cones added a nice touch. And the flowers. The flowers really did it for me. 

Eco Flower sent me a wood flower bouquet for styling with my calligraphy work. As a quick shout-out, I wish they’d been around when Chris and I got married. They’re beautiful and last forever!

Chris helped me deconstruct the bouquet and add the beautiful blooms to our tree. Since they’re on wire stems, it was easy to wrap them around the branches and affix in place. In fact, most of the decor is firmly stuck to the tree so it’s quite kid-friendly. The only issue I’ve had with the decorations so far is that Junie likes to open up the presents when I’m not looking. She’s having fun and it’s no big deal to re-wrap those boxes.

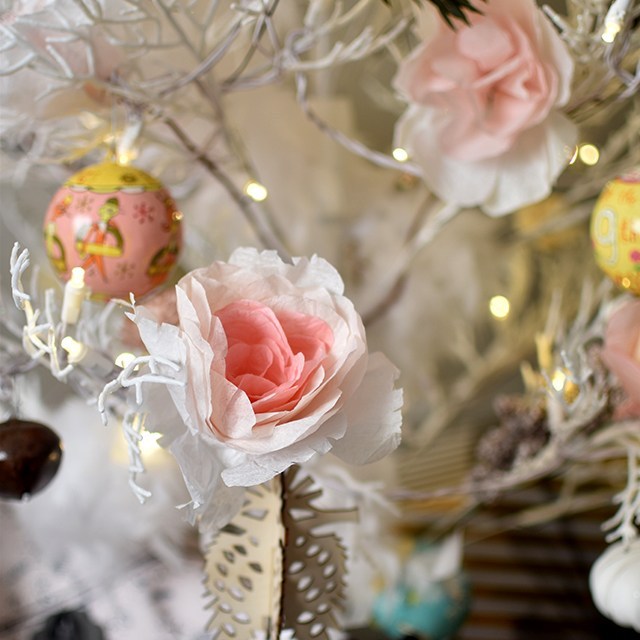
In addition to the wood flowers, I got out the bunch of paper flowers I made months back out of coffee filters as a craft night with friends. The bigger, fluffier blossoms fill out the tree nicely, too. 

In lieu of a tree skirt, I got a basket from Tai Pan trading to fit the tree. I still have to cover the ugly stand with presents, but that’s a good excuse to get my gift-game on early to cover it all up. At some point, I hope to DIY a wooden stump into a stand. Maybe next year? There’s always next year. 

I’m just so thrilled with how it all turned out. I’m slowly figuring out my personal style when it comes to holiday decor, and I’m enjoying the process. 

RESOURCES: 

  • Wood flowers: Eco Flower c/0
  • 12 days of Christmas: Land of Nod c/o
  • Pink wrapping paper: Tiny Prints
  • Gold wrapping paper: Tai Pan Trading
  • Basket: Tai Pan Trading
  • Picks: Tai Pan Trading & Walmart
  • Paper flowers: handmade


DIY: Having Fun with Plain Wrapping Paper

0 Comments

I don’t have giant stashes of gorgeous wrapping paper. I have rolls of white, black and kraft butcher paper. And the occasional roll of gift wrap. But it doesn’t always match my mood or occasion, so here’s a fun little DIY I did to dress up my gifts this year.

melissaesplin-sakura-decorating-gift-wrap-1

Santa doesn’t have this much creativity when it comes to his gift wrap. That would take him way too long.

melissaesplin-sakura-decorating-gift-wrap-6

The key to this whole operation is in the marker. Some time ago Sakura sent me their Pigma Professional brush series. I use them for everything. Heck, they’re even in our brush lettering kits that I send out to all of my beginning brush students. These brushes come in 3 sizes: fine, medium and BOLD. I use the fine brush for small detailed work and little illustrations. I’ll use the medium in cases where my x-height letters are about 3/4″ tall. The bold I’ll use for everything else.

The bold brush is pretty stiff so you still get very fine hairlines even though you can get a ton of drama out of the side of the marker.

melissaesplin-sakura-decorating-gift-wrap-2

And when mine dry out, I’ll use them on textured paper for a more organic look (like above). Want to learn how to make these easy-peasy holly berries? Watch the video below.

Supplies

  • Pigma Professional BB Brush
  • Large sheet of white or kraft paper
  • Sakura Koi red marker (optional)

I love the BB brush, but you can get similar results from even a crayola marker. Granted, if you want this kind of drama to scale, you’ll need to make smaller holly berries and leaves.

Basic jist: get a piece of paper and spread it out on the floor or table. Draw out the berries first in random clusters of 3. Then draw in the center of the leaves, coming out from the berries with a light touch. A fine line helps. Then fill in the remainder of the leaves with two mountains and meeting just beyond the tip of the center line of the leaf. Fill in any awkward blank spaces with leaves. Messy is usually better in this case.

melissaesplin-sakura-decorating-gift-wrap-3

If you want to go for a more ornamental approach, draw out a berry grouping on cardstock. Watercolor paper is going to give your cluster more texture and depth. Punch a hole near the cluster of berries.

melissaesplin-sakura-decorating-gift-wrap-4

With your scissors, cut around the cluster leaving a 1/4″-1/2″ border. Thread through ribbon or string and use as a decoration on your gift.

melissaesplin-sakura-decorating-gift-wrap-5

Easy? Brainless? Awesome? Yes to all three. Happy last-minute gift-giving and wrapping!!

Sponsored: Symbols of Christmas Printable Book

13 Comments

Disclaimer: I don’t pretend to think that all of you are Christians or even like religion. If you are a Christian, you might really enjoy this post and sharing this printable with friends and family. And I sincerely hope you do! If not, please don’t take offense. This is simply a project that I feel in my heart I’ve needed to make and share here in case others may find it impactful for their holiday celebrations.

If celebrating Christ’s birth at this time of year is not your thing, I would love to hear more about your personal beliefs and traditions for this time of year in the comments below*.

This month has been insane. So many things to do and so little time. I’ve actually had this project completed for weeks, but I haven’t had a chance to photograph and write about it until now. I figure Sunday is the perfect time to publish, since this takes a more spiritual tone.

Unfortunately I haven’t had the chance to do my annual candy box. This project ended up taking its place. I have so many ideas for the candy box, though. I may have to publish a New Year’s or Valentine’s candy box. :)

melissaesplin-christmas-symbols-printable-book-diy-3

At church I’m in charge of the activities for our women’s group. We meet at least quarterly for spiritual, service-oriented, social or creative activities. When we were planning I knew I wanted to make a little keepsake/quiet book for adults and children alike to be reminded of the true purpose in Christmas: Christ’s birth. I’m glad I worked on this project. It’s been a busy time of year with a lot of work (a fabulous problem to have, for that I’m humbly grateful!), so carving out time to research symbols of Christmas and coordinating scripture was a great way to get in the spirit.

This printable by no means includes all of the symbols of Christmas (I realized I left out the wreath – oops), the 7 included simply serve as a prompt for discussion and pondering on the other things around us that remind us of Christ and God.

I wanted it to be something that could be enjoyed by kids and adults alike, so I made little calligraphed illustrations that could be colored and kept the design simple to appeal to adults. It’s all small enough that it can easily fit in a purse to be toted around all season long (even though it’s almost at it’s end).

I printed off a few and plan to give them to my grandparents and parents this year. The ones we made for our women’s group activity were a huge hit. We prepped 30 kits and even though we didn’t have 30 in attendance, all were spoken for! It was a thrill to see women take extras to share with others.

melissaesplin-christmas-symbols-printable-book-diy-5

The book includes symbols on: The evergreen tree, the star of Bethlehem, the candle, the poinsettia, the candy cane, the stocking and holly berries. At the end there are a couple of pages for thoughts so you could use it as a holiday journal or as a way to write your personal thoughts on the season to give to someone else. Or write in some of your favorite holiday traditions/memories.

melissaesplin-christmas-symbols-printable-book-diy-6

Each symbol has a brief explanation and a scripture. Each scripture is taken from the King James version of the Bible. Mostly from the New Testament.

melissaesplin-christmas-symbols-printable-book-diy-4

To assemble, you will need:

  • printed sheets
  • hole punch
  • needle
  • thick thread
  • bone folder
  • 6×9 inch piece of leather or felt**

Download the printable (link at bottom of the post) and print. Print double-sided and DO NOT fit to page (print at 100%). 

Cut the paper in half width-wise so that you have 8.5 x 5.5 sheets. Rearrange your papers so they are in order. I like to go by the odd numbers on the bottom right hand side. Use the blank half sheet on the outside of the title page.

Punch holes in the guides on pages 10-11. Center your pages over the leather, mark the holes on the leather and punch.

Thread your needle and sew the book: Start on the outside front cover in the middle hole. Go to the inside of the book and leave a 4 inch tail. Go through the bottom hole, then thread through the top hole and then back through to the middle hole. Your tails will be coming out of the middle of the book. Tie a knot around the string running up the spine and finish with a bow. Fold in half and crease with a bone folder.

Now you’re finished! If you batch these, you can make 10-20 books in about half an hour. They’re great for gift giving! Enjoy!

CLICK HERE TO DOWNLOAD

This post is sponsored by Mormon.org | check out their video “He Is the Gift“. It so beautifully conveys the nativity with song. All thoughts and opinions are my own.

*This blog is a positive, creative space. Comments that attack any religious faction will not be tolerated or published. 

**Leather provided by Leather Hide Store.

Easy Ink Transfers Tutorial

3 Comments

I was on Studio 5 yesterday sharing a few printmaking tutorials for easy Halloween DIYing with friends or kids! See the segment here.

As featured in the segment, here’s another printmaking idea for you perfect for the upcoming spooky season, or really any time of year.

istillloveyou-printmaking-ink-transfers-4

I love how these ink transfers are grainy, organic and grungy. The grunge is really fun for this season.

We used to make these kinds of prints all the time in college. I did basically an entire series with oil ink transfers. See my circle series circa 2005.

Grungy Ink Transfer Tutorial

istillloveyou-printmaking-ink-transfers-1

Supplies

  • ink (water soluble is best)
  • paper
  • pencil
  • brayer
  • acrylic printing plate

Note: you can use acrylic ink (the kinds that comes in tubes, not bottles) or oil paint for this technique!

(more…)

Easy DIY Holiday Banner Tutorial

2 Comments

I whine and complain all the time about not having any holiday decorations. It’s all my fault for not having anything when the holiday seasons roll around. All my fault. I’m crafty, right? Why can’t I take a few minutes and make something?

istillloveyou-printing-on-styrofoam-2

A few weeks ago I organized all of my holiday gear in boxes (a first!) so now it’s time to invest in some fun decor to fill those boxes.

Today I’m sharing with you an updated tutorial from days of yore and a way to jazz it up for the holidays.

Styrofoam Prints DIY

istillloveyou-printing-on-styrofoam-3

Supplies

  • pencil
  • styrofoam sheets (or plates with the edges cut off)
  • craft paint or block printing ink (water soluble is best)
  • acrylic plate
  • brayer
  • bone folder

(more…)

mobile site