I’m excited to be participating in this year’s Travel Handmade! Last year I shared with you how to make a quick earbud pouch for keeping those earbuds with you at all times. This year I want to share with you my travel staples. I don’t wear the exact same outfit when I travel, but I follow a few rules of thumb when travelling.

Dress up! You’ll never see me in the airport in my pajamas. I think it’s lazy and disrespectful (I grew up in a home where we basically wore our Sunday best to go to the mall). It doesn’t take much effort to slap on a bracelet and necklace. So why not?
Layer! Make sure the accessories and layers aren’t crucial to your outfit. Going through security can get really hot and those airplanes can get mighty cold. It’s nice to be able to layer and shed as needed. I do this with accessories, too. My belt isn’t crucial to my outfit, so I can take that off if I want added comfort.
Pack and wear wrinkle-free! Wearing items with synthetic fibers can save you from looking like a wrinkled mess upon arrival. I made the above top out of an unknown synthetic material (made to look like a silk georgette, but it’s probably polyester), it won’t wrinkle so it’ll pack well and look nice all day.

Mix and match! Make sure you pack items that are in a similar color palette so you can mix and match accessories with minimal effort. I’m using a fall color palette with bright tones. The basic colors being brown and gold. As long as I don’t pack black and silver items I could mix it up all I want!
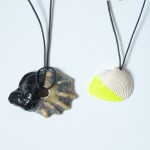
Wear statement pieces! I love wearing unique handmade pieces for travel, especially in the airport. They’re always a great conversation starter (I’m sort of an airplane chatterbox). Here I’m wearing the blazer my mom and aunt made, a top and bracelet I made and a necklace that my friend made. That handmade blazer is pretty sharp, right?

Here’s a better view of the top I made yesterday. It’s a simple two-piece top with ribbon detailing at the shoulders. This kind of top is something you can whip up in a matter of a couple of short hours. I say hours because you’ll need to make your pattern and that takes the longest to figure out. The sewing is the easy part.

Just make a pattern from your favorite shirt, add extra on the sides and sleeves for non-stretchy fabric. Sew seams and finish. The finishing I did with my rolled hem foot (looks so professional) and biased tape.
Sew biased tape onto the neckline right sides together, then fold over so the biased tape is only on the inside and hem. It creates a clean curved hem every time.

I really love the high-low hemline trend. 
I keep thinking I need a pair of plum pants. See how awesome plum pants would look with this outfit?
What do you try to pack or wear when your traveling? If you’re heading to Sewing Summit in a couple weeks, be sure to let me know. I’d love to meet! I’m really looking forward to the conference this year!