Archive for the ‘refashion’ Category

Ikea Tote + Sewing with Leather

36 Comments

A few weeks ago I attended a blogger event at Ikea in Draper. They wanted to collaborate with bloggers, show off their new PS collection and brag about being completely solar powered. I’m already in a love affair with Ikea, so all those things made me love them even more.

At the event, they challenged us to find something in the store to work into a DIY. I wasn’t planning on participating until I found this pillow case in the As Is section. I love this print and the tooth of the fabric, but it doesn’t match my house.

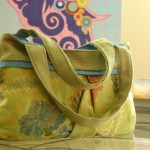
I’ve been mulling over the idea of making a leather tote for years now, so this case was screaming to be a leather-bottomed tote.

The tote took about 5+ hours to complete because I took my time and did things right the first time. Leather is a bit tricky to work with, so here are a couple of tips to help if you’re thinking about working with leather any time soon:

  • use a leather needle – they are made for puncturing through the material
  • use a walking foot – they keep the leather from slipping
  • use bulldog clips instead of pins for keeping pattern pieces in place
  • use the widest stitch length possible
  • sew once, and only once – once you puncture the leather, you can’t un-puncture it!
  • go slowly
  • iron your seams – cover the leather with a cotton cloth and iron at the hottest steamiest setting

The pillow already had a zipper set in, so I worked around that. It’s super roomy, so this tote could easily work as my diaper bag, but transition effortlessly into a weekend tote.

I added lots of pockets for compartmentalizing my stuff and the kids’ stuff. I used a charcoal grey canvass for the lining instead of the typical black. It looks clean, but it’s not so dark in there that you can’t find your black pen (a dilemma of mine all the time).

Doing the leather bottom and handles wasn’t as hard as I thought. It helped to have a walking foot, leather needle and kick-trash sewing machine. This project is evidence of how much I love my new sewing machine.

I can’t help but check out the As-Is (Chris and I call it AZEEZ) every time we’re at Ikea, and we always find great items for DIY projects: my tabletop for fabric storage, our poang chair for our music room and now this tote. We were at Ikea this weekend looking for a couch and I found lots of great ready-made panels perfect for wall art there, too.

Outfit Details:

  • top: Walmart
  • necklace: handmade
  • jeggings: PacSun + refashioned
  • shoes: from Sarah
  • tote: Ikea + refashioned

This post is not sponsored by Ikea, but the materials were given to me by Ikea.

Refashioned: Double Felled Trousers

11 Comments

I love these pants. My father-in-law got them for me not long after I had Penelope. They’re high-ish waisted, so they’re perfect for flattering a mom body. I wore them quite a bit, until they shrunk.

My sister borrowed them while I was expecting Felix, and I think (not sure) that she may have put them in the dryer at some point, because they came back about an inch shorter. When it comes to a wide leg trouser, that makes a huge difference. I could no longer wear them with heels, and wearing them with flats made me feel like my legs looked stubby.

They were in desperate need of a makeover. They are nice jeans. Hello, Anthro. The problem with them is the fact that they’re double felled on the side seams. DOUBLE FELLED. there was no way I was going to unpick crazy felled seams to take them in.

So I made darts. I lined up the seams and laid out my favorite pair of jeans on top and marked out my darts. The refashion ended up taking 2 hours instead of 6. I’d say that was a win. They’re at about a cigarette width at this point, but I may have hemmed them too short for that, so I think I’m going to go back and make them more of a skinny jean.

Yay for a new pair of pants! I’ve been whining to Chris about how I only have 2 pairs of jeans that fit. Now it’s three.

I think if I actually exercised I could fit into my old jeans again, but I’m just too darn lazy for that.

Outfit Details:

  • top: handmade
  • pants: Anthropologie
  • shoes: c/o Blowfish

UPDATE: I couldn’t stand the cigarette pant with that length for long. I just skinnified them. AHHH, much better!

Refashioned: Hipster Herringbone Pants

7 Comments

I found these pants for $2. They showcase all the parts that went wrong in girl’s clothes in the late 80s, early 90s. They have velvet, maroon & forest green, overwrought embroidery and a slight flare. Disastrous, no?

I quickly saw that they were the perefct waist size for Felix, but long and wide. I just had to simply cut off the disgusting flowers and trim up the legs a bit. I used Felix’s go-to skinnies as a template and went to town on them.

I should have added rad knee patches for awesomeness and functionality, but I didn’t. Kids this age really wear their clothes hard. Especially when crawling. I really should’ve thought about that, but laziness got the better of me.

I’m working on going through Penelope’s and Felix’s closets to put away the tight clothes and replenish their wardrobes with duds ready for fall and winter weather. It’s fast approaching us in our new neighborhood. We’re expecting 6 feet by the beginning of November.

Refashion: XL Clearance Top

10 Comments

I finally got around to altering the second of two shirts I scored for $5 at Target last month. I wanted to complete this before leaving for San Francisco, so having a bit of a deadline for the project was a great motivator.

The theory of tailoring this top was simple. I needed to take up the neckline and take in the sides. It was a bit more daunting because of the slippery fabric and the hem finishes. I had a lot of unpicking to do in order to even get started on the project.

Thank heavens the structure of the top was so simple. I took up the shoulders by 3 inches and took in the sides by 4 inches on each side.

It’s not quite sheer, but it’s really cool and super simple. It’s a fantastic summer top. The color and texture are what attracted me to the top in the first place. I could definitely see myself styling this top for spring, summer, fall and winter.

I think if I were making this top from scratch, I would’ve pressed the bottom pleats better than you can see here. I wonder if my steamer will get the puckering out?

Outfit Details:

  • earrings: i heart a million little things, etsy
  • necklace: handmade by my dad, c/o cambria cove
  • top: Target
  • denim: PacSun
  • shoes: gift from Sarah

A few of you wondered how I took in the neckline, this is a rough sketch of what the refashion looked like. I made sure to unpick hems before taking in any seams. As soon as the seams were right, then I reconstructed the hems. It’s all sort of case-by-case basis, but that’s generally how I work on my refashions.

Refashion: Winter to Summer Clothes

8 Comments

While at a blogging event (Apricot Lane) a few weeks back, I scoured the clearance section (as I always do) to see if there were any fun pieces. And I was lucky enough to find long-sleeve midi sheath dresses for $9 each. I bought two; one in charcoal grey the other in an ashy brown. It was obvious these were meant for fall and winter, but I quickly saw how easy it would be to transform those dresses into something a more seasonably versatile.

I haven’t done a thing to the grey one, although I might shorten the sleeves on that one. The ashy brown one fit well, but the color looked terrible on my lifeless pale skin. I dyed it a deep purple, really the perfect color for all seasons. I could pair it with browns for fall, blacks for winter and bright hues for spring and summer. The dye job didn’t turn out as solid as I would’ve liked. I think it might be related to the fact that I didn’t wash the new dress before dyeing. It’s almost uniform like a tie-dye, but it’ll be interesting to see if it will even out with wear.

I shortened the sleeves and in an attempt to bring up the hemline of the dress, I added three pleats across the chest.

The pleats were trickier than it might seem. I had to be very particular with measuring and steaming in order to get all of the seams straight, and I needed a stretchy straight stitch. I found that the stitch with three stitches like this: ||| worked out the best.

This dress is perfect underneath my shear tops. I love that I can wear it plain, under crop tops or shear tops.

Outfit details:

mobile site