Blogging has been a struggle for the last year. But more so in the last few months. All of my images were deleted and we’re in the painful process of migrating to something that is simpler and works better. I don’t know what that means for my work that’s here, but for now, if you can’t see it, I’m sorry it’s unavailable.
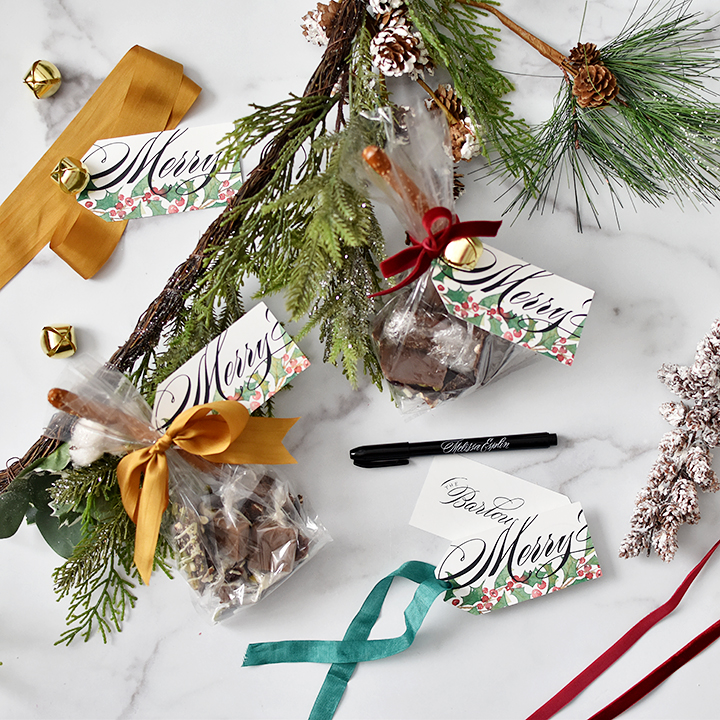
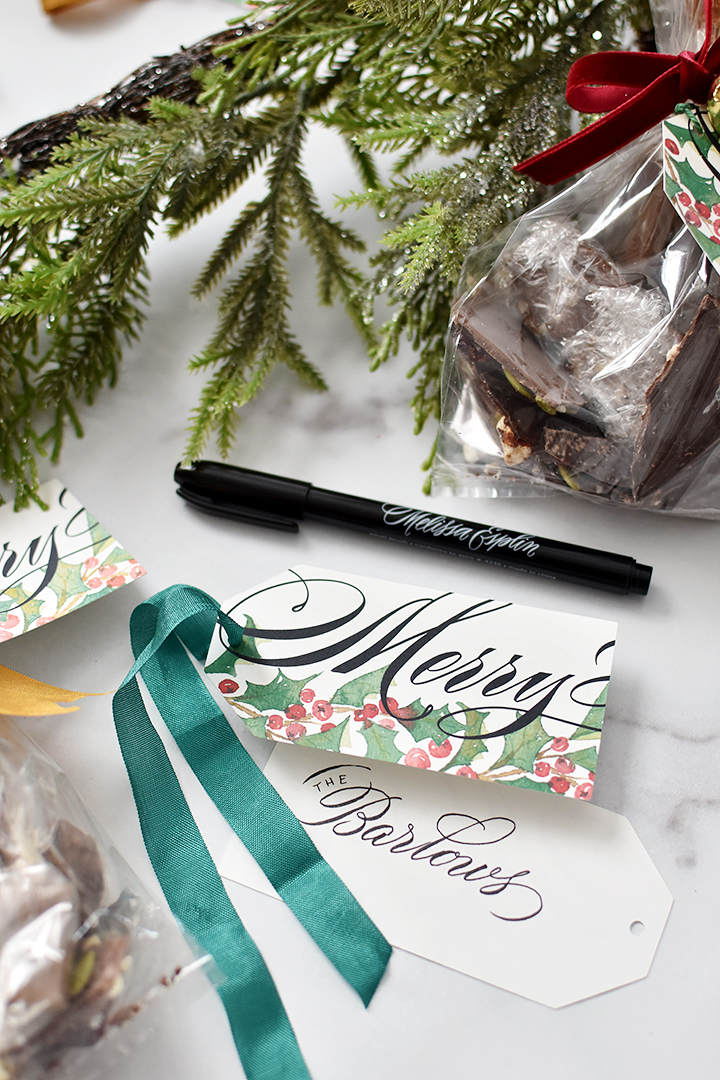
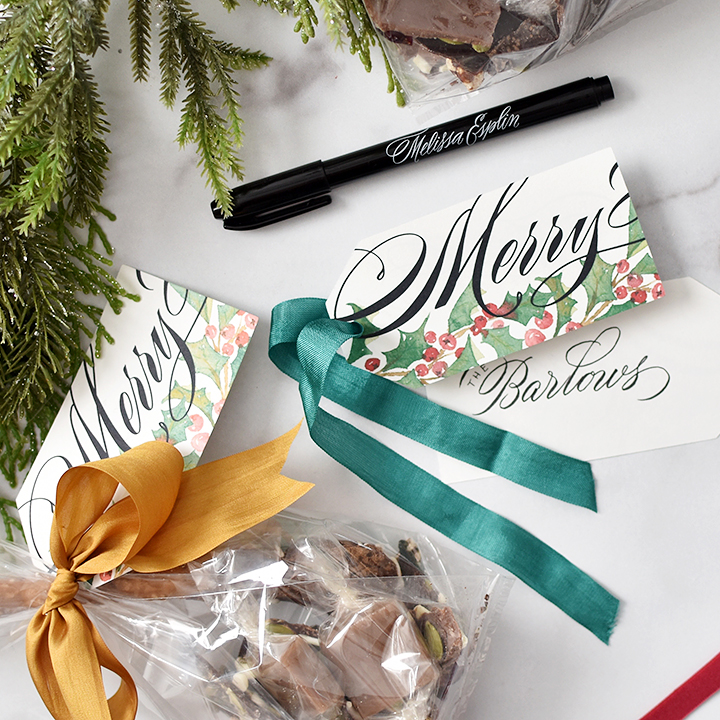
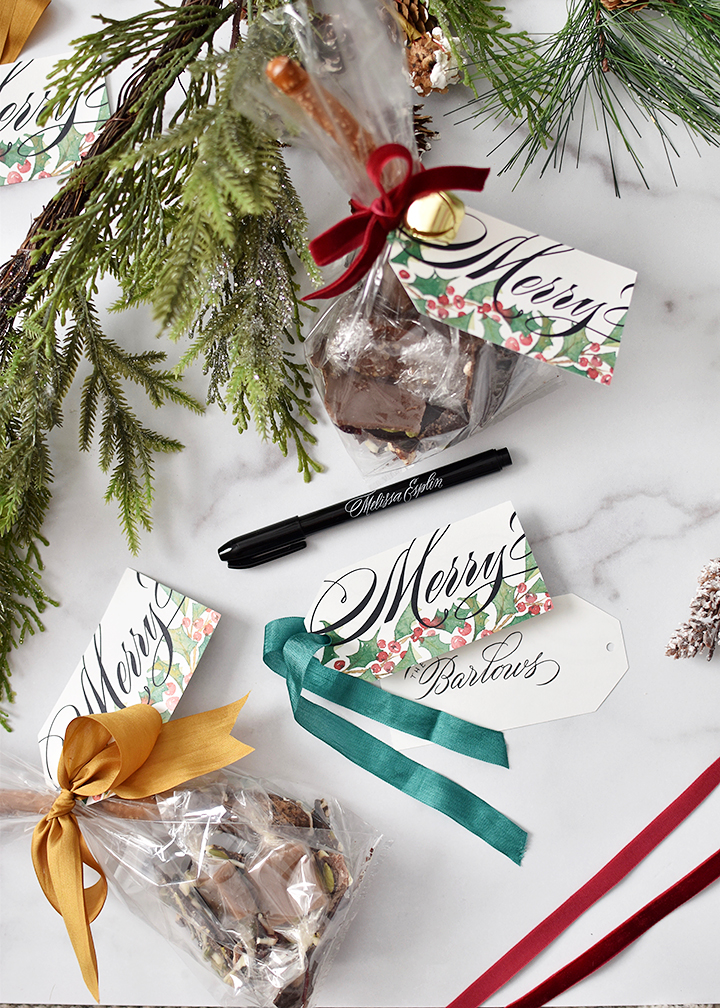
Christmas is a time of stress, but also lots of excitement! I love myself some pretty packaging so I made these tags with a scan of one of my 100 florals paintings and then vectorized my calligraphy and put it all together with a tag shape.
The inspiration was vintage packaging. I don’t know if you can tell or not, but I love those cookie tins from forever ago and wanted to embody that in the design.
With that said, I hope you have a Merry Christmas. Here are the tags I made this year for neighbors and friends. Feel free to download and use them! For personal use only. The download page is a google docs folder with a printable and a silhouette print and cut file for your convenience.
Hope this year is a wonderful one for you and yours!
Happy holidays friends! It’s been a whirlwind year this year and I can’t believe we’re less than a week away from Christmas! We’ve really been enjoying our holiday season so far. And I got my tree up in plenty of time to enjoy it!! I wanted to share with you a round two of my Christmas tree (round 1 is here).
Not a whole lot has changed besides the fact that I’ve added more flowers from Commercial Silk. They approached me to see if I wanted to review some florals for them, and I gladly obliged. I need more tree filler to take my sparse and twiggy try to the next level.
I used ranunculus and dusty miller to add more depth to my branches. And I think I could have used even more than I got, but I really like the depth it added to the tree as it is. I left the stems on the dusty miller, but not on the ranunculus. I cut those off and glued the excess leaves from the stems onto the backs of each bud. I just placed the ranunculus atop each branch.
It’s simple, but I really like how it looks. And I can use these decorations year-round for different holidays and events! So that’s a win. I’ve never been much for seasonal decorating, but using durable items like artificial plants really makes it worthwhile. They store nicely and they look fresh year-round!
The next thing on my list is to make a wood stump base for the tree to stand in. I’ve got the stump on my front porch, I just have to sand the underside and drill the hole. Think I can get that done by Christmas? :) Wish me luck!
This post is sponsored by Tiny Prints. They provide excellent quality printing and amazing printing options to make your holiday cards stand out this year. #ad
It’s my favorite time of year!! I love sending snail mail to loved ones, and getting lovely letters in return! It’s ALL I could ever want for Christmas. But I do admit, it can be stressful, looking at the daunting task of addressing every single envelope by hand.
Sure, there are services that will do all the work for you (Holla Tiny Prints! They have mail services available!), but if you want to send out a hand-written address, I’ve got you covered.
FIRST, get a marker or pen you love (I’ve mentioned my favorites for dark envelopes RIGHT HERE). Second, get your envelope template. The envelope template will not only help your addresses look beautifully aligned and awesome, you won’t have to give it a second thought. Just place the template overtop your envelope and write away. If you’re still intimidated by the whole thing, Here’s a video breaking down my must-do tips & tricks:
For using a printer: download the printable template. Print on thick card stock and cut out solid black lines with a craft knife.
For using a Silhouette cutter: download the DXF file. Import file to library, add artwork to your artboard, size to 5.25×7.25 and cut out on stencil material (seriously, this stuff is fantastic) or extra thick card stock.
Sure, you can use fancy-pants ink and nibs and make it all formal, but you don’t have to. Even something as simple as your own handwriting in a large marker will look AWESOME. Trust me, everyone will tell you how awesome your cards were this year. Pinky promise.
And if your penmanship sucks? Don’t worry. Here’s a quick freebie on how to improve your penmanship. But if you want to learn calligraphy (good penmanship isn’t a pre-requisite), check out my online classes in both brush lettering and modern calligraphy. We include personal feedback/coaching so you’re not alone in your journey.
Can we stop and talk about how lovely the Tiny Prints designs are this year? And how amazing our photos turned out? We did a super quick session with the lovely Kristin Hale & despite how awful our children were behaving (they were all OVER the place), she still managed to get some fantastic ones that I will LOVE forever.
From our family to yours, Happiest Holidays!
This freebie and tutorial is free for personal use only. This post is sponsored by TinyPrints, but all thoughts and opinions are my own. Affiliate links used for materials.
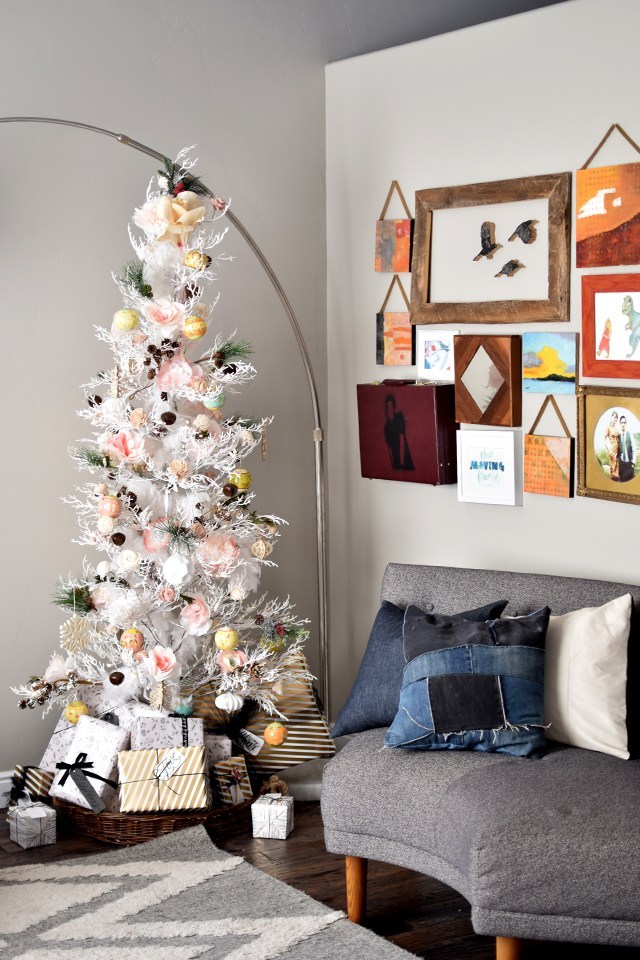
This year marks the first in 7 years that I haven’t booked my ticket to Alt Summit. As a result, I’ve decorated for Christmas. And I’ve had fun doing it, too! I’ve been slowly growing my collection of decor items, and I’m at a happy place this year with a grown-up tree that’s dressed to my liking.
I have a few personal hang-ups with holiday decor. One being that it’s impossible to store the other 12 months of the year and the other is that it takes up too much living space while out that everything feels cramped.
I found our white, pre-lit, minimalist tree a couple of years ago at Walmart for $80. The closest I could find is this one. But I fell in love with the realistic texture of the branches and the tiny box footprint it takes up when in storage. The problem: it’s really sparse. So I got creative.
I don’t like the look of seeing the metallic pole down the center, so I bought a couple of feather boas and wrapped the center of the tree with them. The feathers added richness and weight to the tree that was lacking.
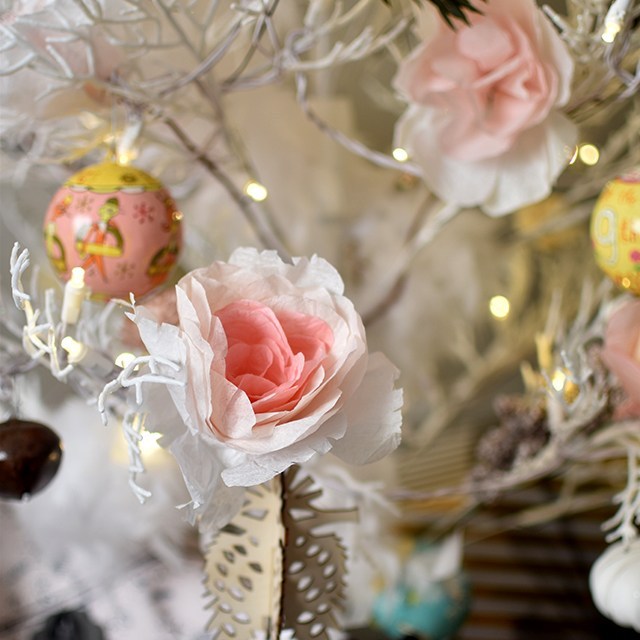
Many of the ornaments I’ve had in the past are white and silver, but with the white tree, I felt like it’s too cold to have silver details. So I opted for warmer white and soft pink details with pops of green and dark browns. Since the tree is so obviously fake, I thought some realistic tree picks with flocked pine cones added a nice touch. And the flowers. The flowers really did it for me.
Eco Flower sent me a wood flower bouquet for styling with my calligraphy work. As a quick shout-out, I wish they’d been around when Chris and I got married. They’re beautiful and last forever!
Chris helped me deconstruct the bouquet and add the beautiful blooms to our tree. Since they’re on wire stems, it was easy to wrap them around the branches and affix in place. In fact, most of the decor is firmly stuck to the tree so it’s quite kid-friendly. The only issue I’ve had with the decorations so far is that Junie likes to open up the presents when I’m not looking. She’s having fun and it’s no big deal to re-wrap those boxes.
In addition to the wood flowers, I got out the bunch of paper flowers I made months back out of coffee filters as a craft night with friends. The bigger, fluffier blossoms fill out the tree nicely, too.
In lieu of a tree skirt, I got a basket from Tai Pan trading to fit the tree. I still have to cover the ugly stand with presents, but that’s a good excuse to get my gift-game on early to cover it all up. At some point, I hope to DIY a wooden stump into a stand. Maybe next year? There’s always next year.
I’m just so thrilled with how it all turned out. I’m slowly figuring out my personal style when it comes to holiday decor, and I’m enjoying the process.
This post is sponsored by Tiny Prints. They provide excellent quality printing and amazing printing options to make your holiday cards stand out this year.
I love Tiny Prints. They make sending out Christmas cards a no-brainer. The designs are beautiful and already done for me (we used this one for ours). It’s wonderful to be able to simplify another thing about this time of year without sacrificing tradition. To help you simplify even more, below I’ve included a printable envelope template to help you address your holiday cards quickly. I’ve even included a fun, casual all-caps alphabet exemplar to use with the template.
Do you have a Silhouette cutter? CLICK HEREto download the .DXF file for the envelope template. You may still want to scroll to the bottom so you can print out the alphabet exemplar as well.
The family photos were totally chaotic, but Sam Pierson captured the energy and love of our family perfectly. And to be quite honest, I love the screaming photos. June was in the worst mood ever, she didn’t want to have anything to do with our photo session. I was worried that we wouldn’t have any good ones, but candid photos just get me.
Use the envelope template for all-caps work with markers or pens (thicker pens work better, in my opinion), or use it in your regular handwriting! Just write the descenders last, after you take off the template.
With the help of Tiny Prints, I’ve gotten grandparent, teacher, bus driver and friend gifts all taken care of. Their custom wrapping paper is beautiful and you can get it in large rolls to wrap bigger gifts.
A huge thanks to Tiny Prints for working with me this year! It’s the third year I’ve partnered with them and I’ve loved every single product I’ve ordered through them. If you have any questions about ordering, just ask!
The freebies in this post are free for personal use only. Alteration or distribution without written consent is prohibited.


