Posts Tagged ‘clothing’

Sewing!!!!! An Open-Knit Sweater Hoodie

14 Comments

Last week it took a melt down for me to carve some time for selfish sewing. I’ve been really busy with black friday business for I Still Love Calligraphy, prepping for Alt Summit and taking care of kiddos. No complaints though!! We’re flabbergasted at how quickly the calligraphy kits sold out (buying supplies for more kits tomorrow!). Your support has made putting food on the table and a roof over our heads possible. Thank you for keeping us busy!

istillloveyou-sewing-crocheted-hoodie-2

In addition to being busy, it’s been cold around our neck of the woods. The chill has been anywhere between -14º and 5ºF. Our furnace chugs nearly 24/7.  Naturally, if I’m going to sew anything, I’m going to sew something cozy and comfortable.

istillloveyou-sewing-crocheted-hoodie-6

I found this crochet-like sweater knit several months ago. I can’t remember where, but there were only 3 yards left. I bought all 3. This yardage called my name every day since September, begging to be something warm. It took me until a few weeks ago to figure out how I was going to finish the edges. It’s a really loose knit, so I couldn’t do a blind hem and call it good. It’s also too bulky to use for a cuff. That’s when I found this lightweight oatmeal knit that matched perfectly.

istillloveyou-sewing-crocheted-hoodie-5

I used the oatmeal for a lining (this hoodie is technically reversible), for the cuffs and the hood. The hood is technically functional, but it works more like a scarf than anything.

istillloveyou-sewing-crocheted-hoodie-8

The briar sweater pattern fit the bill for this piece. I straightened out the hem at the bottom and raised the neckline at the top. I traced a hoodie I had lying around for the hoodie pattern.

This hoodie took some time to complete since I lined it (sewing both inner and outer tops separately, then connecting them with the hems). I also reconstructed the bottom hem. I originally sewed it too loose and long, making the proportions look bottom-heavy. Reworking that hem wasn’t fun, but I knew I wouldn’t wear it if I didn’t make those changes!

istillloveyou-sewing-crocheted-hoodie-7

I also sewed the leggings from the block I made back in September (you can get a PDF pattern here, too). They’re made out of a super stretchy brick-patterned ponte knit. They’re really thick, making them more passable as pants than other leggings I’ve made in the past. They’re my new leisure pants. I have enough yardage to make a wiggle dress or some more leggings. Which should it be? Hmmm.

istillloveyou-sewing-crocheted-hoodie-9

I just love the striped patterning in the texture!! I’ve seen so many great oatmeal/off-white/angora colored sweaters this season, maybe I can fit in with the cool crowd?

istillloveyou-sewing-crocheted-hoodie-3

What are you wearing non-stop this winter to stay warm?

istillloveyou-sewing-crocheted-hoodie-10

Outfit details:


Looking for similar sweaters? Above is a list of similar sweaters for under $45.


Refashioned: Non-Gaping Neckline

21 Comments

I know for sure I’m not the only one that feels a bit uncomfortable wrangling kids with a gaping top. We’ve talked about this before, when I wrote about my slouchy tee refashion. Slouchy & gaping tees are fun to wear. They offer both style & pajama-like comfort, but there’s one problem: the gaping necklines. So we’re here talking about them again.

(see how the wide collar gapes?)

I found a fantastic mid-length dress at Ruche (Way to go, Ruche, for offering mid-length dresses & skirts this season!), but I had the sneaking suspicion that the neck would be too wide. That proved to be true. This idea for a refashion hit as I was debating whether I should keep it or not. I decided it was worth the $40 risk. 

I used a piece of leather to gather the back into a bow-like shape. It doesn’t change much of the neckline, but it does tighten it down a bit so that when I bend over, my girls don’t show.

I’m glad I took the risk! I’m excited to start working this into my regular wardrobe.

Read more for how to do it yourself! You’ll find yourself finishing this refashion in a matter of minutes. It’s really that easy.

(more…)

Oversized House Dress Refashion

22 Comments

I used every spare minute before Sewing Summit to refashion pieces I’ve been meaning to get to for ages. Gosh, I think I’ve had this number for at least 8 months. If I remember correctly, I got this at Savers in Phoenix for something like $6.

I didn’t like the shape, red details or the fit. I did like the circle skirt & checked pattern, but that was about it. When I looked at it I knew I wanted to refashion it, but I originally thought that I needed to just update the sleeves, fit & neckline to something a little more modern. Last week it hit like a ton of bricks: it needs to be a midi skirt instead. Once I decided on that my work refashioning this little number took about 30 minutes. Lickety split, eh?

I just cut out the skirt just below the waistline and attached elastic to the waist, using leftover elastic from my leather belt project*. Just to break it down, here’s what I did:

  • measured my waist with the elastic
  • cut out elastic & sewed ends together
  • divided elastic & skirt waist into fourths & pinned together
  • pinned elastic wrong side out to outside of the skirt which was right side out
  • evenly pinned gaps of skirt every 2-3 inches along elastic
  • stretched elastic to match up with skirt waist as I sewed my longest straight stitch
  • ironed & wore

I think it’s a big improvement on the original & I love that I now own a midi-length skirt! I’m just over the moon that they’re super hot this fall. The above outfit is what I wore during my Refashioning class at Sewing Summit. The class went really well, too! We had a great time making fun of the gross things you can find at thrift stores. See outfit details here.

*Elastic provided by rufflefabric.com

Tie-Front Refashion

43 Comments

Tie front tops are all the rage right now. In fact, I’ve not been able to get this top out of my head since the moment I spied it on Anthropologie’s site. Why does Anthro seem to make me so depressed? Perhaps it’s their perfectly executed visions of style & beauty that I always try to grasp, but never can. Don’t get me started on that store. I have a love/hate relationship with it. Am I the only one?

Not even a week after I spied that top, I found this baby at a thrift store close by my house. Love. Now this might not be that noticeable to some, but totally by me, I was totally put off by the super high neckline & the keyhole below. I still had dreams of the V tie neck like that Anthro one. With some unpicking here & some stitching there, I was able to make the neck tie much more modern. I also tailored the sleeves by 2 inches on each side. It’s subtle, but I feel like it’s in the 21st century now.

So what do you think? Was it worth the whopping $4? I think so. To see more details of this outfit, check out the fashion blog. 

A few of you were asking how I did it, I’m terrible at explaining, but here’s an illustration to show basically what I did:

Hope that helps!!


Outdated Denim Refashion

30 Comments

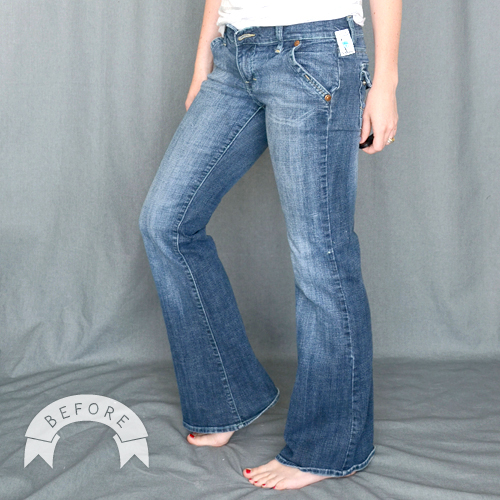
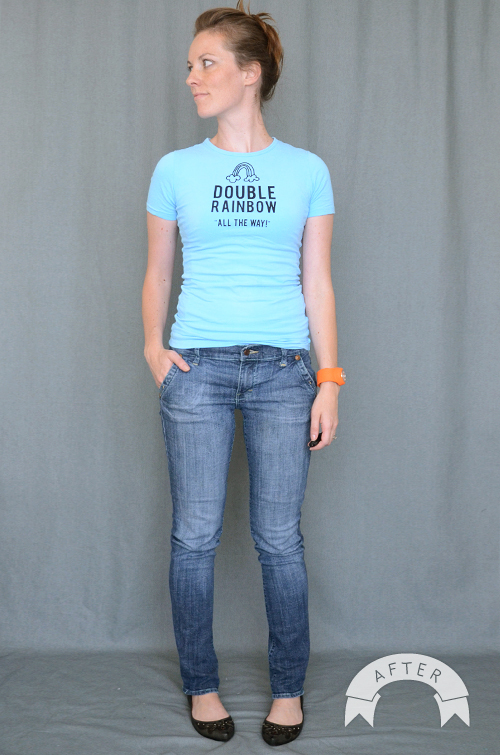
I scored these jeans a couple of Saturdays ago for $4. The tag said $6, but come on – the button was missing. I knew these would be a great pair of pants to refashion since they fit really well in the waist & thighs, they just had an outdated cut in the legs. I’ve been looking for denim that has more give in the thighs, because my pre-Felix skinnies don’t fit. Sure I can pull them on, but I’m the wicked witch of the west whenever I wear them because feeling like a stuffed sausage makes me angry. It’s time to move on from those pants.

Like I said – the cut in the leg was just outdated. they were too short to be cool bell bottoms & MUCH too wide to be worn with flats. I felt like I had stubby legs when I tried them on. Do you ever feel that way with pants?

Hello, missing button! I love these slanted pockets & the cheery blue stitching. Not necessarily anything that’s on trend, but I like those little details.

I didn’t do much besides take in the bottoms. I took my super skinnies & laid them wrong side out on top of these pants & marked lines just outside of the super skinnies to mark the tapering. I took in about 4 inches on the bottoms. YIKES. I feel like the skinny really lengthens my leg. One of the many reasons why the skinny jean trend can never go out.

After I was done adjusting the bottom & adding the button, I noticed that the back felt a little loose & a bit too low for me. So I added two darts (the denim was thin enough) on either side of the back seam. That made all the difference in the world! The fit of these jeans is perfect. They’re my new go-to pant. Now I don’t feel bad that I don’t fit into my pre-Felix skinnies.

To view more photos & the outfit details, click here

Thorough tutorials on how to skinnify your pants can be found here:

Freshly PickedI’m Topsy TurvyCotton & Curls

mobile site