Posts Tagged ‘decor’

Silk Flower Christmas Tree

0 Comment

Happy holidays friends! It’s been a whirlwind year this year and I can’t believe we’re less than a week away from Christmas! We’ve really been enjoying our holiday season so far. And I got my tree up in plenty of time to enjoy it!! I wanted to share with you a round two of my Christmas tree (round 1 is here).

Not a whole lot has changed besides the fact that I’ve added more flowers from Commercial Silk. They approached me to see if I wanted to review some florals for them, and I gladly obliged. I need more tree filler to take my sparse and twiggy try to the next level.  

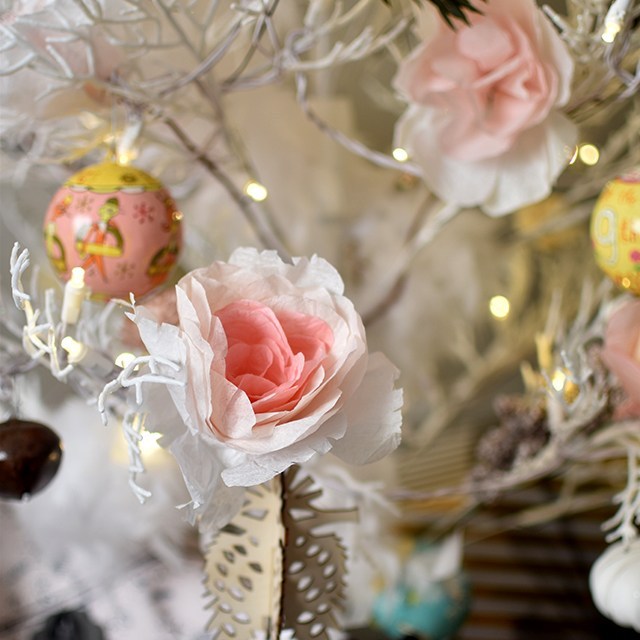
I used ranunculus and dusty miller to add more depth to my branches. And I think I could have used even more than I got, but I really like the depth it added to the tree as it is. I left the stems on the dusty miller, but not on the ranunculus. I cut those off and glued the excess leaves from the stems onto the backs of each bud. I just placed the ranunculus atop each branch. 

It’s simple, but I really like how it looks. And I can use these decorations year-round for different holidays and events! So that’s a win. I’ve never been much for seasonal decorating, but using durable items like artificial plants really makes it worthwhile. They store nicely and they look fresh year-round!

The next thing on my list is to make a wood stump base for the tree to stand in. I’ve got the stump on my front porch, I just have to sand the underside and drill the hole. Think I can get that done by Christmas? :) Wish me luck! 

RESOURCES: 

  • Ranunculus/Dusty Miller: CommercialSilk c/o
  • Wood flowers: Eco Flower c/0
  • 12 days of Christmas: Land of Nod c/o
  • Pink wrapping paper: Tiny Prints
  • Gold wrapping paper: Tai Pan Trading
  • Basket: Tai Pan Trading
  • Picks: Tai Pan Trading & Walmart
  • Paper flowers: handmade

*Product was provided for this post, but all opinions are my own. 

Bohemian Meets Minimalist Christmas Tree

0 Comment

This year marks the first in 7 years that I haven’t booked my ticket to Alt Summit. As a result, I’ve decorated for Christmas. And I’ve had fun doing it, too! I’ve been slowly growing my collection of decor items, and I’m at a happy place this year with a grown-up tree that’s dressed to my liking. 

I have a few personal hang-ups with holiday decor. One being that it’s impossible to store the other 12 months of the year and the other is that it takes up too much living space while out that everything feels cramped. 

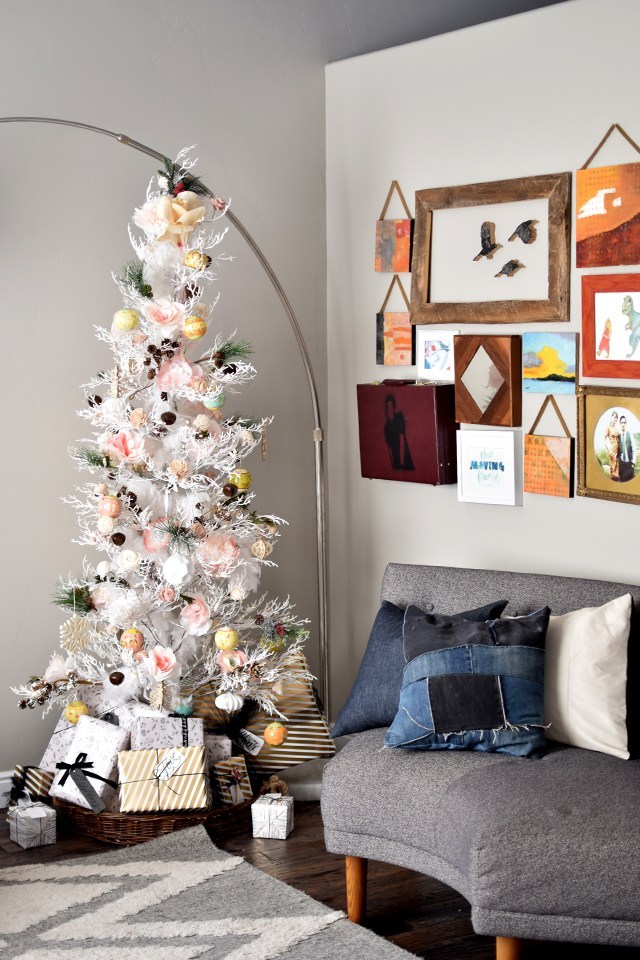
I found our white, pre-lit, minimalist tree a couple of years ago at Walmart for $80. The closest I could find is this one. But I fell in love with the realistic texture of the branches and the tiny box footprint it takes up when in storage. The problem: it’s really sparse. So I got creative.

I don’t like the look of seeing the metallic pole down the center, so I bought a couple of feather boas and wrapped the center of the tree with them. The feathers added richness and weight to the tree that was lacking. 

Many of the ornaments I’ve had in the past are white and silver, but with the white tree, I felt like it’s too cold to have silver details. So I opted for warmer white and soft pink details with pops of green and dark browns. Since the tree is so obviously fake, I thought some realistic tree picks with flocked pine cones added a nice touch. And the flowers. The flowers really did it for me. 

Eco Flower sent me a wood flower bouquet for styling with my calligraphy work. As a quick shout-out, I wish they’d been around when Chris and I got married. They’re beautiful and last forever!

Chris helped me deconstruct the bouquet and add the beautiful blooms to our tree. Since they’re on wire stems, it was easy to wrap them around the branches and affix in place. In fact, most of the decor is firmly stuck to the tree so it’s quite kid-friendly. The only issue I’ve had with the decorations so far is that Junie likes to open up the presents when I’m not looking. She’s having fun and it’s no big deal to re-wrap those boxes.

In addition to the wood flowers, I got out the bunch of paper flowers I made months back out of coffee filters as a craft night with friends. The bigger, fluffier blossoms fill out the tree nicely, too. 

In lieu of a tree skirt, I got a basket from Tai Pan trading to fit the tree. I still have to cover the ugly stand with presents, but that’s a good excuse to get my gift-game on early to cover it all up. At some point, I hope to DIY a wooden stump into a stand. Maybe next year? There’s always next year. 

I’m just so thrilled with how it all turned out. I’m slowly figuring out my personal style when it comes to holiday decor, and I’m enjoying the process. 

RESOURCES: 

  • Wood flowers: Eco Flower c/0
  • 12 days of Christmas: Land of Nod c/o
  • Pink wrapping paper: Tiny Prints
  • Gold wrapping paper: Tai Pan Trading
  • Basket: Tai Pan Trading
  • Picks: Tai Pan Trading & Walmart
  • Paper flowers: handmade


Sewing: Body Pillow

4 Comments

Time is ticking on this baby bomb. I’m getting bigger and more uncomfortable by the minute. It’s not a complaint, just a fact of life when growing a human. Sleeping has been particularly tricky with this baby as I find myself waking up on my back multiple times a night.

melissaesplin-handmade-body-pillow-1

I needed something to give me more back support while I was sleeping on my side, so I thought about buying a body pillow. Then Chris reminded me that we have a ton of memory foam just lying around that I’ve been hoarding for some undecided future project. BOOM. Done. I made myself a body pillow.

melissaesplin-handmade-body-pillow-2

I ended up rolling the foam like a crepe (or burrito?), measuring and sewing two pillow cases for it. The interior case is just to protect the raw foam from drool or any other liquid that may come in contact with it (via my disgusting – but adorable – kids or me). The second case is decorative, made from amazing fabric* that I’ve had in my stash for about a year. I fell in love with the print, but couldn’t think of something awesome to use it for.

melissaesplin-handmade-body-pillow-3

I boxed out the bottom of the case and made a simple drawstring for the top to keep everything in place. It weighs about 15 pounds and it’s a beast. We took it on a weekend family reunion vacation. It was brilliant in the car, both kids could cuddle and sleep with it. It also served as the perfect separator to keep Felix and Penelope from brutalizing each other in the back seat. HOWEVER, it was a little too big to sleep with.

I haven’t had much time to alter the design much, but I just plan on taking everything out and shaving off about 12 inches of the roll of memory foam. I think that’ll do the trick.

*Fabric provided by Modern Yardage. Check out the amazing collections available here.

Partied Out: Secret Garden Party Details

10 Comments
This post is sponsored by Tai Pan Trading, where you can find outrageously awesome decor and fashion for a fabulous price.

1-taipan

First off, I want to give a huge shout out to Tai Pan for making our party possible. We couldn’t have made quite the visual impact without their generosity or fabulous decor.

Alt Summit put a call for party submissions several months ago (August? September?). I quickly emailed Erin (I’ve been wanting to collaborate with her for some time), and we put our minds to work. Alt went with Erin’s genius plan for a Secret Garden themed soiree.

Why the genius? Because it totally played into the styling and decor that already exists at the Grand America (our venue)!

secretgardenparty-ruerococo

photo by rue rococo

We took on two more extraordinary creative partners, Alix and Brittany, and planned the heck out of it. I can’t begin to tell you how much hard work went into every little detail. Nevermind. I guess I can because you’re here, reading this.

Our hurdles:

  • $1000 decor/photography budget
  • a refrigerator box and a dishwasher box and a bundle of 10′ pipes that needed to be transported 700+ miles
  • arranging seating in a 500 sq. ft. room, half filled with a meat carving station
  • hanging things without touching the walls
  • finding time in our busy schedules to make everything happen


3-secretgardenparty-justinhackworth-2

photo by Justin Hackworth

Knowing that the florals were taken care of (minus shipping them 700+ miles), it allowed us to focus on the decor. Unfortunately, if we wanted any kind of big statement (and we did) $1000 wouldn’t get us a whole lot.

Tai Pan let us borrow the most magnificent over-sized urns, topiaries, ceramic gnomes, 4′ lions and more! Every little piece was the right kind of whimsical detail to make the party great.

4-secret-garden-party-ruerococo-1

photo by rue rococo

5-secretgardenparty-brookedennis-2

photo by Brooke Dennis

We used two 5′ planters on either side of the interior of the door to hold the 8-10 tall florals. With our team and the help of serious floral foam, we got them to create a cozy archway that made such a fabulous impact on entry of the room. Sort of an Alice-in-Wonderland moment.

6-secretgardenparty-justinhackworth-1

photo by Justin Hackworth

7-secret-garden-party-erinmercado-1

photo by Erin Mercado

I didn’t get nearly as many photos as I would have liked, but here’s a little snippit of some of the signage I made and the hankie wall. We pinned the hankies onto several moss plaques. It made a fun statement, but when the hankies were gone it still looked nice.

8-secret-garden-party-erinmercado-2

photo by Erin Mercado

Flanking either side of the exterior doors were lions. They were at least 3 feet tall. Alix made giant floral crowns for them. I loved the juxtaposition of those two elements.

9-secret-garden-party-ruerococo-2

photo by rue rococo

11-secretgardenparty-1

Shhh!! It’s a secret! It was so wonderful to work with such talented ladies. From left: Erin, Brittany, Alix, Me

Alix made the photo backdrop from shredding lace and dyed thrift store bed sheets. Inspired by this pin (anyone know the original resource?), but a TON fuller. It made a fabulous impact in the room.

12-secret-garden-party-ruerococo-6

photo by rue rococo

We kept the tables pretty simple with moss runners, river rocks, ceramic gnomes and inspirational quotes. Trying to find quotes that would fit the Secret garden theme was TOUGH! I watched the movie with Penelope about a month or so ago. I forgot how sad it was. Penelope even started crying! She was so sad to see the little girl’s mom ignoring her. It might have hit a little too close to home for Penelope (Chris has been picking up a lot of slack lately with all this Alt craziness).

13-secret-garden-party-ruerococo-4

photo by rue rococo

14-secret-garden-party-ruerococo-5

photo by rue rococo

15-secretgardenparty-2

View all photobooth pics here.

Planning a party of this scale couldn’t have been done without such great support of these fabulous ladies (and a husband or two). Working with these inspiring women was so much fun (a little too much fun at times, even).

16-secretgardenparty-brookedennis-1

Another special thanks to all of the people and brands that helped make our vision happen: Tai Pan Trading for decor and jewelry, Lizy Bowden for florals, Spoonflower for the hankies and Tiffany for the C-stands for the backdrops.

Now I’m ready for a nap.

Sponsored: Easy Thanksgiving Decor

2 Comments
This post is sponsored by Way Basics – your source for eco-friendly, light-weight and strong organizational systems. Each of their products is designed for the world’s easiest assembly. 

We don’t have any holiday decor. Holiday decor isn’t something that can be purchased all at once like a couch, or bed linens. I feel like these things are collected over time. So this year I’m working on making and buying festive decor that will easily store and last for years to come. I’m hoping that my efforts this year will make a dent and make next year’s decorating for the holidays just a little bit easier.

istillloveyou-thanksgiving-waybasics-1a

Just before Halloween, I found a few of these paper mache pumpkins while at Michael’s. They’re not there any more, but I’ve since found them online here and here.

I love that they offer a blank slate. I had them out as-is, but recently decided to give them more of a Thanksgiving/Fall theme the other night.

istillloveyou-thanksgiving-waybasics-2a

Is it strange that I’m still making fall/Thanksgiving decor even though most people have already decorated their homes to the gills for Christmas? Sometimes I feel behind the times, but I remind myself, “NOOOOO!! I’m going to enjoy Thanksgiving FIRST.”

I simply grabbed a #2 liner brush, white ink and went to town on my little pumpkins. While “thanks giving” may lend itself most towards the holiday, it’s a great mantra to have in the house all autumn long. I think these little babies will be a permanent part of my fall decor.

istillloveyou-thanksgiving-waybasics-3a

On another note, this is the first wall shelf that I’ve mounted in our new house (besides the utilitarian ones in my studios). I love having parts in my home strictly for decor that can be “untouchable”!

istillloveyou-thanksgiving-waybasics-4a

I loved how easy Way Basics’s wall shelves were to mount. I actually mounted this during a late night, it was 3 in the morning and it was still easy to install in my sleep deprived state. Total win.

I was compensated for this post, but all thoughts and opinions are my own.

mobile site