Posts Tagged ‘fast’

Refashion: Sunset Ombre Button-Up

9 Comments

Last weekend I got together with a couple of creative ladies & got my hands messy in a bunch of dye baths! I’ll be recapping my experience as a whole with Rit Dye later this week, but I couldn’t wait to share with you this little update.

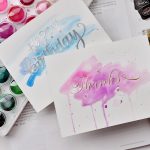
I’ve had the above button-up since before Chris & I were officially dating. Chris, a bunch of his super-hip buddies & I ventured up to Salt Lake (we were living 40 miles south at the time) and went thrift shopping. We had a great time. It was during this excursion that I scored this button up and this funky jacket – all in the boy’s department. I’ve had this fabulous oxford for over 6 years. It’s been through a lot. It started out with the pocket on the left side and long sleeves. The color has been looking a bit ratty recently, so when the ladies came over for a little dyeing fun, I added this one to the pile of things to dye.

With everyone riding the ombre train, a big part of me wants to steer clear from it entirely. It’s beautiful, but I don’t want to be the kind of person to put a bird on something just because it’s the hip thing to do. I thought I’d do a different take on the ombre & do a few things differently. Most ombre dyes are light to dark. This is dark to light. Also, most ombre dyes are different saturations of the same tone. I kept within the same color family & gradated the yellow to a sunset orange. I love how the ombre effect woke up my shirt from its deep sleep.

Liz & Susan both have great tutorials on ombre dyeing, but I took a different approach on the method. I’ve never dyed before Saturday, but having a lot of experience with watercolor (and watercolor gradients), I took more of a watercolor approach. Here’s how I did it:

  1. start out with a weak dye bath (using liquid Rit Dye for the bath – powder wouldn’t work as well for this technique)
  2. dip the garment all the way in the bath for 10-30 seconds getting it completely wet and creating a base layer
  3. ring it out
  4. add more yellow dye to the bath & mix thoroughly
  5. place the garment in about half way through – Susan & Liz both measured their steps out, which is a good idea
  6. let the garment soak for 10 or so minutes bobbing the garment in and out of the bath to see how the color is coming along
  7. add tangerine dye to change the color of the saturated end
  8. take the garment out more. I clamped my shirt to the wall of the bath to keep it from sliding down
  9. soak the edges of the garment for another 10-15 minutes bobbing it in and out
  10. add dye as needed and lift the garment out even further
  11. keep repeating steps 8 & 9 until you’ve reached your desired result

I did this technique with a few other items & I can’t wait to share the rest with you later this week! Click here to see more pictures & outfit details.

Dye courtesy of Rit Dye.

Simple Refashion: Jean Jacket

9 Comments

Last week I had fabulous luck at the thrift store. I found a bunch of things, among them: a Tommy Hilfiger 2T denim shirt dress. Thankfully, Penelope was there with me, so I could confirm that the shirt dress did in fact fit her. It fit her more like a shirt/jacket than a dress. The only downside to the $2 score? The embroidery along the bottom of the dress. I subscribe to the philosophy that clothing shouldn’t have labels (like #1 slugger, princess, etc); in fact, I feel like many perfectly adorable clothes are ruined by kitschy embroidery and cartoons.

These stars aren’t Penelope’s style at all (I totally project all of my interests & snobbery onto her).

The linen table cloth that I bought recently from DownEast home had a brown P embroidered on it that I successfully unpicked without any damage to the linen. I figured since this embroidery was smaller and on a thicker material, removing the stitching wouldn’t be a problem at all. I was right.

Removing the cheesy stars makes all the difference in the world to me. I do this a lot to hand me downs & thrifted items. It’s the perfect way to give something new life & style. Doing this is practically brainless – I just grab my seam ripper, an embroidery hoop, my computer & cuddle on the bed with Felix while I catch up on shows.

The little stars were the most time consuming because the stitching was so tight, so I ended up getting my tweezers to help get those out of the way. No big deal, though. I love the final result & this outfit is just so adorable. She’s such a little hipster with her little man dress shoes, cut off jean shorts & jean jacket.

I didn’t think it was terribly necessary to remove the Tommy Hilfiger embroidery on the pocket – that’s pretty subtle. Click here for more adorable photos & the breakdown of her outfit.

Crazy Cat

0 Comment

Nothing spices up oven-fried catfish like a deformed lemon. Chris and I make sure to pick all of the weird ones from our tree first, mostly because they’re the tastier ones.

catfish and deformed lemon

A couple of nights ago I made catfish fish sticks from a recipe I found online titled Fishsticks in a Flash. Of course I’m going to make them. If it’s made of few ingredients and takes less than a half hour, I’m all over it. The fish sticks took 20 minutes. BONUS. They tasted just like the large cat we always order at Jonathan’s Fish & Chips. DOUBLE BONUS. And Chris couldn’t stop talking about it. TRIPLE BONUS.

Penelope even had a taste. She was mad we didn’t give her more.

Fish Sticks in a Flash

1/2 cup cornmeal
1/2 cup Parmesan cheese
3/4 teaspoon garlic powder
1/4 teaspoon salt
3 tablespoons canola oil
1 pound U.S. Farm-Raised Catfish fillets, cut into 1-in thick strips

1. Preheat the oven to 475°F.
2. Lightly oil or coat a large baking sheet with nonstick cooking spray and set aside.
3. Combine the cornmeal, cheese, garlic powder and salt in a medium bowl and mix well.
4. Place the oil in a small bowl. Lightly coat each piece of fish in the oil and then roll in the breading until well coated.
5. Arrange the fish on the prepared baking sheet and bake until golden brown, 10 to 12 minutes.

Million Formula Cans Pt. II

11 Comments

It’s a good think that Penelope drinks so much, otherwise I wouldn’t have anything to put Christmas presents in. Now I’m thinking, what am I going to do when she grows out of formula? Maybe I’ll just have to buy formula just for the cans. Or beg neighbors that have little ones for their leftover cans. I love those things.

This year I made marshmallows, caramels, chocolate-dipped meringue cookies. I feel a little guilty that I’m contributing to the annual sugar-induced coma. Oh well. At least they’re tasty.

No Deadline, No Motivation

5 Comments

I have to have deadlines, ‘assignments’ if you will, in order to get things done. I learned this after we moved here. I didn’t have friends, family, school, job or kids to keep me occupied. You’d think I’d spend all that time working on my art, arts & crafts projects, cooking nice meals, etc. Oh no. I slept for almost 6 months straight.

Which means, if I don’t make it to a baby shower, bridal shower or any sort of gift-giving event, I have ZERO motivation to work on a present. Translation: I missed a friend’s baby shower in August. I just finished making the gift and gave it to her on Saturday. I’m such a dork.

My friend’s little boy is 4 months old, and catching up to Penelope quickly, so I made a Kimono that fits Penelope, and maybe baby Will will be able to wear the fuzzy sweater more than once before he’s too big. I like how it turned out. The fleece made the project easy for finishing, and great for this kind of wet-cold weather we’ve been having recently.

Want to make your own? HERE’S THE TUTORIAL. It’s fabulous.

mobile site