Posts Tagged ‘home’

Bohemian Meets Minimalist Christmas Tree

0 Comment

This year marks the first in 7 years that I haven’t booked my ticket to Alt Summit. As a result, I’ve decorated for Christmas. And I’ve had fun doing it, too! I’ve been slowly growing my collection of decor items, and I’m at a happy place this year with a grown-up tree that’s dressed to my liking. 
I have a few personal hang-ups with holiday decor. One being that it’s impossible to store the other 12 months of the year and the other is that it takes up too much living space while out that everything feels cramped. 

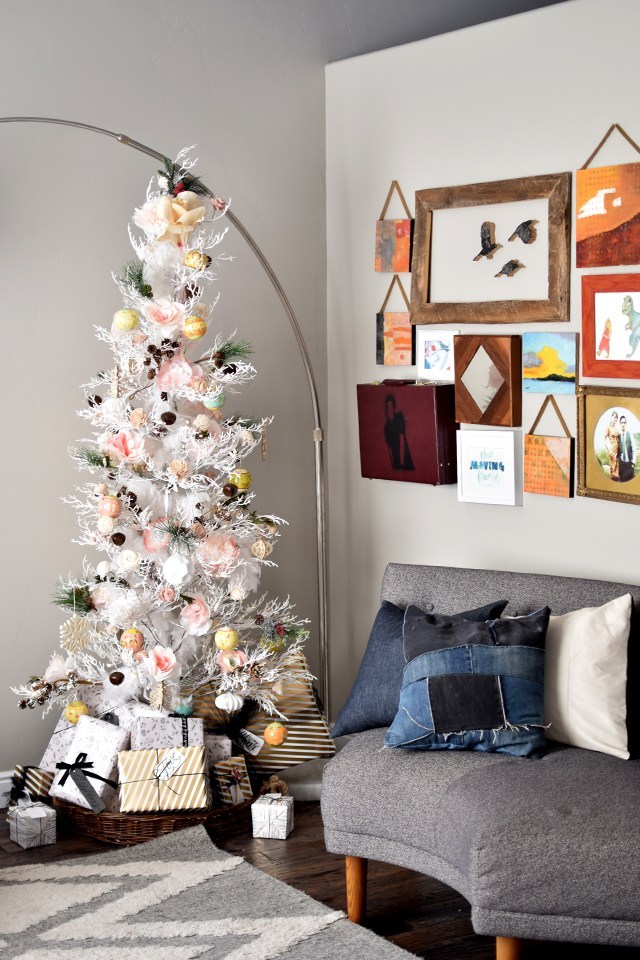
I found our white, pre-lit, minimalist tree a couple of years ago at Walmart for $80. The closest I could find is this one. But I fell in love with the realistic texture of the branches and the tiny box footprint it takes up when in storage. The problem: it’s really sparse. So I got creative.

I don’t like the look of seeing the metallic pole down the center, so I bought a couple of feather boas and wrapped the center of the tree with them. The feathers added richness and weight to the tree that was lacking. 

Many of the ornaments I’ve had in the past are white and silver, but with the white tree, I felt like it’s too cold to have silver details. So I opted for warmer white and soft pink details with pops of green and dark browns. Since the tree is so obviously fake, I thought some realistic tree picks with flocked pine cones added a nice touch. And the flowers. The flowers really did it for me. 

Eco Flower sent me a wood flower bouquet for styling with my calligraphy work. As a quick shout-out, I wish they’d been around when Chris and I got married. They’re beautiful and last forever!

Chris helped me deconstruct the bouquet and add the beautiful blooms to our tree. Since they’re on wire stems, it was easy to wrap them around the branches and affix in place. In fact, most of the decor is firmly stuck to the tree so it’s quite kid-friendly. The only issue I’ve had with the decorations so far is that Junie likes to open up the presents when I’m not looking. She’s having fun and it’s no big deal to re-wrap those boxes.
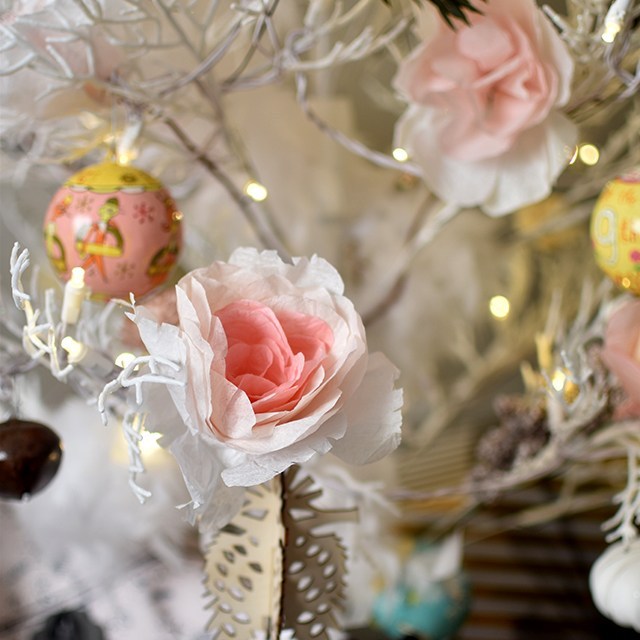
In addition to the wood flowers, I got out the bunch of paper flowers I made months back out of coffee filters as a craft night with friends. The bigger, fluffier blossoms fill out the tree nicely, too. 

In lieu of a tree skirt, I got a basket from Tai Pan trading to fit the tree. I still have to cover the ugly stand with presents, but that’s a good excuse to get my gift-game on early to cover it all up. At some point, I hope to DIY a wooden stump into a stand. Maybe next year? There’s always next year. 

I’m just so thrilled with how it all turned out. I’m slowly figuring out my personal style when it comes to holiday decor, and I’m enjoying the process. 

RESOURCES: 

  • Wood flowers: Eco Flower c/0
  • 12 days of Christmas: Land of Nod c/o
  • Pink wrapping paper: Tiny Prints
  • Gold wrapping paper: Tai Pan Trading
  • Basket: Tai Pan Trading
  • Picks: Tai Pan Trading & Walmart
  • Paper flowers: handmade


Sponsored: Nesting with The Honest Company

4 Comments


honest-company-logo
This post is sponsored by the Honest Company. They’re a fabulous resource for safer home products such as cleaning supplies, personal care and baby essentials. They’ll even deliver all that awesomeness to your doorstep through their bundle and save subscriptions.

Also, how cute are their diapers?


Has anyone ever asked you the question: Would you rather have a cleaning service or a landscaper?

I was thinking about this the other day, I’d much rather have a landscaper. I can’t stand all the weeds in our yard and I have no idea what to do to make our yard look pretty. It’s been a source of internal contention for some time. I can’t seem to keep the real plants alive and the morning glory seems to love whatever it is I’m doing wrong.

And the truth is, I don’t mind cleaning. Doing the floors and dishes aren’t my cup of tea (Chris does those, thank heavens), but I get strange satisfaction out of cleaning bathrooms.

melissaesplin-honest-company-bathroom-nesting-2

After some reflection, I think I know why:

  • The bathroom is a small finite space (unlike floors which go on FOREVER).
  • You know when it’s clean because of how it smells when you walk in.
  • A clean bathroom seems like a much brighter, open space.
  • It’s easier to keep a bathroom relatively clean/tidy for a longer period of time than to keep the kitchen sink tidy (unless you just never cook).

I’ve slacked off in my bathroom duties with this pregnancy because of the tight spaces, little air circulation and how those two play into basically suffocating me when cleaning out the toilet with bleach. I’m sure What to Expect When You’re Expecting has some warning about cleaning agents alongside with germophobic warnings as well. Let it go on the record that I absolutely hate that worthless book. I read it once while I was pregnant with Penelope. It induced moderate to severe paranoia about everything I came into contact. Worthless.  I digress.

melissaesplin-honest-company-bathroom-nesting-1

See my slacking duties? You can see smears on the mirror and all of my junk out with no particular purpose. Honest Company sent me a bunch of cleaning supplies which were just the motivation I needed to get cleaning and jazz up my bathroom a little bit.

Did I mention these cleaning supplies didn’t send my lungs into a panic? The eucalyptis mint bathroom cleaner works as nicely to remove bathroom grime as it smells. And it smells soooo good.

melissaesplin-honest-company-bathroom-nesting-3

Taaa Daaaa!!! Look at that transformation!! This is no amazing before and after. Quite pathetic really, but Chris noted a very dramatic change when he first stepped foot into my bathroom.

At some point, we’re going to demolish this bathroom and give it the finish it deserves (or should I say I deserve?). We want to replace the vanity with double sinks (so Chris can actually use this bathroom, he’s currently stuck with the one down the hall). I want to tear down the wall to the “toilet closet”, who needs a 3′ x 8′ closet for a toilet? Open that floor up, baby!! I also want to tear down the wall to the linen closet and have open teak shelving there. Add subway tiles along the floor and walls and a giant soaking tub and I’ll be a happy woman.

Until that happens (cough, $$, cough), I’ll be happy with my minute upgrades. :)

melissaesplin-honest-company-bathroom-nesting-2

I started out by designing and cutting out vinyl decals of random geometric outlines to add some fun texture to the wall. I organized my nail polishes on the little rack to keep them away from Penelope and around for frequent use. This is a spice rack I scored from Ikea for $4. Chris originally put one in his bathroom so I copied the idea. It’s perfect for storing bathroom stuff up high.

melissaesplin-honest-company-bathroom-nesting-4

I end up taking my cosmetics around the corner to the bedroom mirror and work on applying my face while sitting on the floor. It’s much easier than trying to manage my giant belly around the counter top to get close enough to the mirror to curl my eyelashes. I was previously using a wire basket, which would frequently lose pencils because of the wire-y-ness of the basket. Switching to a real tray made a difference. It’s prettier, too.

melissaesplin-honest-company-bathroom-nesting-5

I decanted my hand soap to a pretty dispenser and bought mis-matched containers for my toothbrush, tumbler and plant.

The light in this bathroom really stinks, so the plant is now happily living in our bright master bedroom instead. I miss the greenery in my bathroom, though.

melissaesplin-honest-company-bathroom-nesting-7

I got a new curtain that allows a little more light in and has more of a neutral spin to it. The geometric pattern plays well with all of the different textures.

A while back we were using regular towel rods, my towels never seemed to migrate off the floor. Chris cut out some wood, stained it and added hooks to the wall instead. It’s much easier to hang towels when in a rush to get kids out the door in the morning.

melissaesplin-honest-company-bathroom-nesting-8

I created a little piece of artwork that reads, “Hello Gorgeous”. I already feel gross with this pregnancy and I know it’ll only get magnified when the postpartum body comes into play. I need a little reminder that I’m gorgeous no matter what my body may look like. It’s sad how media distorts perceptions of how our bodies are supposed to look like after a baby. I’m a believer in trying to maintain a healthy lifestyle, but a healthy outlook is also important.

Other than that, I haven’t done as much nesting as I would have liked. Next up is organizing artwork; making sure it’s all framed and hanging it on our bare walls. I’ve got 2 boxes and a pile about 5 inches tall of art that’s waiting to find a home on our walls. My mom will be in town next week to help with the baby, so maybe she’ll be able to help. :)

This post is sponsored, but all thoughts and opinions are my own. 

Sewing: Body Pillow

4 Comments

Time is ticking on this baby bomb. I’m getting bigger and more uncomfortable by the minute. It’s not a complaint, just a fact of life when growing a human. Sleeping has been particularly tricky with this baby as I find myself waking up on my back multiple times a night.

melissaesplin-handmade-body-pillow-1

I needed something to give me more back support while I was sleeping on my side, so I thought about buying a body pillow. Then Chris reminded me that we have a ton of memory foam just lying around that I’ve been hoarding for some undecided future project. BOOM. Done. I made myself a body pillow.
melissaesplin-handmade-body-pillow-2

I ended up rolling the foam like a crepe (or burrito?), measuring and sewing two pillow cases for it. The interior case is just to protect the raw foam from drool or any other liquid that may come in contact with it (via my disgusting – but adorable – kids or me). The second case is decorative, made from amazing fabric* that I’ve had in my stash for about a year. I fell in love with the print, but couldn’t think of something awesome to use it for.

melissaesplin-handmade-body-pillow-3

I boxed out the bottom of the case and made a simple drawstring for the top to keep everything in place. It weighs about 15 pounds and it’s a beast. We took it on a weekend family reunion vacation. It was brilliant in the car, both kids could cuddle and sleep with it. It also served as the perfect separator to keep Felix and Penelope from brutalizing each other in the back seat. HOWEVER, it was a little too big to sleep with.

I haven’t had much time to alter the design much, but I just plan on taking everything out and shaving off about 12 inches of the roll of memory foam. I think that’ll do the trick.

*Fabric provided by Modern Yardage. Check out the amazing collections available here.

Zero Budget Project: Penelope’s Studio

12 Comments

For Penelope’s birthday, Chris and I wanted to give her something that would make her squeal. She is obsessed with her art supplies and crafting. Most days it’s all over the kitchen table, pantry, floor, counter tops and couch. She just spreads her artistic love all through the house.

zero-budget-project

It’s great, but I want to channel it somewhere that I can close the doors and ignore it. I also wanted the space (and flooring) to be utterly indestructible to her glues and glitters. She thinks my studio is so cool, I wanted to give her one of her own.

istillloveyou-penelopestudio-before-1

The downstairs toy room was out (too much soft carpet down there). My studio was definitely out!

We have this utility closet that we don’t really use that efficiently upstairs just next to my studio. It has washer and dryer hookups, but we have a laundry room downstairs instead. We had a few random boxes and things (above) that could be easily organized elsewhere, so I made this space Penelope’s.

istillloveyou-penelopestudio-utilitycloset-1

It’s the perfect size for her and the tile floors allow for easy clean up. As far as the cost and logistics of making this space hers, here was the breakdown:

  • tables: $50, Ikea
  • chairs: already on hand
  • shelving and brackets: $16, Ikea
  • containers: already on hand (Pink: $5, Michael’s | black: $3.99, Ikea)
  • frame for her sign: $5, Ikea
  • flat art storage: already on hand
  • filing cabinet: already on hand
  • magnets: gift from LivyLove

Total:$80

Of course, while I was at Ikea, I wandered through their art supplies and picked up about $40 worth of supplies for her as well. Who knew Ikea had such awesome art supplies for kids?

istillloveyou-penelopestudio-utilitycloset-2

The top shelf is still a dedicated space for the drill, light bulbs batteries and misc cleaning supplies. I’m thinking the above space needs an overhaul as well.

istillloveyou-penelopestudio-utilitycloset-3

With the open containers, Penelope can move them and clean up easily. And she’s pretty good about keeping things clean. So far.

istillloveyou-penelopestudio-utilitycloset-4

I finally found a use for those tins I bought on impulse by way back. This one holds chalk, the other holds her glitter pens.

istillloveyou-penelopestudio-utilitycloset-5

My mother-in-law sent Penelope a bunch of sweet supplies for her birthday like floral fabric tape, pebble crayons, twig pencils and loads of paper. What a nice grandma. Now she can use these in her own way and not worry about me nagging to clean up.

istillloveyou-penelopestudio-utilitycloset-6

The metal cabinet is perfect for displaying her favorite pieces before storing or framing them.

istillloveyou-penelopestudio-utilitycloset-7

It’s really a great space for her. She can do whatever she wants in that space and I can close the doors at the end of the day and ignore it all!

Did you have a creative space just for you growing up? Will you or have you done this for your own kids?

Inexpensive Minimal Gallery Wall

20 Comments

zero-budget-project

I’ve got another installment of the great Zero Budget Project. I don’t know why I’ve been dragging my feet on styling our bedroom. It’s not like it took that long or wasn’t fun to do. I guess I just needed to channel the right creativity.

melissaesplin-zero-budget-project-bedroom-art-1

I walked past these ribba frames while on a routine run to Ikea. They were $1.99 – and that spurred an idea. What if I did an entire wall out of these awesome cheap frames? I think the best part about these frames is that they’re an inch and a quarter deep. They don’t look as cheap as they are. So for just over $20 I was able to decorate this wall. Easy peasy.

melissaesplin-zero-budget-project-bedroom-art-2

It took a measuring tape, a level and a pencil. I measured out the width of the wall and graphed out where each piece should lie. It worked out to 10 inches apart. I went through old artwork and cropped down the pieces that would work (really only taking the pieces I liked that were just about 5×7). I had a few holes in my 11 piece series so I looked through Penelope’s stash and made a few new pieces as well.

melissaesplin-zero-budget-project-bedroom-art-3

Curating, prepping, cleaning, painting and hanging artwork took a few hours. All the while Chris was MIA, it was fun to reveal the newly cleaned and decorated space to him. Making him excited about our space really makes my efforts worth it.

melissaesplin-zero-budget-project-bedroom-art-4

The ribba frames come with these pre-cut mats, I didn’t use any of them for the artwork on display so I sandwiched an engagement photo of ours in between two of them using a flower frog (from Gather & Hunt).

melissaesplin-zero-budget-project-bedroom-art-5

I didn’t go with any specific style or color theme with this gallery, and I like it that way. I went with pieces that I liked and tried to arrange them in a way that would make them balanced.

melissaesplin-zero-budget-project-bedroom-art-6

melissaesplin-zero-budget-project-bedroom-art-7

I believe I made 5 pieces specifically for this gallery, it was a much-needed exercise to bust out the watercolors. Details on each painting after the jump.

(more…)

mobile site