I’m over at Whimsey Box today, sharing how you can make a cheap target find into a crafty storage box.

And I bet you have most of these supplies already on hand!

Click here for the full tutorial.

 |
 |


I’m over at Whimsey Box today, sharing how you can make a cheap target find into a crafty storage box.
And I bet you have most of these supplies already on hand!
Click here for the full tutorial.
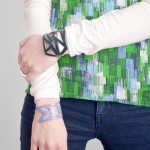
Not long ago, I was reminded of how fun it was to cut out leather into fancy shapes (much like my mom’s cookbook). Which spurred the idea of making some jewelry. I do love me some bracelets that don’t get in the way when I’m typing. I thought I’d share with you how I did it and a printable template for you.

Penelope sure loves wearing them, too. I’d love to see her start wearing more jewelry with me. Mommy daughter jewelry, how cute would that be? Let’s get started!

You don’t need a whole lot of leather for this project, a small scrap will do. I’ve used magnetic fasteners here and I love them, I don’t have to have any help or coordination in order to put the bracelet on!

Print out the template (two templates offered – angular and leafy) and cut it out and tape on leather. Be sure to tape all the way around the border.

Cut the cutouts first. Go slowly and try to remove any fibers from the corners.

Cut the border out and remove the template from the leather.

Punch a small hole in each end. I used the 1/16th inch hole punch from a craft store.

Put the leather piece around your wrist and measure how much chain you will need. Gather your findings and assemble the findings to the leather first. Then attach the clasp – especially if it’s a magnetic clasp. The magnets will stick to everything so it’ll make assembly more difficult if you do it the other way around.

Once you’re finished with assembly, wear with pride!

If you’re going to make the leafy one, you’ll want to take the two ends (pictured on the left) and attach them with one piece of chain in a v formation. attach the clasp to the middle with a jump ring. Enjoy!
Download the printable template below.

![]()
This post is brought to you by Baby Lock. Baby Lock is dedicated to the love of sewing by creating a full line of sewing machines all with ease-of-use, high quality and a touch of elegance.
Connect with Baby Lock on Facebook and TotallyStitchin.net.
![]()
I made a pillow today. I’ve had this idea rolling around in my head since I made leather bows out of this horribly tacky leather. It looked SO INCREDIBLY TACKY in store, but it was 99¢ a square foot (ridiculously cheap for leather) and I couldn’t help but think something cool could come from it. Something.

Then Celeste was telling me about her plans for her master bedroom ideas to incorporate purple. It’s really a lovely color that gets the boot all too often for it’s bad rep of being a tween girl color. It can be so much more than that.
 So I made her a pillow. I couldn’t resist, and I think it turned out lovely. The pictures show the leather being more blue than it actually looks like. I’m hoping it’ll work for her decor.
I used a pre-quilted broadcloth (similar) I found in my mom’s stash of sewing goodies she gave me a few years ago. It has a natural feel to it with little flecks of fibers here and there. I’m not sure what my mom had originally planned for the fabric, but it works perfectly for this purpose. I cut out the quilted broadcloth and leather, then made a straight cut around the 3/4 mark on the front piece and that’s where I added the two strips. I made the gold strip smaller than the purple one to balance out the glam and natural details. I used a leather needle here, but since I was sewing the leather to fabric, I didn’t use my walking foot. I just made sure to sew leather-side-down when attaching pieces together.
I topstitched the fabric side of the piecing to give it a crisp look, but felt no need to do that on the leather sides. I did press the leather, which makes it look really sharp. When pressing leather, you’ll want to cover with a pressing cloth (cotton sheet works fine) with the iron on med-high with low steam.
This kind of project is perfect for small leather scraps. Instead of piecing, you could applique! Leather edges don’t need to be finished. Have you ever pieced with leather before?
Here are some great envelope pillow tutorials: Envelope Pillow • Hidden Zipper Pillow
Like most years, I like to make as many Christmas gifts as possible. This year was much better than last. It’s been quite a bit less stressful this year than last (we were still settling into our last digs), but I tried to keep things as simple as possible.
For the kiddos, I adopted Gabrielle’s philosophy on gift giving. I didn’t make anything for them this year.

On my side of the family, we were in charge of giving to my younger sister and her husband. They’ll be heading up here from Tuscan to celebrate Christmas and pick up their new puppy. So I thought I would make something appropriate for that. I lettered their names in frames (they can easily swap those out for photos), cut out an ampersand and made a leather collar for the new dog, Reese. I made a little tag with her name on it, but couldn’t get it to attach to the buckle (hands too raw). Hopefully they can do that.

The ampersand is really hard to photograph, it’s clear 1/4 inch acrylic, but I love it. I actually made two so I can keep one and give the other away. (selfish much?)

On Chris’s side, I’m in charge of giving to my brother-in-law Steven and Chris was in charge of giving to my sister-in-law Rebecca. Steven just got his wallet stolen and absolutely loves bow ties so I made him a leather wallet (it’s really thin!) and a leather bow tie out of the same leather I used for the wallet. I tried to tie the bow tie and didn’t have much luck making it look good, but I’m terrible at tying fabric ones, I’m hoping he can get this one to look good. That was a bit of a gamble. He has also played a lot of guitar lately, so I got him Chris’s favorite guitar tuner.

Rebecca is a great sewer. She’s made some really beautiful quilts and clothes. Chris is a bit clueless in this arena so I took care of the present for him. This was fun. I made her an acrylic ruler and got her an etsy gift card.
What would I have done for the holidays without access to a laser cutter?! I want one all my own so badly.
How are your holidays wrapping up? What things have you made? Are you surprising anyone this year with something big? I hope all of you have a fantastic Christmas!

This post is sponsored by Art.com. Find your art and love your space with art.com’s prints and museum-grade framing.
Decorate with photos you love with Art.com’s Photos to Art (they have a sweet app for that, too).
![]()
Art.com provided me with the ability to take one of my photos and turn it into wall art. They print on canvas, paper, acrylic and can finish your new art with stretcher bars, wood panel or matte and frame. All this in a couple of clicks. They print art from 8×10 to 18×24, and you can print your photos straight from your phone using their new photos to art app (hello instagram pics!).

I took advantage of their canvas option, and it came out lovely. I was encouraged to choose something that had to do with travel. We’ve not really travelled much beyond visiting parents so I stole this image from my dad – my parents live in Charlotte and have so many fun adventures without us. Last time he came to visit, he told me about this serendipitous moment he had when the sun was setting and the geese were swimming across the lake at Cane Creek. Luckily he had his camera to capture this moment.

When the opportunity to take photos to art, my mind jumped directly to this as a Christmas gift for my Dad (the man who has everything and wants nothing). It’s perfect. See, he’s the one who taught me how to use a camera. Way back when, I was around 9 or 10, my parents would trade off Saturdays going out with us kids on “kid dates”. We could choose what we wanted to do. One weekend we went to the local Aviary and my dad taught me all about his SLR, an old Nikon 2020. There have been several quiet moments like that since then where my dad has supported and encouraged my love and interest of art. And I feel like in some very small way this print signifies my gratitude for his support.
The encouragement to choose a travel-related photo to turn to art sparked another idea: make miniature art pieces with luggage tags. So I decided to make a luggage tag with a miniature version of his photo. Perfect for a tree ornament! I’ll be using this as the gift tag for my dad’s gift.

These are really quite easy. You can make them with quality paper, felt, pleather or leather. Hang these with your travel photos with the names of places or hang them as part of a miniature art gallery. Sew these pieces together or use glue for a no-sew project!


Tape pattern onto one piece of leather. Don’t cut out the pattern perfectly and don’t tape inside of your pattern line. Punch holes for corners.

Cut out your window.

Attach second piece of leather suede sides together and sew. Bulldog clips work great. Be sure to use sturdy thread and a leather needle. Use a long stitch length (4.5 +) and sew about 1/4-1/8 inch away from the pattern’s edge.

Once you’re done sewing, cut away excess.

Punch out your top hole and remove top paper. It’s best if you use newsprint or a really flimsy paper to print out your pattern.
Measure from seam to seam and cut your artwork to size.


This tutorial or freebie is free for personal use and should not be distributed/republished without the express consent of Melissa Esplin. I love getting shout outs from around the web, but please, link with love. You may publish 1 photo along with credit back to the original post, do not copy instructions. Never link directly to the download. If you would like to use this tutorial or freebie for commercial purposes, please email me. Thanks!