Posts Tagged ‘leather’

Handmade: Girly Christmas Gifts

10 Comments

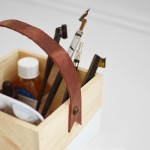
I love making leather crafts and accessories, as you may know (1/2/3/4/5/6/7/8/9/10/11/12/13/14/15/16/17/18/19). It’s a great material for long-lasting goods that look better with wear. It’s not terribly expensive, and especially affordable if you’re picking up scraps from a local upholstery shop (doing that is also very environmentally friendly – keeping good scraps from the trash).

But there’s no way to cut out leather quickly or perfectly without a few tools in your arsenal. I’ve found that cutting it with nice scissors, nice-side down gives a much nicer edge than cutting it regularly.

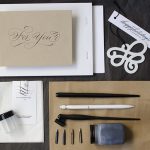
I was curious to see how the Epic 6/L Letterpress would handle leather, so I gave it a try using their knotty and nice kit. It’s pretty good. You need to work with 1.5 ounce leather or thinner, but that kind of leather isn’t too hard to come by. You’ll want to search for garment weight. Here are some suggestions:

pig splits | economy suede | gold lambskin | minelli sides | sheepskin

You’ll also want to remove the squishy padding from the die and add a piece of cardstock on top of the leather. It helps cut the leather all the way through. Even if it didn’t cut the leather all the way through, it was easy to finish my job with scissors. At least the die left a nice embossed edge along the top.

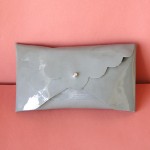
The top leather is a lambskin and the bottom is a cheap decorative suede that I found for 99¢ per square foot. It’s pretty ugly as a hide, but after making it into a bow, I’m liking this a lot more. I love how the gold peeks out of the inside of the bow.

With the one die cut I made a pin, a hair clip, a fascinator and a pony holder. I’m pretty stoked about using these. Penelope is, too.

I was unsure how a necklace would work or if the bow would stay in place, but because it’s made out of a heavier leather, it lays quite nicely. I made 7 bow-related accessories in about an hour. A great bang for your time/buck if you’re doing gift swaps this year, or planning out a bunch of girlfriend gifts.

I couldn’t resist putting this bow in Penelope’s hair this morning. She loves it. She also loves her new thrifted “saved by the bell” glasses.

Or is that an Erkel reference? I can’t quite remember. But they’re hilarious and awesome.

Now to figure out how to make my own custom dies.

*This post is not sponsored. Product provided by Lifestyle crafts.

Handmade: Triple-Wrap Magic Braided Bracelet

2 Comments

So I serve at my church in the young adult program for girls 12-18. Over the weekend we had a special annual program focusing on the things that they have done to further their strength in core values and principles. To celebrate the women who have finished the value program, we as leaders gave them a couple of special gifts. I hand-lettered and framed “I can do hard things.” and made them each magic braided bracelets.

I used the template I made for my magic braided bracelet tutorial, but lengthened the template times two. I used some blue leather I had on hand (also seen here) and button studs. I liked how they turned out so much I made an extra for me. I can’t wait to break it in. Wanna know the best way to break in a new leather bracelet? Shower with it on!

The blue is so pretty, I’m looking forward to pairing it with my recent jewel-toned finds.


Sponsored Tutorial: Tribal Leather Vase

8 Comments

This post is sponsored by Art.com. Find your art and love your space with art.com’s prints and museum-grade framing.

Follow Art.com via Pinterest to discover new artists, beautiful artwork and exclusive news.

This month Art.com is focusing on Americana. Let’s talk about that movement for a minute. Americana is one of those many-faceted movements that tends to get pigeon-holed into one very specific thing. When I was younger, Americana was to me a specific distressed style with stars, stripes, dusty blues and muddy reds, and Norman Rockwell front and center. It’s more than just that. America is a melting pot of a million different cultures and histories, and its art movement is indicative of that. My favorite part of Americana showcases the history and culture of the West. It’s my blood. I have Apache on my dad’s side (the cheek bones are a giveaway, no?) and my great-great-great grandfather on my mom’s side settled Salt Lake city.

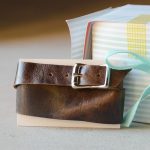
You can see how vastly different each piece above is from one another. But each tells stories of my personal history, so they work together. Any one of these would look fantastic next to my leather piece, a tribute to the connection I have on both sides with the southwest and Native American cultures.

The Golden Nugget by J.R. Eyerman reminds me of fond memories of visiting family in Las Vegas. I hated the smoke-filled casinos, but I loved gawking at all the beautiful type and bright lights. It was also in Las Vegas that my Grandfather struck out on his own (at 15!), which was a huge turning point for him.

The skis by William Swartz  represent my fond memories in Park City, Utah. My grandparents had a condo and it was SO seventies ridiculous. It was decorated to the brim with old ski posters, macrame and shag rugs. I remember getting snowed in one weekend where we spent an entire day trying to skis with equipment identical to the image above. It was impossible!

The aspens by William Hook remind me of driving and hiking in the canyons on Sunday evenings with my family.

Another facet of Americana is craftsmanship. Art.com wants to showcase their amazing framing craftsmanship this month as part of their Americana theme. Their framing craftsmanship is really amazing. You can see for yourself in Art.com’s craftsmanship video. I got goosebumps the first time I watched it.

Do you have any Americana in your home? Would you like to make some with me? Follow the instructions below to make your own 2-d leather sculpture.

Tribal-Inspired Leather Sculpture

Supplies:

  • 2-3 ounce veggie tan leather
  • ink, fabric paint or sharpie
  • sharp scissors
  • brush
  • pencil
  • tape
  • template
You can find leather at Tandy Leather or on Ebay. Use the above search terms to find the right kind. You don’t have to use paint, you can use a sharpie instead. I felt like paint was more legit.
(more…)

DIY: iPhone 5 Case 4.0

8 Comments

Chris got his first iPhone back in 2008 when the 3 came out. As soon as he brought it home we made him a case. Somehow I never posted about that case, but he’s used it for the last 4 years. It even worked with his most recent 4 (which he’s selling, btw). That leather case protected the phone so well! Looking at Chris’s old iPhone 4, you can’t see a single scratch on it. Serious.

So naturally we had to make Chris a new leather case for his iPhone 5. This time I’m going to share it with you, along with a pattern so you can DIY your own. I’ve made a few iPhone cases in my day. Chris’s first one, iphone case 1.o, 2.0 and 3.0. Now this one. 4.0?

I gave the 3.0 case I made to my brother-in-law, and I think Chris was a bit jealous of the wallet functionality of Eric’s case that he wanted it in the new one. We did it slightly different this time. The case has two compartments; one for the phone, one for the money. They’re both the same size, but one has a lever mechanism to allow for the cards to easily go in and out of the case effortlessly. Pretty clever, right?

It’s just a piece of riboon with a leather pull at the end.

So far Chris has had the case for a few days and it has its flaws. The pulley isn’t working out as flawlessly as I had hoped, but Chris hasn’t given up on it yet. Once we solidify something awesome, I’ll share it here. Promise.

DIY: No-Sew Door Muffler

9 Comments

Thanks for all of your encouragement last week. It was great to hear that I’m not the only one who gets ornery when I don’t get enough done in a day. One reader suggested that I make a door muff after hearing about Penelope’s bad habit of slamming doors. I though it was a pretty brilliant idea. And it works flawlessly. Penelope can try to slam the door all she wants, she’s not going to wake sleeping baby Felix.

I’m sharing the full how-to (along with a printable template) over at Make and Takes. I’m an official monthly contributor over there now, and I’m excited to share my first post!

CLICK HERE FOR THE FULL TUTORIAL

mobile site