Posts Tagged ‘Blowfish’

Draw It Sew It: Slouchy Hoodie

5 Comments

The slouchy hoodie won last week by a land-slide. Are turbans not cool anymore? I still want to make one, like a legit one. I’ve got the perfect light-weight white with black pin-dot scarf fabric for it.

Constructing this hoodie was not terribly hard. I didn’t use a very easy fabric, and now that I look at it, I would’ve done so many different things with the fit and finishing details. Live and learn, right?

istillloveyou-sewing-slouchy-hoodie-1

Chris says I look like a Sith Lord. A girly one. 

I used my hand-drafted cardigan pattern, raised the rise of the neckline (to about a t-shirt height) and added a hoodie. The hoodie was pretty easy to draw out, I just measured the neckline and accommodated the seam allowance.

If I do this again I will:

  • take the shoulder seam in
  • make the sleeves looser to create more of a bishop sleeve
  • draft a taller hood
  • finish the seams around the hood and the front with bias tape or twill tape for a cleaner finish

istillloveyou-sewing-slouchy-hoodie-2

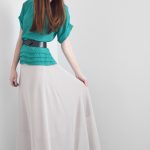
I had just about a yard of fabric, fabric I scored while digging at Michael Levine loft (similar here and here) and I used every square inch. It’s incredibly soft, but not too difficult to work with. I love the transparent stripes! This kind of hoodie is perfect for cool summer nights, and will get some great use in San Francisco!

istillloveyou-sewing-slouchy-hoodie-3

We get our fair share of cool summer nights on top of our mountain. We always seem to have a breeze, and the cool canyon air seems to come our direction at night. It’s marvelous. A lightweight hoodie like this is perfect for all of the cool nights and days we get here.
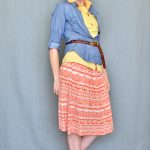
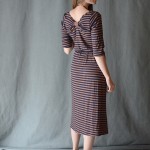
istillloveyou-sewing-slouchy-hoodie-4

Outfit details:

istillloveyou-sewing-slouchy-hoodie-5

I’m wondering what I should do next. Pants? A legit pair of pants are on my bucket list of things to master. Cobblery is too, but that’d be part of a completely different series.

Peplum Top Refashion Tutorial

22 Comments

You asked for it, so here it is. I was a little lazy and decided to show this as a refashion instead of making something from scratch. The nice thing about this being a refashion: no inserting sleeves, no hemming necklines, no hemming sleeves and no need for a serger. If you’re constructing a basic tee from scratch, you definitely want one. If you’re adding a peplum? No need.

istillloveyou-sewing-peplum-top-refashion-tutorial1

I just took a simple top from my drawer ($5 at Kohls or something?) and matched it as best I could to fabric I had on-hand. After the fabric mother-load two weeks ago, you better believe I was going to find it in my stash. No fabric shopping for this girl for some time to come!

istillloveyou-sewing-peplum-top-refashion-tutorial2

The refashion was easy enough to pull together. After drafting the pattern, it took just over an hour to complete it. I could’ve finished it faster had I not been distracted by tv shows.

Outfit Details

  • top: Kohls, refashioned
  • necklace: Forever 21
  • pants: Target
  • shoes: c/o Blowfish

istillloveyou-sewing-peplum-top-refashion-tutorial3

I think I would prefer the pattern to be reversed, stripes up top and the solid as the peplum, but it’s fun and funky. I’m thinking I may wear this to my 10 year high school reunion on Saturday. Or maybe I’ll sew up something completely new. Wait. What? Ten years has flown by so fast!

Click the button below for the full tutorial!

istillloveyou-sewing-peplum-top-refashion-tutorial4

(more…)

Tutorial: Color Blocked Wiggle Skirt

22 Comments

This post is part of the Stretch Yourself Series hosted by Miriam of Mad Mim and Miranda of One Little Minute. You should check out their series if you haven’t already. It’s a very thorough series on the ins and outs of sewing with knits.

Today Heather and I are sharing how to color block with knits. It’s really so easy. Promise.

When asked to participate in Mim and Miranda’s knit series (specifically the color block part), I immediately thought of these shoes. They’ve been circulating the interwebs recently, and I haven’t been able to get them out of my head. So I thought I would translate those shoes to a skirt.

I told Chris this was my business in front, party in back skirt.

We’re only doing it on one side, and we’re doing it with stretchy knit so it’s a lot more forgiving than you might think. Here’s how you can make your own:

You’ll need a stretchy base knit, something that has 40-60% stretch. The gold knit you’ll just grab some gold lame or swim material. It’s got good structure and stretch. You’ll also need pencil, large paper, scissors, seam ripper, pins, ruler and a sewing machine.

Make your measurements. Measure where you want your skirt to sit along your waist, measure your rise (distance between waist and hips), hips and skirt length.

Draft up a quick pattern using the above measurements. This is for 1/4th of your skirt. Since you’re using a stretchy material, we won’t worry about seam allowance.

Now we’ll cut out the material. It’s best to lay it out on the ground and weigh the pattern down on the fabric with bowls, cups and other weighty objects. Cut out with scissors or rotary cutter. Cut your gold piece just a little bit bigger than the bottom of your skirt.

Take one skirt piece aside and lay it on the ground right side up. Lay the gold fabric right side up about 3/4 inches below the hem. Grab your ruler, lay it down and cut through both layers.

Now you have your two pattern pieces cut at the exact same angle! Ready for piecing.

Lay the pieces right sides together, and stitch. Iron seam flat with a cool iron.

Line up front and back pieces right sides together and sew, using a 1/2 – 5/8 inch seam allowance.

Finish the hems: Roll hem with a serger, cover stitch, zig zag or double-stitch your top and bottom hems. Be sure to use a stitch that allows for stretch!!

Outfit details:

  • top, earrings and necklace: H&M
  • skirt: handmade
  • shoes: c/o Blowfish

Now rock and roll!

Refashioned: Double Felled Trousers

11 Comments

I love these pants. My father-in-law got them for me not long after I had Penelope. They’re high-ish waisted, so they’re perfect for flattering a mom body. I wore them quite a bit, until they shrunk.

My sister borrowed them while I was expecting Felix, and I think (not sure) that she may have put them in the dryer at some point, because they came back about an inch shorter. When it comes to a wide leg trouser, that makes a huge difference. I could no longer wear them with heels, and wearing them with flats made me feel like my legs looked stubby.

They were in desperate need of a makeover. They are nice jeans. Hello, Anthro. The problem with them is the fact that they’re double felled on the side seams. DOUBLE FELLED. there was no way I was going to unpick crazy felled seams to take them in.

So I made darts. I lined up the seams and laid out my favorite pair of jeans on top and marked out my darts. The refashion ended up taking 2 hours instead of 6. I’d say that was a win. They’re at about a cigarette width at this point, but I may have hemmed them too short for that, so I think I’m going to go back and make them more of a skinny jean.

Yay for a new pair of pants! I’ve been whining to Chris about how I only have 2 pairs of jeans that fit. Now it’s three.

I think if I actually exercised I could fit into my old jeans again, but I’m just too darn lazy for that.

Outfit Details:

  • top: handmade
  • pants: Anthropologie
  • shoes: c/o Blowfish

UPDATE: I couldn’t stand the cigarette pant with that length for long. I just skinnified them. AHHH, much better!

Style: House Dress

8 Comments

No make up yesterday. We ran serious errands so I just wanted to be comfortable and cool. I love this stretchy belt. It gives my dress shape, but because it’s an elastic belt, it breathes and is far more forgiving than my other belts.

dress: thrifted + refashioned

belt: thrifted

bracelet: handmade

shoes: c/o blowfish

mobile site