Posts Tagged ‘materials’

Sakura CAC Neons & Metallics Review

0 Comments

Hey friends!! Welcome here. I’ve got 3 upcoming workshops this summer (more in the works, fingers crossed). I hope to see you there!

Beginning Brush Lettering Workshop | DRAPER, UT | JULY 19

Learn brush lettering based on more traditional foundations and how to manipulate those foundations to write some funky letters! All skill levels welcome, but it is geared more toward beginners. Lefties welcome!

Eventbrite - July 19 Brush Lettering Calligraphy Workshop


Penmanship Workshop | PROVO, UT | AUGUST 16

Learn the art of beautiful penmanship and how to harness your own style to tell your story. This is perfect for beginners, lefties and future brides! We’ll go through foundations, style and how to address an envelope. 

Eventbrite - Beginning Cursive Penmanship & Letter Writing Night


2-Day Brush Lettering/Digitization Intensive | NASHVILLE, TN | AUG 25-26

Join me in Nashville for a whole lot of fun with a 2-day lettering intensive with the pointed brush. We’ll dig deeper than in any other class in the two days. We’ll go letter-by-letter through variant options, work on word and compositional structure and style structure. At the end of the class, we’ll work on the beginning essentials of digitization by making our own personalized stamps with our artwork. All skill levels welcome. 

Paperinkarts - brush lettering event august 2018

I hope I can see you at one of the above workshops this summer. We always have a blast and I try to pack as much information as possible so you leave the workshop motivated, empowered and ready to continue your calligraphy journey.

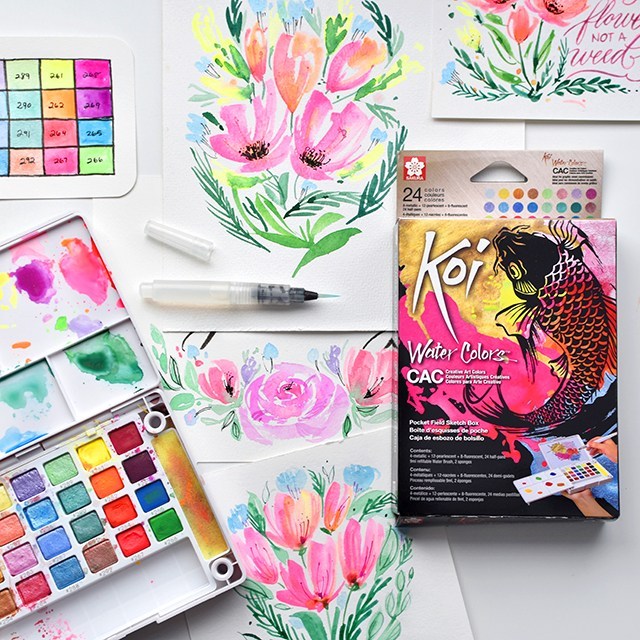
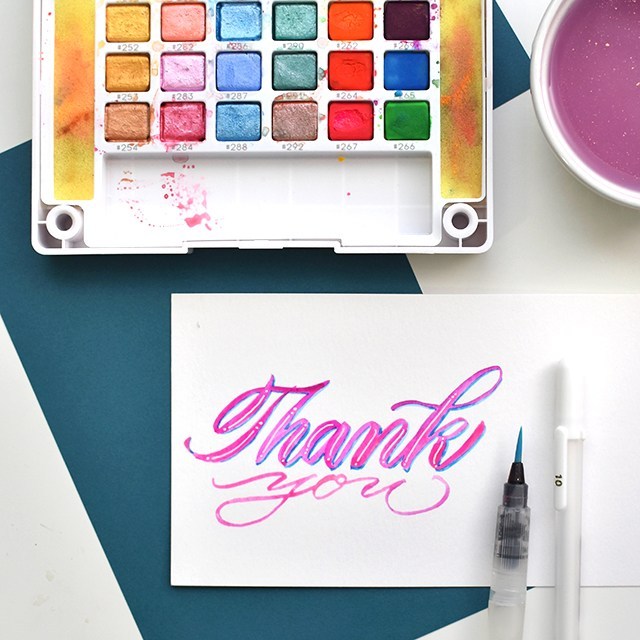
Sakura sent me their BRAND-NEW CAC (Creative Art Colors) 24 pan watercolor set to play around with. It’s just like their regular 24 pan field sketch set, but with nothing but neons, metallics and pearlescent colors. Uhhhhhhmmmmmmm yes please! I love how bright these pigments are and it’s a real pity that they’re not captured fully with these photos. The colors just JUMP off the page. So I made a review video (above). Give it a watch or you can scroll down below to see the pros and cons list:

Pros:

  • SUUUPER bright pigments
  • Smooth blending (even with regular colors)
  • Zero chalkiness
  • Portable size palette
  • Generous wells for mixing pigments
  • Shimmery pearlescents

Cons:

  • Student grade
  • Not lightfast
  • Metallics not opaque

I feel like I need to give explanation to the cons. It’s a bummer they’re student grade and not artist or professional grade, but they out-perform any student grade pigments I have in my studio as if they were artist grade. So bummer, but not a deal breaker.

The neons especially aren’t lightfast at all. But you’re not going to find light-fast neons anyway. Just be aware that they’re not lightfast so you’re not displaying your work where it gets direct sunlight.

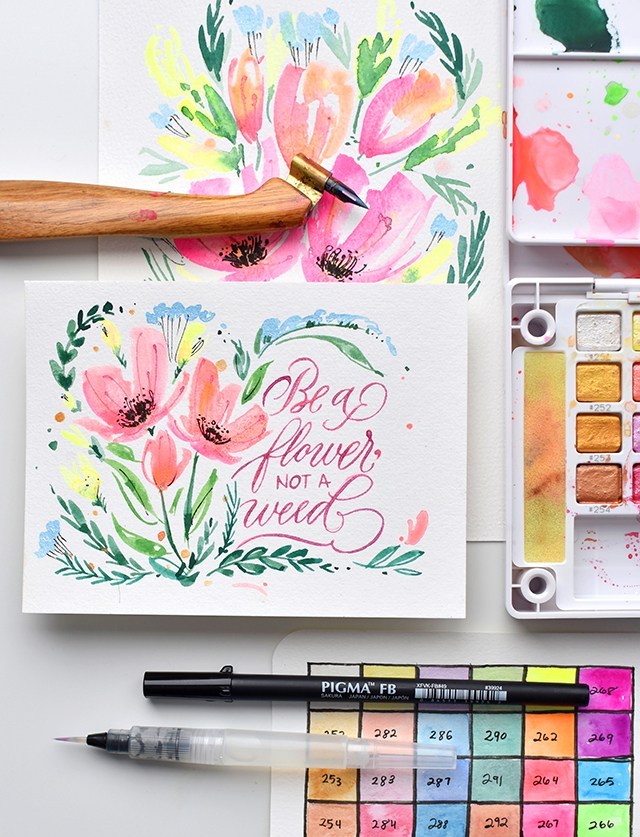
I personally like more opaque metallics. Don’t get me wrong, these metallics are beautiful, but if you’re going to try and do fine linework like use the pointed pen with the metallics, you’re not going to get the opacity you need to get the metallic to jump off the page. You’ll want to switch over to the pearlescent pigments for pointed pen linework. The pearlescents have watercolor pigment and metallic in them so the pigment soaks into the page while the metallic shimmers at the top of the page. It’s lovely.

Overall: I really love these watercolors! They’re really great! I hope you give them a try some time.

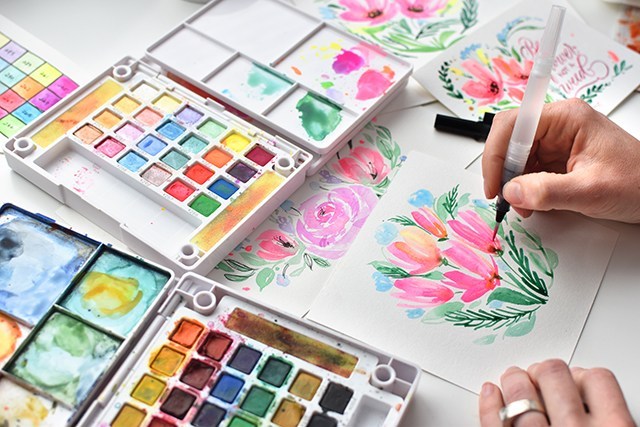
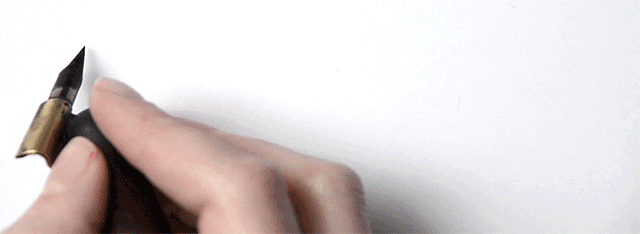
I’ve been using the medium waterbrush that came with the kit, but then also adding in fun details with the Gillott 404 to bring in those finer details. It’s a lot of fun to bridge the gap of brush lettering and pointed pen modern calligraphy with this neon set. Overall, I’m a fan. 

Sakura of America provided me with the materials for this review. All opinions are my own. Affiliate links are used, your support by purchasing through these links supports more content like this! 

The Right Calligraphy Materials

0 Comments

One of the many draws to calligraphy as a hobby is that it’s a desktop craft. It can take up as much space as a simple shoe box. Or it can take up several rooms. But the shoebox is where it starts. It’s not like skiing where you have to get the skis, and the boots and the bindings, and the pants and the jacket and the gloves and the poles and the goggles and… and… and…

learn-calligraphy-pen

Getting into calligraphy can be as simple and cheap or as expensive and elaborate as your budget allows. There are fabulous materials in every price range. Let’s break it down into 3 price ranges, shall we? This post has been created with affiliate links, but I strongly recommend ordering through Paper & Ink Arts regardless. They have fabulous customer service and tons of amazing calligraphy-related products.

ON THE CHEAP

You really can get great materials without spending a pretty penny. But there are a couple of caveats that go with going bargain-basement. Once you understand the limitations, you can better enjoy the cheap-o supplies.


Ticonderoga pencils are smooth and cheap. Easy to find as well. But you have to sharpen them by hand. That’s a bit of a bummer.

The bargain nibs listed are wonderful! However, one or all may not be ideal for your particular style or touch (nibs are like boyfriends, you might not like some and that’s okay). These nibs listed are guaranteed to be easily found at most art stores and will fit your Speedball Universal Holder. The Zebra G, Nikko G and Tachikawa G are great beginner nibs, but do not fit in the universal holder. You may be able to make it sort of work, but the orientation isn’t going to give you stable results.

I use the lacquered straight holder quite frequently. It’s great, but DO NOT get wet or the wood will split. The pen is still functional after the wood has split, it’s just less comfortable.

Higgins Eternal is a great ink! The consistency right out of the bottle is easy to work with and it’s not terribly corrosive to the nibs (just a teeny bit corrosive). The bottle is prone to leaking (don’t let the bottle freeze or it definitely will leak) and the ink doesn’t work on all paper types.

You may see some feathering and bleeding with Higgins on the Hammermill paper. You can still get great practice in regardless of the feathering ink, but if you see yourself being bothered by the feathering, try a different paper (see other paper options below). The Hammermill paper is great for beginners as you can easily print out guidelines directly on top of the paper and you can buy in reams for those heaps and heaps of initial practice.

melissaesplin-waterproof-calligraphy-inks-2

Mid-range investment

If you’re in a spot to splurge a little more, get the mid-range materials and the bargain basement materials (like the nibs, ink and paper).

Canson Marker Layout Paper is semi-transparent and handles ink well. I like to print out my guidelines and slip them underneath the paper. It handles all inks well.

Using a mechanical pencil is convenient since you don’t have to sharpen the lead, it’s great for practicing in pencil and laying out compositions.

Peerless oblique holders are a little more expensive than the Speedball Oblique, but you can get them fitted to the larger nibs listed above. Those larger nibs are great for beginners and heavier hands, with the exception of the Leonardt Principal, it’s just a great nib to try.

The straight holder is going to be a little more water/ink resistant since it’s made with a slightly harder wood.

Sumi ink is super black, so you get nice stark lines. It takes forever to dry so I like to mix it with water, Higgins Eternal or Walnut Ink to dilute it.

melissaesplin-christmas-calligraphy-workshop-online-learning-3

 Highish-end Investment

I say highish-end because this isn’t the highest end. If you want to go all-out, you’re getting everything on all these lists list, gold inks, a custom turned holder and on and on. The sky is truly the limit on what you can spend on calligraphy materials. But that’s a different post (here is a gift guide for splurging) for a different time. But when it comes to just starting out, these materials listed are going to get you there with the least amount of frustration. But you may notice, there’s not a huge difference price-wise between the cost of materials in the budget end and the highish-end.

Rhodia paper handles all kinds of inks. I use gridded paper because guidelines are already printed on there. The walnut ink is silky and smooth (it also ships well because it comes in crystal form that you dilute with water) and gives you just a little bit of transparency and fast drying times.

The copperplate sampler is a wide range of nibs you can try out every one and see what suits you best. The adjustable oblique will fit any of those nibs. The mahogany straight holder is made out of a hard wood (obviously) that does well for pointed pen work. It’s also gorgeous.

So there you have it. You want to get started with calligraphy? Stock up on any of these things.

Want it all done for you? Purchase the Calligraphy.org kit. And heck! While you’re at it get the calligraphy class, too. The class includes lifetime access to the content (which gets new content annually) along with 30 days of instructor feedback. And it’s not just “great job” or “awesome”. We tell you what’s working well, what you can improve and give you bonus materials to help you keep going and troubleshoot.


A Few Of My Favorite Calligraphy Things

3 Comments

We have had our fair share of travels these days. Between partying in Vegas with Calligraphy friends, Disneyland with the kids and a Phoenix Calligraphy workshop I’m happy to be home. And I’m tired. One of the many reasons why I haven’t updated this blog in some time.

I hate the silence! Let’s fix that. :)

melissaesplin-learn-calligraphy-envelopes-2

A couple things I’ve come to obsess with over the last couple of months:

melissaesplin-learn-calligraphy-envelopes-4

In the above image I used Jacquard’s Lumiere Halo blue gold for the “Local Calligraphy Workshop” lettering. It’s one ink and the golds and blue swirl around to create this fun dance with color.

In the envelope below, I did an ombré with dioxazine purple and turquoise blue gouache. It’s more obvious in person, but the gradation is fun. And I also used the lettermate for writing guides on that envelope.

melissaesplin-learn-calligraphy-envelopes-3

You can subtly see the clear glitter gelly roll pen on the above card. It gives things the subtle hint of shimmer. I like to do swirls, but I don’t worry if they’re perfectly balanced or executed, because you really can’t see them that close when you’re looking at it in person.

In the ‘thank you’ I’m using that jacquard lumiere ink. It’s got to be diluted with water a fair amount. Mix regularly and apply with a brush, but it’s great.

I’m also using little bits of glitter glue for little dots of sparkle. I have one in every color except orange. That needs to change soon. I need ALL the colors!

melissaesplin-learn-calligraphy-envelopes-1

Here I’m using Jacquard’s Pearlex super bronze powder. It’s hard to convey through a picture alone how bright the metallic is. It’s mirror-like in some lights! I love it! Mix with gum arabic and water to make a useable ink.

melissaesplin-learn-calligraphy-envelopes-2

I’m using the Lettermate directly on the envelope to write the above envelopes. The top one I letter without ascenders or descenders then I take off the template and pen them in afterward.

With the Scratch envelope I wrote Franky Scratch by hand, let it dry then used the Lettermate for the address below. I added an excessive amount of flourishes between each line when I finished.

What are your favorite calligraphy things right now?

If you have no idea what I’m talking about and would like to get into calligraphy, take my class! I teach year-round at istilllovecalligraphy.com. Purchase the class and starter kit right here.

This post contains affiliate links for products I own and love. Using these links help support my craft habits. Thank you!
mobile site