Posts Tagged ‘diy’

Alternative Valentines: Cutie Tag Freebie

2 Comments

Last year I had this darling idea (I’ll share next week), ordered a bunch of things 3 months in advance and they never came. So, day before Valentine’s I was scrambling to do something a little out-of-the-box that didn’t involve candy. 

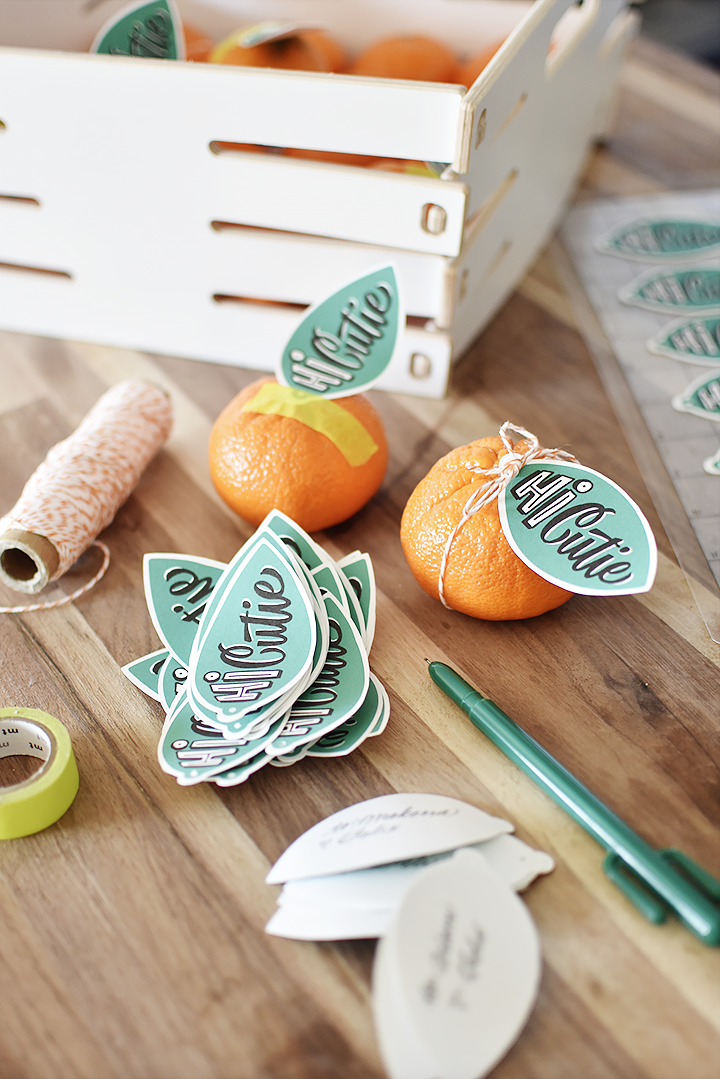
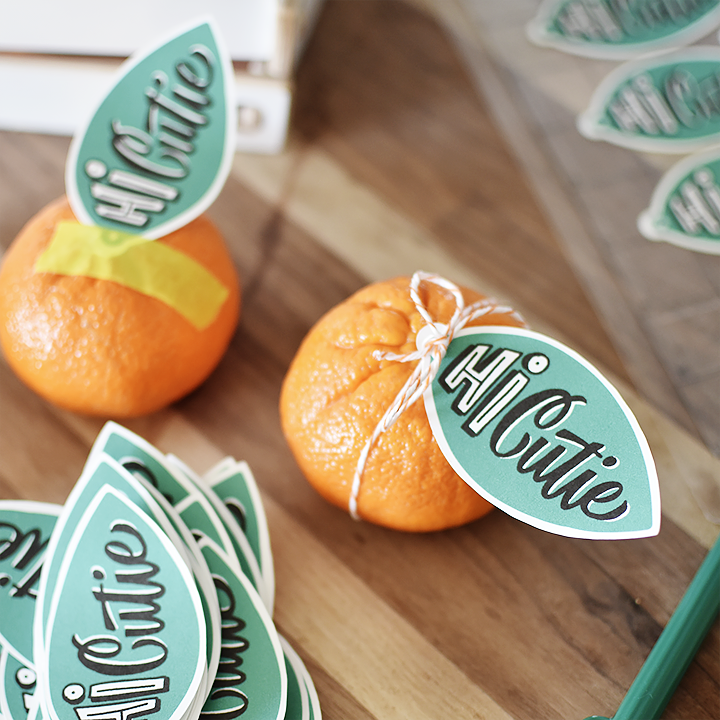
I drew the design in Procreate on my iPad Pro and then exported it to Silhouette where I printed and cut all of the tags. I had Penelope put her name on all of hers, but Felix needed a little bit of help. It was easy, and the kids absolutely LOVED it! I didn’t know if fruit would be an acceptable offering for grade school kids, but apparently it was just perfect. PHEW!! 

I didn’t realize I forgot to share the printable here until a few weeks ago, so here you go. And hopefully this year’s 2019 printable won’t take me a year to post. ;)

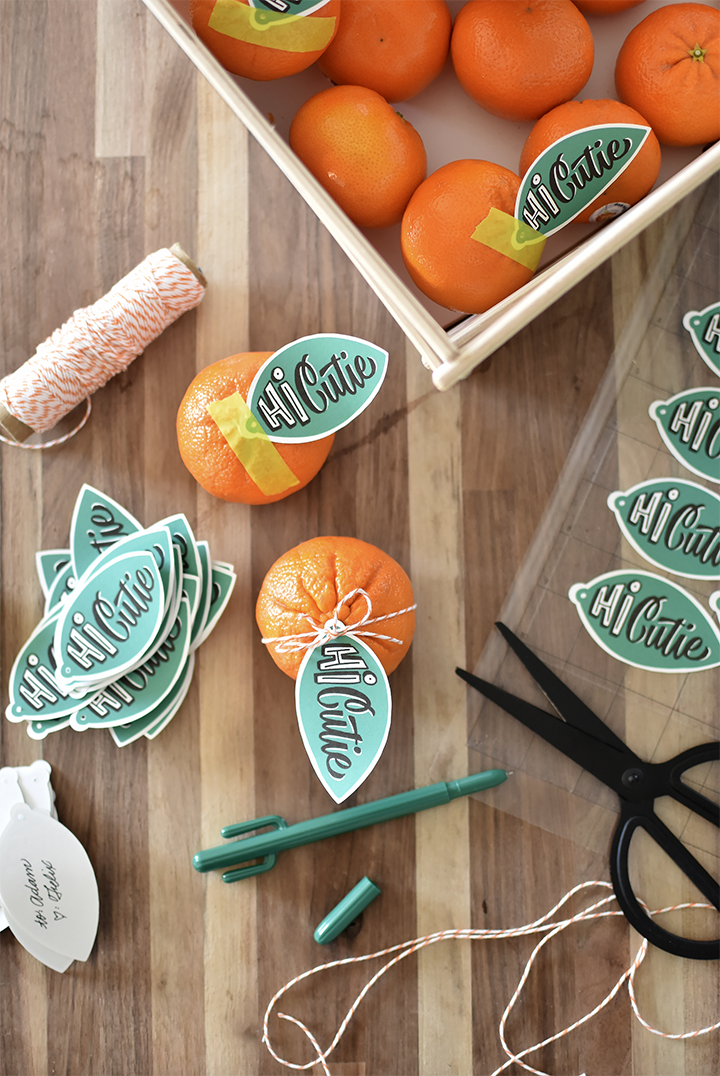
I kept the shape simple enough that if you don’t have a Silhouette cutter at home, you can easily just cut around the outside with scissors. You don’t have to get a perfect cut in order for them to look darling, either. 

CLICK HERE TO DOWNLOAD THE PRINTABLE (SANS SILHOUETTE MACHINE)

Now if you’d like to use a Silhouette machine to cut them out for you (because why would you not) see the link below to download. 

SILHOUETTE STUDIO FREE PRINTABLE
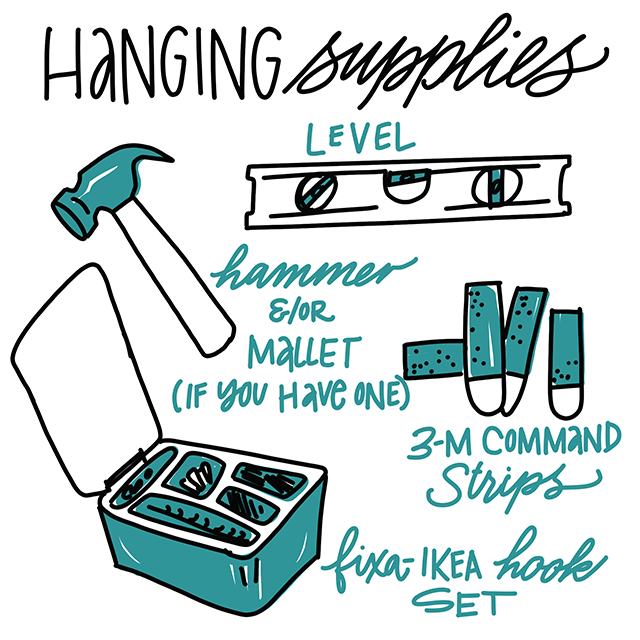
MATERIALS USED

Did you print it out? What did you think? Tag me @melissapher if you do! I’d love to see how they turned out. 

This freebie and the artwork associated with this freebie are yours to use for personal use only. Any alteration, redistribution or selling this work without my permission is prohibited. Thank you! Affiliate links used help support this website. Thank you for your support. If you have any questions, feel free to comment below or email me directly melissaATmelissaesplinDOTcom

How to Hang a Gallery Wall Vignette

0 Comments

I’ve wanted to share this with you for some time now. Creating gallery wall vignettes with a wide variety of artwork and found objects is what my house is made of. Just a couple weeks ago, Hayley and I set out to hang artwork on the walls of our entertainment space in the new kitchen. Over the next few months, I’m going to share with you the updates that we’ve made over the course of the last year (still ongoing :/). So to kick it off, I’m sharing with you the process I use for hanging artwork on the walls. 

I love taking medium to small sized blank walls and create little galleries with a wide range of artwork and objects. I hope this can serve as inspiration and motivation to get your creative side going and hanging some artwork!! 

As an introduction, this space is quite the multi-functional spot. We dine and craft and relax in this space. We have no formal dining area, so I wanted to tone down the gigantic black box in the middle with some lively artwork and clean up the bar from the artwork I had piled on there so we could use it as a buffet when company comes over. Getting the art from the counter to the walls really cleaned up the space so much. So let me take you through the space….

So let’s get on to hanging artwork! 

These are my must-have tools for hanging art work. 

I really love the above hangers. They’re really stable and great for heavy pieces, especially if you’re not hammering into a stud. You can find these at home depot, but they’re in various sizes in the Fixa set. Seriously, $5 very well spent there. I’ve had that little set for a couple of years, and it’s well worth it. It’s self-contained which makes it easy to keep from the children “playing” with the materials.  

Finding ways to unify pieces is great. Sometimes if you have a variety of styles that you want to bring together (like, for example, family portraits in a wide range of eras and styles). But hanging artwork on every wall in your house in the exact same frames gets really stale. So start collecting art and objects in a wide variety of sizes, shapes and frames! This is where being a little scatter-brained and ADHD comes in handy. 

Collecting a variety of prints, original art, found objects gives you lots of variety, texture and depth. But by having a variety, you need to find ways to bring back unity. 

Grouping pieces together that have similar color schemes and making sure that art is spaced evenly brings in consistency that the eye enjoys. 

HOT TIP: if you stand back from your grouping (whether on the wall or the floor as a mock-up), defocus your eye. You’ll see what spots are visually more heavy and where to add pieces. 

Gallery walls don’t need to fit into a tight rectangular shape. As you’ll see from the grouping on the top right hand side, that it peeks out of the rectangle, but it takes up roughly the same negative space as the tighter grouping on the left. 

So what do you think? Will you be hanging art vignettes on your walls any time soon? 

Best Tooth Fairy Ever

0 Comment

We have a killer Tooth Fairy. Not in the creepy horror film way, but in the OMG-she-totally-knocks-it-out-of-the-park sort of way. She’s amazing. Not to toot her horn too much, but she’s a darling little 6″ sprite that writes the sweetest little love notes to Penelope. They even have occasional back-and-forth correspondence that’s total cuteness overload. 

We don’t have many ridiculous or time-intensive traditions at our house. Really, we don’t have many traditions at all. But this is one that really jives with our family core values. It’s creative. It’s cheap. It makes my children’s childhood magical. 95% of the time the Tooth Fairy has her act together, but some times she’s busy. And she gets the tooth the next night. But she usually includes a very heart-felt apology in her little love note the next night. 

Cute dress from the ever darling My Sister’s Closet

I age restricted the video in case little eyes come across the video. Let me know if that’s an issue. I’m still pretty new to this whole YouTube publishing thing. Click on over to YouTube if you’d like to subscribe to my weekly videos. Content includes creative art-related DIYs, art material reviews and lettering/calligraphy time-lapse videos. I’d love it if you subscribed, but you do you. ;)

So here’s what you need: 

Knowing calligraphy isn’t an absolute must*, but it certainly helps. ;) I can teach you how. 

Since I have a Silhouette machine, I downloaded an envelope template from the Silhouette design store and resized to my liking. The final envelope size is somewhere between 1″-1.25″ wide. The letter is about 3/4″ wide and 1 1/2″ tall. So these letters are TINY! It’s what makes them so fun. If you’ve got a Silhouette, resizing an envelope template and cutting out on your machine is easy-peasy. I have cut out envelopes by hand before. Not the most fun thing in the world, but also not the most time consuming thing ever, either. 

The paper listed above handles ink really well. If you’re using a very fine point pen (Sakura has .003 micron pens that will give you a ridiculously small point), then any kind of smooth paper will do. 

If you’re using pen & ink, the Modern nib alternative to the one in the video (the Leonardt Principal) will get you a nice fine hairline. Make sure you use a fine ink as well. I prefer walnut as it’s easy to use and it doesn’t corrode your nib like iron gall inks do. 

Once you’re done with writing your note, fold up the note to fit inside the envelope. Wrap the envelope flaps around the note and seal with a wax seal. You don’t have to glue the flaps closed because the wax will do the work for you. I use wax seal wax and a drill bit to make a fun imprint. 

Then grab your dollar bill and fold it into something exciting. These are my favorites out of the ones I’ve tried:

Then tuck the envelope in one of the folds of the animals and you’re done! I’m sure it’s easier for the Tooth Fairy to slip a buck under the pillow and be done with it, but this is just straight up magical. Let me know if you end up doing this with your kid(s)!


Affiliate links are used. Your price doesn’t change, I get a small percentage of each sale from these links. All proceeds from affiliate sales goes towards making new videos like these. Your support is greatly appreciated!

Post-Holiday Thank Yous for Kids

3 Comments

Finally coming up to the surface after a very wonderful, but very busy holiday season. OH wow. It was great. My kids were spoiled, too. So, how do I include them in giving thanks for their massive haul of presents? They make the backgrounds and I make the cards out of them. It’s really quite easy. I made a video about it, but I’m sure you can figure it out on your own, though, too. ;)

SUPPLIES:

  • paper (I love this stuff, you can find it at Walmart usually for $5)
  • watercolors 
  • brushes
  • Sakura brush markers (they’re waterproof)
  • -or- a Thank You stamp/sticker (I made my stamp with the Mint)

No need to cut the papers down, give them to your kids and let them have fun! But not so much fun that they totally saturate the page with water and pigment. We need the paper to still have some integrity. So try (sometimes easier said than done) to pull the paper away and give them a new one to color once they have markings in all four quadrants of the page. Teach them how to splatter their paint (only if you have washable colors like crayola watercolors!).

Once you have a collection of pages from your kid(s), let the papers dry and cut the paper in fourths (5.5×4.25). Now add your Thank You phrase! You can write it by hand with marker or use a Thank You stamp (like this or this).

Now on the back, write your Thank You on the back on the left half of the paper. Be sure to leave room for your kid to make a mark, whether it’s a scribble or part of their name. Write the recipients address on the right half and stick a stamp in the top right corner. BOOM. DONE. Postcard postage is 34 cents now, so keep that in mind. :) 

I hope you get your kids involved in expressing gratitude with us! Let me know how it goes by tagging me on Instagram @melissapher. And if you’re looking to learn how to do that fancy-pants calligraphy on the front of the card, look no further. I teach brush lettering with personal coaching (one-on-one feedback that’s actually helpful) over at calligraphy.org. Hope to see you over there! 

*Affiliate links used for products I use and love.

Random DIY: Gigantic Yard Googly Eyes

4 Comments

If you’re here from KSL Studio 5, WELCOME!! I’m excited to have you here! If you’d like to join my next calligraphy workshop in Salt Lake City, click here to register. If you’d like to learn calligraphy online, click here instead. ;)

Here’s the link to the Studio 5 segment, in case you missed it. ;)

This DIY is too simple and hilarious not to share. Last year I bought some 7″ googly eyes from amazon and hung them on my willow tree in the front yard. It rained. The googly eyes fell apart. $7 down the drain. I think those googly eyes would have been great if I had used them inside, or if I lived in a climate that never rained or snowed during the month of October. :/ BUT this year I decided I needed to keep with the googly eye tradition and just make my own. 

And honestly, I don’t know why I didn’t make a million of these bad boys before. They’re easy and cost basically nothing. I had everything on-hand because, well… I’m a craft supplies hoarder. I didn’t have black cardstock, but I did have black lined writing paper, so I used that. You can cut out your own by hand or on a craft cutter like the Silhouette (which is what I did) OR you can print out the eyeballs from the template I’ve designed by clicking the download link below: 

(more…)

mobile site