Posts Tagged ‘tutorials’

TUTORIAL: DIY Ink/Paint Holder

0 Comments

I made this and shot pictures like 2-3 years ago. I just discovered it while cleaning up images on my desktop (which is a hot mess) and figured I would share. I’m sure it’s been done various other places, but I need to cross this off my list so here we go.

istillloveyou-calligraphy-tiny-dish-holder-diy-1a

I found myself wanting small jars for mixing custom ink colors in gouache (for calligraphy, but works for any aqueous media) and then tipping them over. Constantly. We replaced the flooring in my studio not long ago because of how horribly stained it got. Also, I hate carpet.

So I made this little ink tray. You may want to, too.

SUPPLIES

istillloveyou-calligraphy-tiny-dish-holder-diy-2

Cut down your block to 12″ wide. Sand the edges so they’re smooth to the touch.

istillloveyou-calligraphy-tiny-dish-holder-diy-3

Mark out every inch along the board with a pencil. Optional: create an indent with the tip of the screw so your bit won’t slip around as you start the process.

istillloveyou-calligraphy-tiny-dish-holder-diy-4

Measure how deep you want the drill to go and tape it off. This will allow you to have consistent heights when you put your jars in the board.

istillloveyou-calligraphy-tiny-dish-holder-diy-5

Drill away! Go slowly and make sure you’re in a well-ventilated area with protective glasses.

istillloveyou-calligraphy-tiny-dish-holder-diy-6

Admire your handywork!

istillloveyou-calligraphy-tiny-dish-holder-diy-1

Use the sticky tack to apply to the bottoms of your jars so they don’t move around. it also helps tilt the jars when the ink gets low.

This tutorial or freebie is free for personal use and should not be distributed/republished without the express consent of Melissa Esplin. I love getting shout outs from around the web, but please, link with love. You may publish 1 photo along with credit back to the original post. If you would like to use this tutorial or freebie for commercial purposes, please email me. Thanks!

3 Fun Things To Do With Bleach: Tissue Paper

4 Comments

3 fun things to do with bleach. The perfect last-minute craft you can do with your kids in-time for Mother’s day. Wouldn’t an artistic tee or apron be the perfect gift for grandma? Click here to see all the posts in this series.

melissaesplin-3-fun-things-bleach-tutorial-1

Jazz up some plain tissue paper with spritzes of bleach!

melissaesplin-3-fun-things-bleach-tutorial-10

Grab an old toothbrush, dip in bleach and spray onto the ends of the tissue paper. It works best on dark colored papers. I love black tissue paper. It works well for EVERY occasion.

melissaesplin-3-fun-things-bleach-tutorial-11

Allow paper to dry (2-3 minutes) before stuffing in a gift bag. Be sure to spray bleach in a well ventilated area!! If you’re DIYing with kids, make sure at least one adult is supervising at all times!

3 Fun Things to do With Bleach: Gift Tags

0 Comment

3 fun things to do with bleach. The perfect last-minute craft you can do with your kids in-time for Mother’s day. Wouldn’t an artistic tee or apron be the perfect gift for grandma? Click here to see all the posts in this series.

melissaesplin-3-fun-things-bleach-tutorial-2

The great thing about these posts is that you likely have everything you need for this project! It’s super fun to do and it’s exciting to see the message unfold like a polaroid picture. You just might be tempted to shake the tag as you wait for the design to dry.

  • Bleach
  • Round Brush
  • Scrapbooking Paper

You may need to have an assortment of papers to test to see if they’ll react to the bleach. My Mind’s Eye Heavyweight Cardstock did very well.

melissaesplin-bleach-paper

It’s easier to just show you how it works in a quick GIF. Dip the brush in bleach (straight bleach works well*) and write! You’ll see the paper change as it dries. Be sure to rinse the brush in water after you’re done.

melissaesplin-3-fun-things-bleach-tutorial-8

Create a bunch of reasons why you love your mom with a bunch of tags! I love how the color varied with each stroke.

Be sure to create this DIY in a well-ventilated area!! If you’re DIYing with kids, make sure at least one adult is supervising at all times!

*I experimented with different consistencies of bleach. I made the mistake of adding gum arabic to the bleach and created some chlorine gas! I noticed the solution in the jar started to foam at the surface and get warm. I quickly took it outside and watched the mixture boil. After a call to poison control, I realized what I had done. I didn’t make nearly enough to cause damage to my lungs (thank heavens), but I wouldn’t advise doing anything like that. I’ve read tutorials on thickening bleach with corn starch, but that’s still mixing an acid with a base. You may want to try toilet bowl cleaner with water until you reach your desired consistency (an idea I got from my aunt). STILL, use extreme caution and care around bleach.

Sponsored: DIY Elastic Banded Receiving Blanket

6 Comments

This post is sponsored by Lily Jade. Their bags are fabulously fashionable and oh-so-amazingly practical. With their one-of-a-kind inserts, there’s a pocket for every on-the-go-essential and they’re a breeze to launder.

The top-notch leather construction will have you looking polished while still being prepared for just about every baby contingency!

Connect with Lily Jade on Instagram, Pinterest, Facebook and Twitter.

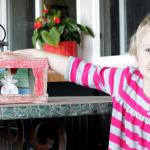
I feel like we’ve been out of the little baby phase for so long, I’ve had to re-learn how to pack a bag to leave the house!

receiving-blanket-tutorial-1

Spare outfit, food, snacks, toys diapers, wipes. And now it’s like I have to pack for two babies. Felix will be in diapers for the next foreseeable future, so double the wipes and diapers.

melissaesplin-lilyjade-sponsored-elastic-folding-blanket-tutorial-1

With winter in full-swing around our house, I’m finding that I need to pack extra warm goodies. There have been a couple of times that we’ve left the house to find that Penelope and/or Felix underdressed for the weather. In one case we had an extra blanket in the car for Penelope. The other, I gave her my extra layers. There’s nothing I won’t do for my kids. I’m a-okay with shivering if I know my kids are toasty warm. But it’s not ideal with how windy and cold it’s been.

melissaesplin-lilyjade-sponsored-elastic-folding-blanket-tutorial-4

This gave me an idea. Instead of packing multiple outfits (one for each kid), I’ll just pack a onesie and an extra blanket. ‘ve made a blanket that rolls into itself quite small, but it’s large enough to wrap a nearly-7-year-old that’s crazy enough to forget a coat before leaving the house.

melissaesplin-lilyjade-sponsored-elastic-folding-blanket-tutorial-3

I made this blanket with flannel on one side and a soft vintage shirting on the other. The shirting has a fairly tight weave and the flannel is warm. The two together cut out quite a bit of wind, providing for a surprisingly warm layer that isn’t ridiculously bulky.

And with the added elastic, it doesn’t unravel in my purse. It stays small.

melissaesplin-lilyjade-sponsored-elastic-folding-blanket-tutorial-5

The size of the blanket makes it perfect for a tight swaddle. I can wrap her twice so her arms and legs can’t get out. On Friday, we went to see lights at a local shipping center. I wore her in a wrap, but to keep her extra warm (since I couldn’t zip up my jacket at that point), I wrapped the blanket around her and me, tying it in the back. She kept toasty warm during the below-freezing temperatures.

melissaesplin-lilyjade-sponsored-elastic-folding-blanket-tutorial-2b

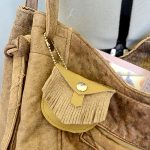
I have to say, using this purse has been amazing. It’s got something like 20+ pockets in various sizes so everything has a space and it doesn’t get jostled around. I keep thinking, this would also double for the perfect weekender bag.

The leather is incredible, the interior insert is washable! My purses’ interiors tend to get so hashed, it’s great to be able to take it out and clean it up. The multiple handles provide great variety so I can sling it cross my body or just on a shoulder.

melissaesplin-lilyjade-sponsored-elastic-folding-blanket-tutorial-6

So back to the blanket. It’s ridiculously easy to make, just requires a few simple things. Let’s get started, shall we?

elastic-receiving-blanket-tutorial-1

SUPPLIES

  • 1.5 yards of top fabric
  • 1.5 yards of back fabric
  • 15 inches of elastic (1 inch wide)
  • ruler
  • scissors
  • seam ripper
  • pins
  • sewing machine
  • matching thread

Click through for the full instructions!

(more…)

Sponsored: Leather Folio Tutorial

0 Comments

jo-totes

This tutorial is sponsored by Jo Totes. They have a wide selection of fashionable camera bags in both genuine and vegan leather. My favorite of all is the Siena bag – an italian leather bag that ages beautifully. I use it as my every day bag. It fits all of the essentials! The structured body allows me to easily find all of my purse’s contents quickly.

Stay up to date with Jo Totes on Instagram, Pinterest and Facebook.

My purse essentials (beyond baby stuff): my instax camera, a notebook, pen, chapstick and gum.

melissaesplin-leather-notebook-folio-tutorial-1

For a while I had my notebook just floating around my purse naked. The problem with this was that the top page would frequently break off, wrinkle and just get disgusting. To remedy the problem, I hand-bound a folio where I can just insert the notebook I’m using and protect it from the contents of my purse. I’m constantly ripping out pages and tossing them, so it’s nice to have something reusable instead of having to bind a new journal every time I run through my pages.

melissaesplin-leather-notebook-folio-tutorial-2

The original version I bound was a traditional 3/4 rounded back bind with cutouts and pockets. I thought about sharing how to make this, but as I broke down each step, I realized that I had very specific bookbinding tools and the steps would take 5+ hours to photograph and explain. I ditched that idea for a simpler sewn version. It’s not as rigid, but it’s still quite sturdy and can be completed in well under an hour. You could opt out of real leather and use an industrial felt instead. I’m not sure I would recommend a vegan leather as it doesn’t tend to wear well over time.

melissaesplin-leather-notebook-folio-tutorial-3

This would be a great gift for a guy or gal. Christmas gift perhaps? It’s just over 2 months away, so time to start planning! I’ve already taken care of a couple of Christmas gifts already. I feel way more on top of things this year. Don’t worry though, I have plenty of time to procrastinate and get behind on my gift-giving.

So would you like to make one with me? It’ll take you about 20-30 minutes. If you’re making a bunch all at once (which I would totally recommend!) it’d take less than that for each one.

melissaesplin-leather-notebook-folio-tutorial-4

Supplies:

  • ruler
  • rotary cutter (and mat)
  • bulldog clips
  • thread
  • leather needle (or topstitch needle)
  • elastic
  • button
  • hand-sewing needle
  • x-acto knife
  • pen
  • bonefolder
  • leather
  • sturdy canvas or a fabric wallpaper*
  • notebook**

* I used fabric wallpaper for this. I scored some years ago from design centers in SF. Just ask an interior design company if they have any wallpaper samples that are being discontinued that you can have. Alternatively you can fuse any kind of fabric to Ultra Hold Heat ‘n Bond with regular copy paper.

** My favorite paper is the Rhodia pad or Clairefontaine Triomphe paper. They come in plain, grid, dot grid and lined.

Read more for the full tutorial.

(more…)

mobile site