Posts Tagged ‘photography’

White Balance Lens Cap Review

11 Comments

I’ve got some exciting stuff to share with you soon: A ginormous giveaway & the big reveal of Penelope’s & Felix’s room. Their room is coming along quite nicely (well, that is if Penelope will ever stop destroying it long enough for me to clean it up & take pics of it). I’m also excited to share with you my new toy: White BAlens Lens Cap. This (besides my wireless remote), might be my favorite camera gadget so far.

I took 5 minutes to find this white balance in Kelvin. BAlens did it in 10 seconds.

I’ve never been happy with the white balance presets that any of my Nikons have had to offer & the auto can get so frustrating when in mid-shoot you have different color corrections. It’s especially annoying when batching photos to find the colors all over the map! Seriously, I’ve spent hours editing poorly exposed/balanced photos before. It’s misery.

Almost exactly two years ago I took Nicole’s table top class, where she emphasized heavily on shooting in manual & mentioned manual white balance. Since then, I’ve gone completely manual when shooting and I’ve been using my Kelvin setting for white balance. I’ve been using that for the last 1+ years and it’s MUCH more consistent than relying on presets. I’m sort of getting the hang of it, but I’m nowhere near consistent enough; especially when in dark situations with multiple light sources.

I forgot to adjust my white balance from earlier in the day. BAlens fixed that.

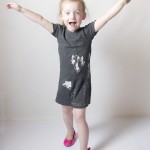
 This little lens cap has seriously solved all of my problems. Not kidding. You can see a huge difference in these photos, right? I sure do. No matter what, the BAlens is going to be consistent. EVERY. SINGLE. TIME. Unlike a greycard. It’s also pretty seamless to use this while capturing fleeting moments.

The lens cap is always with you – as long as you have your lens that you bought the cap for, at least . You just turn on your camera, follow your white balance preset instructions & take a picture with your cap on. Then you take the cap off & shoot away. It’s genius.

This is close, but still too orange/red.

I love that I don’t have to worry or guess anymore to find the correct color balance in low/artificial light settings. No matter the light source, this thing helps my camera properly adjust for the lighting & gives me perfect skin tones every time. That’s huge. I hate it when my pictures make me look like Snooky.

Since using the BAlens cap, I’ve cut down on  my photoshop time by 90%. No joke. SO worth the $45-65 price. This is the least amount of time I’ve spent in photoshop since I started blogging. I have better things to do with my time – like nap with my kids. Or actually do the laundry. What’s your favorite photography gadget?

BAlens provided by Photojojo – THANK YOU, THANK YOU, THANK YOU!!!

I’m Back!

12 Comments

The kiddos & I are back from our week with the grandparents. I’m feeling refreshed, Penelope is feeling pooped and Felix is feeling rather accomplished.

My brother-in-law just got back from a two year stint in Honduras, so most of us Esplins were in Phoenix to celebrate his safe return home. Chris couldn’t get time off work, so he held down the fort & let me galavant off to Phoenix on my own. Chris’s sister, Shelley, flew with the kiddos & me out to Phoenix, which was HUGE. It was the first time I’ve flown with two kiddos & everything went surprisingly well. I didn’t have a companion on the flight home, but we fared remarkably well considering our flight came in at 11pm.

While we were in Phoenix, we went swimming, killed a scorpion, went shopping, watched movies, ate lunch with friends, watched bob’s burgers and helped organize my youngest sister-in-law’s bedroom. Felix spent most of his time in the arms of an aunt, uncle or grandparent and Penelope spent most of her time bossing around Molly the dog. It was perfect.

We got back to a clean house (which we have now destroyed, sorry Chris!) and my new camera! I’ve spent most of the morning playing around & reading the instruction manual. Seriously, I suggest EVERYONE should read their camera’s instruction manual. It doesn’t matter what kind of camera you have, just learn all of its ins & outs. You’ll take much better photos once you do. Promise. I’m about 90 pages into the manual & have about 210 to go, but I feel like I’ve improved immensely since I started reading. I’ll definitely be reading it through a few times.

With all of my enthusiasm, I took this opportunity to shoot some pictures of the nearly 5 month old Felix. He’s getting so big & animated now, I just love it. During our vacation, he discovered his hands & started rolling over! It’s so exciting! Now I need to teach him to hold up that behemoth head of his.

The Feli-Monster

31 Comments

Last Friday, Felix turned 4 months old & had a well-checkup. Oh. My. I’m raising a monster. He weighed in at 17lbs 5oz with a gigantic 17.5″ head. That’s off-the-charts huge for a four month old. The doc said, “I know a lot of 9 month olds that would love to weigh that much!”

undefined

Look at those rolls!undefined

Since things are usually more than a little hectic around here, Felix doesn’t get very many photo ops. I thought I would take the time to have a little session with him while Penelope was napping. I was a little distracted because I was talking on the phone pretty much the whole time, though. Why do I always feel like I have to be multi-tasking? I’m crazy.undefined

This one might be my favorite. He ALWAYS smiles like this. What a sweet smile!

undefined

Shannon Hunt Photography Design

2 Comments

I’ve known Shannon since the good ‘ole college summer days – barbecues on Wednesdays & pool-time practically every day. It wasn’t until about a year or so ago that I found out that she has a photography business. Her work is fantastic: professional & unique. She approached me a while back to help her re-brand. Her previous branding was fine – standard script + standard serif fonts. Basic, but slightly stuffy for her style. She wanted something a little more “her”, of course.

It was a fun challenge to incorporate her spunk & personality with the classic side of her business. I think the two styles combined rather well & I couldn’t be more thrilled about the design. It’s simple, but I had a great time making the fun calligraphic elements. with the pattern in the header I was channeling my inner Jessica Hische (she’s one my design heroes).

If you’re in the Temple, Texas area & looking for a great photographer; contact her. You won’t regret it.

On another design note: I won a little logo contest at Chris’s work! With the prize, we can stuff our faces with all the Lion House rolls our hearts desire. YUM!!

DIY Photography Backdrop

29 Comments

I’ve had a few people ask me where my photography backdrop is in relation to our house. Well, it’s in my little studio room. I got the idea when I realized I had a TON of curtains & curtain rods hanging around from our old place. I thought a great way to clean up the look of my non-maternity maternity shots would be to add a curtain over the closet doors. Then I added another curtain to the floor to cover up the ugly carpet. I’ve been using this system for a while now, but now I’m wanting an even cleaner look.

undefined

I totally get washed out in white. PLUS a white backdrop is harder to expose for & get correct white balance for. I’m still a major rookie at the photography thing. In the back of my mind I’ve been thinking a middle-grey curtain would be so much better to shoot. Yesterday it clicked. I thought I’d go to Home Fabrics, a place that my friend had told me that offers discount home & upholstery fabrics, and see what they had. Despite their lack of grey fabrics (they mostly have tan & burgundy) I was able to find some printed grey cotton for $5 a yard. It was originally $10 a yard.

undefined

I needed cloth that was 57 inches wide – which just so happen to be the exact width of this fabric! All I had to do was hem the two ends & I was ready to rock & roll. Did you know that if you rip fabric, it’ll rip in a straight line, exactly perpendicular to the selvage? That’s how I was able to get an even hem on both ends. Making this back drop took about 15 minutes & $22.

undefined

I slide the fabric to the edge of the curtain rod & use bulldog clips to secure the extra off the ground when not in use. It’s a pretty slick system. Much better & cleaner than my last method.

undefined

Backdrops are so yearbook/1990, but I love that I can focus on taking pictures of me & the kiddies without worrying about the background/ugly carpet/styling. What do you think? So, if you take outfit pictures or kiddie pictures, what kind(s) of backdrops do you use?

mobile site