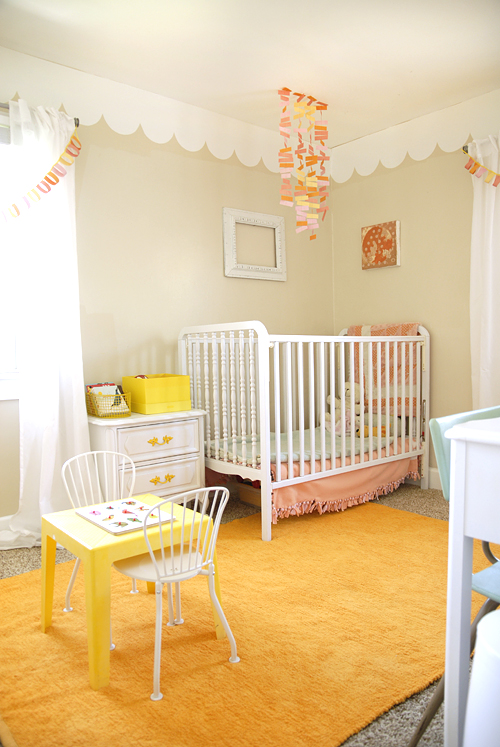
View details of the full room here.
Since returning to stay/work at home, I’ve got the nesting bug all over again. Sheesh! It’s like I’m 8 months along, but with out the swollen feet & belly. Since I didn’t have a nursery to decorate when Penlope was born (I only had a closet) so my brain is just swimming with ideas on how to make miss P’s room adorable.
While it feels like I’m swimming with ideas, it still seems that my ideas have to percolate for about a month before they happen. Naturally. This one incubated for a good few weeks, and I think my hesitation was mostly because the project seemed a little daunting. Hardly.
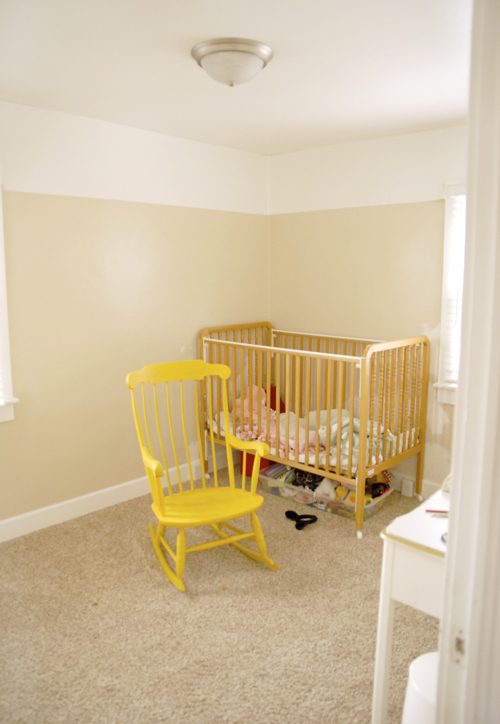
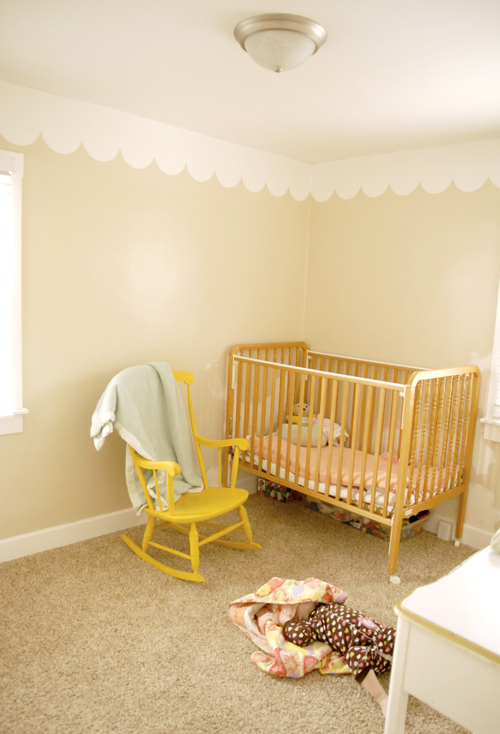
I had this idea to make a scalloped border around the top of Penelope’s room with contact paper. Contact paper has served me well in the past, so I thought I’d give it a try. I only have a “during” photo, but I’m sure if you put on your imaginary hats you’d see that it was just incredibly plain before.
Here’s how to do it:
- Apply the contact paper to the wall. It’s a two person job.
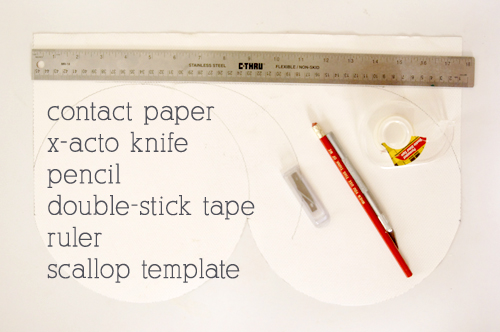
- Make your template to the desired size using a bowl, ruler, large paper and pencil.
- Cut out the template
- Using double-stick tape, temporarily apply the template to the contact paper.
- Lightly cut along template lines.
- Move template along until your scallops are complete.
Applying the contact paper was definitely a two person job and took us about an hour or two to apply. Honestly, that was the hardest part of the whole thing. It got pretty tricky pulling off the lining paper and smoothing to the walls without creating a few air bubbles. My new yudu squeegee came in handy for smoothing everything out.
Once I made the template, cutting out the scallops was a cinch. I think it took me under an hour to cut them out. Contact paper is so easy to cut out! Seriously, all I had to do was score lightly along the template and I got perfect cuts every time. I’m really happy with how it turned out.
Penelope’s room is starting to look better, but I’ve got a long way to go. Something needs to be done about her bare walls! I’ve got a few ideas up my sleeve. You’ll be seeing more of her room as I get them done.
Isn’t Penelope a crack up? She seriously thinks she’s hiding. I love that girl.
This turned out so dang cute! What a great idea–love how her room is turning out!
What a sweet little touch! Is it strange that I want that look for my room?
No way, Kasey, it’s not strange! We’d do it in our room, except we just painted the walls white. And our walls are wood paneling. Contact paper wouldn’t work too well for wood paneling.
Love it! I might have to follow suit on a dingy downstairs bedroom when it makes the change to a kid’s bedroom.
Thank you for sharing!
What a great, cute, simple idea! I love it! I’m getting to that point of nesting, I’m so excited to get the nursery ready.
so cute! i would have done this project the hard way with paint and probably tears – you have such a knack for seeing a better, more simple way to do things!
I once saw a scalloped border in a Pottery Barn Kids magazine. I swore that I would do that in a nursrey. Well my nursery is almost done, and I didn’t do the scallops but seeing this is making me sad that I didn’t! It looks adorable!
i just love this Melissa! I must do scallops somewhere in my house. I can’t wait to see what else you come up with!
Silly little bitty girl. I would be happy and silly like her if I had pretty scalloped walls and popping yellow furniture. This is a very pretty room already!
What a great idea – absolutely adorable, though not as adorable as that sweet baby girl.
: )
Wow, contact paper is genius. I painted a wainscoting-height scalloped border in my daughters room in our old house and it was a-dorable. But it took forver & I got lazy, so it was a bit more “free-form” (I just twirled the brush in a circle. It looked better from across the room…). Before we moved I couldn’t bear to paint over it & the accompanying mural I’d done, so I just left it for the new owners. (You’re welcome new owners! Enjoy the smiling sun over the crib. Ha ha!)
I’ve been meaning to leave you a comment, but I used your Christmas Candy box template at my moms group last week and everyone loved it. We made the ribbon flowers from Gabby’s blog: http://www.designmom.com/2009/12/ribbon-flowers.html
and put the flowers in the box. They fit perfectly. Hooray!
Ok, longest comment ever is DONE.
The scallops look great – a good choice on size/proportion especially!
I love this and posted about it in my blog, if you want to take a look, the link is…
http://kandisdesign.blogspot.com/2010/01/um-toque-especial.html
Legal, você sabe português! Como aprendeu?
What a wonderful idea ! really pretty for a children’s room.have a nice day.
I love it! I think scallops would be a little much for Jack’s room but I’m sure I could finagle some dinosaurs or baseballs out of contact paper – and I hear it’s cheaper than custom vinyl stickers :) What a great idea!Thanks for sharing!
Love Love this. Way to be inventive + creative!
OOOOOH!!!!! I completely LOVE this idea!!! I’m always looking for new ideas on how to decorate with paint in our house and this is just FABULOUS!
Love the scalloped border. And yes, your Penelope is a crack up.
I did the same thing, but did the scallops two thirds up the wall (so my scallops are facing the opposite direction). I was thinking about doing the top boarder like that in the playroom though. I made a cardboard stencil and hand painted it. Your idea is probably a little easier. :)
Your talent is astonishing. Will you come evaluate Charming’s bedroom and tell me what you think we can do on the cheap/D.I./Savers budget to make it rock?
I LOVE THAT YOU’RE HOME NOW!
What a clever idea!
This is way too cute! I love your blog.
LOVE it! This is exactly what I’m doing in K’s rooms when me move into our house. I have a picture of someone else who did this with paint and I never thought of using contact paper! What a great idea! P is just a cutie pie!!
Love the contact paper border!
That border is to die for! Great job!
seriously so sweet. i love scallops. what a unique idea for a nursery, nice job on the innovative designs. cute, cute. so happy to find your blog.. xo.
cute! it looks a lot like this one from one of my favorite blogs:
http://onhandmodern.typepad.com/my_weblog/2009/11/rearranging.html
You’re totally right, It does! Thanks for the link, now I’ve got another new blog crush!
I wonder if she made hers out of contact paper, too.
[…] So, I didn’t have time to plan and/or execute a baby shower, but I did have time to spruce up Penelope’s room a bit. Remember the scalloped border I did a couple of weeks ago? […]
I love the idea. Our room doesn’t have crown molding either due a curved wall. Why did you choose to put the contact paper on the wall and cutting from there instead of appling pre-cut paper? I haven’t used contact paper on the wall and have seen it done both ways.
Thanks!
Rachael Anne,
It was pretty tricky applying the paper onto the wall, because we were trying to lay it on in continuous sheets. My brain starts seizing, thinking about cutting it out and then applying. That’s not to say that it wouldn’t be easier for someone else.
I hope that you try contact paper on the wall sometime. I think you’d find it a lot of fun.
[…] Photo and project courtesy of Melissa Esplin with IS.LY […]
i use contact paper for so many projects!! it’ the best, so versatile, cheap, and easy to apply and remove! i love the scallops.
http://meredithtuttle.blogspot.com/search/label/contact%20paper
[…] Penelope’s Scalloped Border […]
this is BRILLIANT!! I love it so much! WHat a smart way to personalize a room without paint or permanence. We rent so this speaks to me so loudly! lol Thanks for sharing!
[…] merhabalar.sadece çocuk odalar?na de?il istedi?iniz her odaya de?i?ik ?ekillerde uygulanabilecek ??k bir dekor buyrun […]
I did something like this, but with paint, in my old house. I used half a paperplate to make the scallops then painted them. Love your idea, so neat and clean. Might have to do this in my craft room!
I am absolutely in love with this idea!! Would it be possible to get the measurements of your stencil? I am terrible at proportioning and estimating and all things technical. :)
@JenB – It looks like it was 9″ in diameter from the pictures, but I bet anything from 10-12 inches would look great. Hope that helps!
So I pinned this fabulous idea last year in hopes that one day we’d have a girl and I could use it. Well now we are and I’m turning our boy nursery into one for a girl. I used your basic technique along with my Silhouette cutter to create this: http://emskyrooney.blogspot.com/2012/05/nursery-update-part-1.html
Thanks for sharing the inspiration!
[…] your walls. This would be uber sweet in a nursery or a vintage-inspired kitchen. Go take a look at I Still Love You to see how amazing it […]
[…] Dica para pintar o gesso: http://melissaesplin.com/2010/01/the-nesting-pens-scalloped-border/ […]
[…] you’d rather go a little more subtle, take a page from Melissa Esplin’s book and use contact paper to create a neutral but stylish scalloped border on your […]
What color are the walls? I am getting tired of seeing gray as the only neutral really used.
What color are the walls? Sorry I duplicated my comment I forgot to mark the notify me with follow up on the first one.