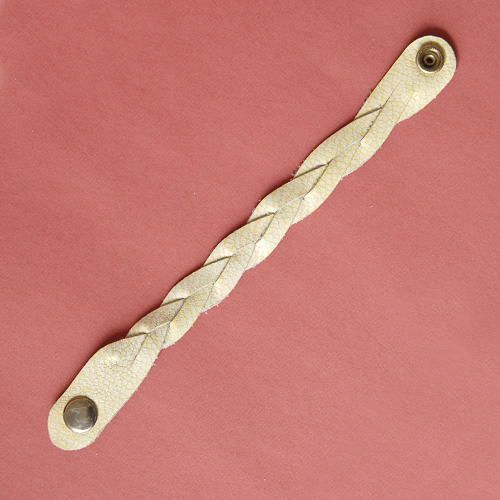
Seriously this tutorial is magic. I’ve been wanting to share it with you for about a year now, but it’s taken me so long to sit down & figure out the best way to explain myself. See, I discovered how to do this while mindlessly watching an episode of House.
My mother-in-law has a rad purse from the ’70s or so; it’s leather with a very cool handle. Parts of the handle are braided & parts are smooth. I thought it was just insanely cool how the handle was braided with closed ends!! What the . . . So I figured it out. Turns out it’s not as hard as you might think!
I’ll be sharing this today on KSL’s Studio 5! I’ll link to the video later today for further clarification. So click the link below to read the tutorial!
• M A G I C • B R A I D E D • L E A T H E R •
(of course the pattern pieces above aren’t the same, I was just too lazy to take a supplies pic that was practically the same as this one. hope you’ll forgive me.)
• S U P P L I E S •
- hammer
- scissors
- hole punch
- tape
- button-stud/snap & setter
- 1-2 oz leather/felt
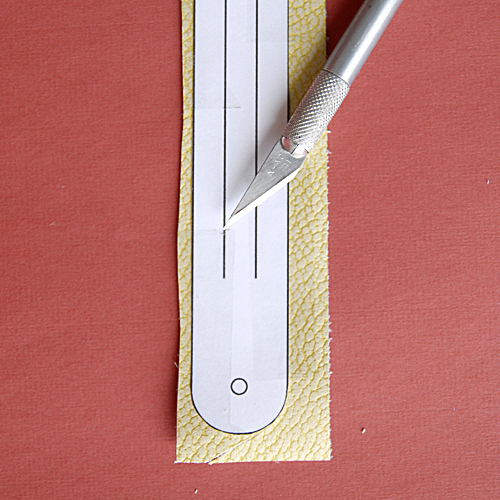
Print and cut out pattern pieces. Tape onto leather. Carefully cut two inside slits with an X-acto knife & ruler. Punch holes then cut out perimeter of the pattern.
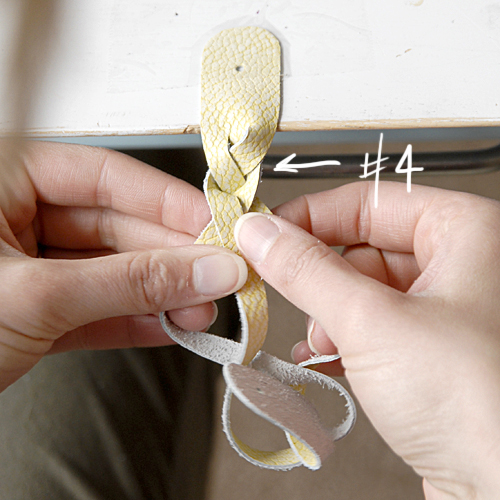
Tape your leather to a sturdy surface, like a desk or slab of wood. Start a tight braid with the farthest right strand & count each time you cross a strand.
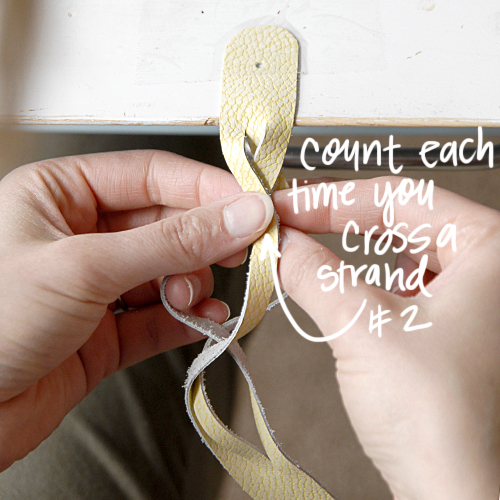
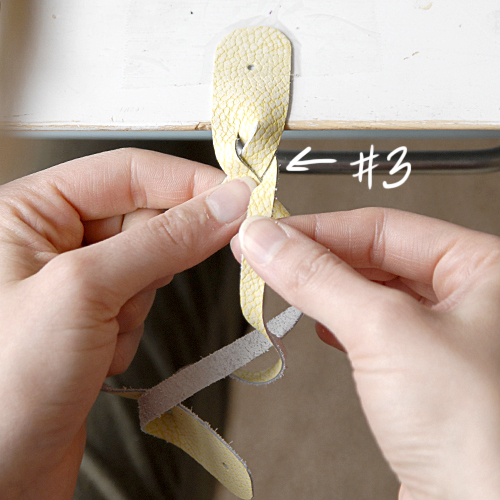
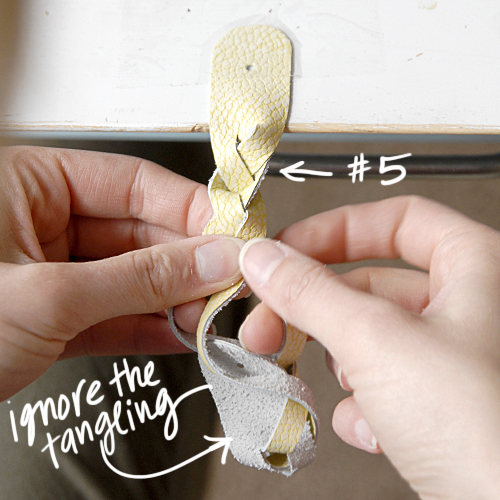
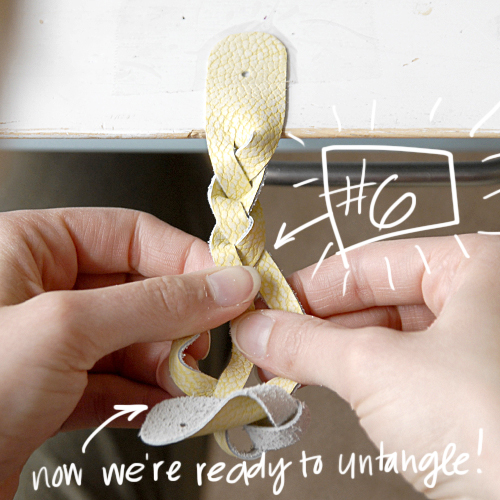
Ignoring the bottom part as you go, count up to 6. Once you get to six, start untangling.
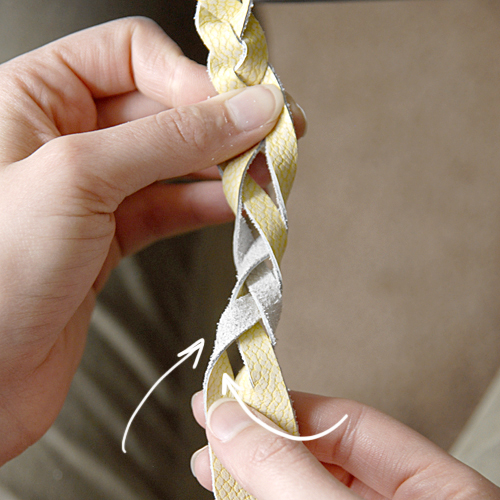
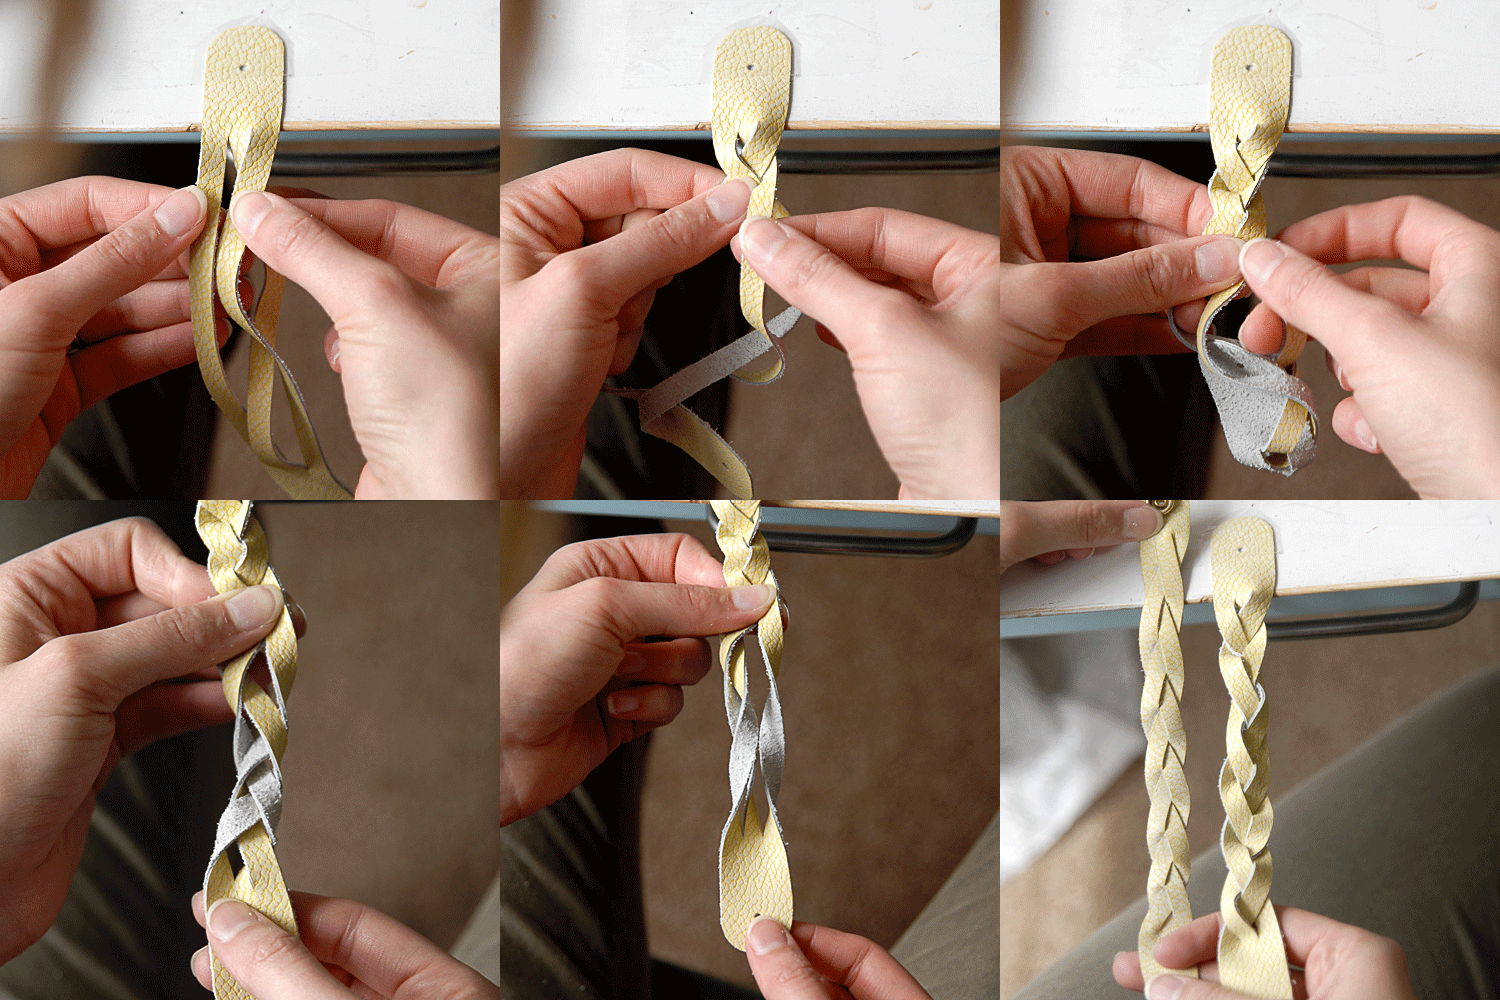
Look at the bottom part, the strand that’s on top should go through the hole. Follow the strand with the end of the bracelet.
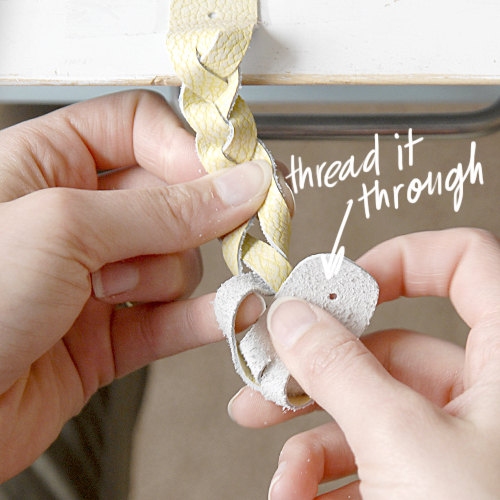
Once you’ve followed through that end, your ends should look like this. Take the right strand & smooth it out. the end will want to go in between the right & middle strands. Once you’ve untangled that, start your second set of 6. You might need to untangle as you go as you run out of room. The bracelet pattern uses two sets of braids.
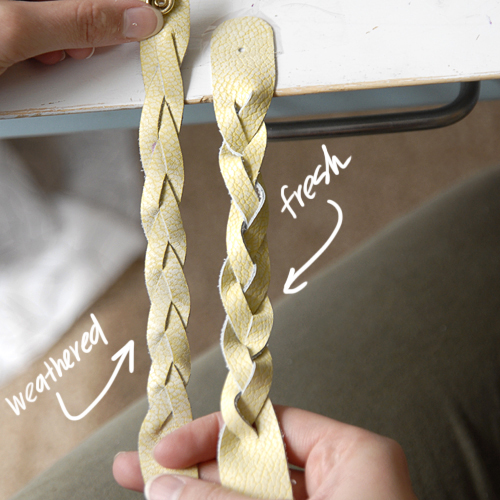
Once you’re done braiding, your bracelet will look a little lumpy. Don’t worry. Just give it some time & it’ll break in nicely.
Here are the photos animated so you get a better idea of how it goes.
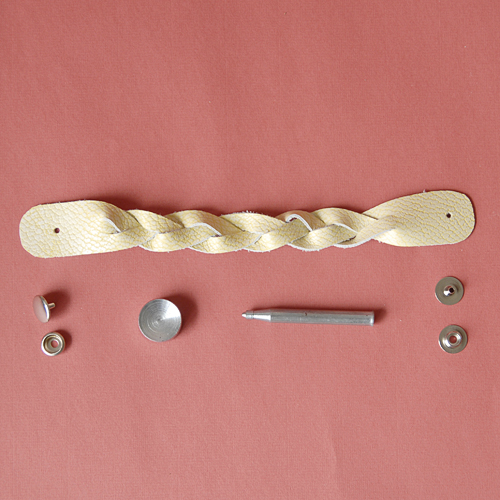
Once you’re finished braiding, you’ll attach snaps or button-studs.
Wear on your wrist for a couple of days to break it in. Be sure to get it wet if you’d like for the braids to lie flat. ENJOY!!
• O P T I O N A L •
Use this technique for purse handles!
Click the button below to download the printer-friendly version of this tutorial & for the pattern pieces. I’d love to see how you make this tutorial yours! Email me pics or link to your pics in the comments.
This tutorial is free for personal use and should not be distributed/republished without my consent. Altering the file NOT ALLOWED. If you would like to use this tutorial for commercial purposes, please email me. Thanks!
Don’t be totally confused. It looks tricky, but it’s really quite simple! Check out the video tutorial below for additional clarification:
Okay, I have been wondering FOREVER how to make this happen!
[…] 3. Magic Braid Bracelet: – I found this pretty tricky. I couldn’t follow any of the written tutorials, but this video was straight forward and easy to follow. I braided all the way until the very end without backwards braiding (that part was a bit confusing). – There’s a download for a printable template here. […]
Love it!!
I shared it, hope thats okey :)
http://crafterlifebyme.blogspot.com/2012/02/this-time-i-didnt-know-what-to-choose.html
[…] you want to try this out for yourself, go on over to Melissa’s blog and follow her instructions Share this:DiggRedditStumbleUpon Filed Under: […]
i love this idea! its so cute too!
For some reason, the video skips back to the beginning each time at 3:46. I tried refreshing the page but that didn’t help either. Is there another way to watch the video? Thanks :)
[…] thought I would supplement my magic braided bracelet tutorial with a plain video (previously it was a 10 minute segment I did on local […]
I just saw the new video! It worked perfectly. Thanks again for getting back to me so fast.
[…] 2. Braided Leather Bracelet – Not as hard as it looks to create this fun accessory. Click here for a full tutorial. […]
[…] Yapmay? dü?ünenlere hem ucuz , hem de kolay gelecek. Deri tak? zaaf? olanlar buraya t?kt?k VN:F [1.9.15_1155]please wait…Rating: 0.0/10 (0 votes cast) Reklam : Etiketler: aksesuar […]
This was fast and so easy! Thank you so much! When I showed my (mathematician) husband, he looked at it and said to come back when it was possible! He couldn’t figure it out!
[…] 3. Magic Braid Bracelet: – I found this pretty tricky. I couldn’t follow any of the written tutorials, but this video was straight forward and easy to follow. I braided all the way until the very end without backwards braiding (that part was a bit confusing). – There’s a download for a printable template here. […]
Great job. Thank you for the pdf version. I saw a youtube tutorial on magic braid using 5 strands. Have you done that? Were you able to create a pdf version on the 5-strand instructions? I would appreciate if you post those instructions, too. Thanks.
[…] then, finally, these sweet little felt napkin rings, braided following this tutorial. I love those almost as much as I love the napkins. So there you have it. The whole table. […]
[…] used the template I made for my magic braided bracelet tutorial, but lengthened the template times two. I used some blue leather I had on hand (also seen here) and […]
merci beaucoup pour cette technique
trop chouettte
Great tutorial
That is awesome! Thank you for sharing. I can think of a million things to do with that pattern.
[…] weiss ich, wie man solche geflochtenen Lederbänder macht […]
[…] last I know how to make these braided leather straps […]
[…] 2. Driftwood Vases – A very unique decor piece and easy to put together. Click here for a full tutorial. […]
This band would make fantastic drawer pulls! If someone has already posted that idea, please pardon me. When she set it down at 4:07 I immediately thought of it. Great job!
[…] you’ll see how I untangled it. If you’re still unsure how it’s done maybe the tutorial from Melissa Esplin can […]
[…] Per accedere al tutorial clicca qui […]
That is so cool!!!
Thank you for the great tutorial; I share it on my blog and I just braided my first strap! It works!
Thanks for the shout out! I’m glad to hear it worked for you!
[…] Braided Leather […]
[…] part of the whole project, go figure). Well, those are just some long pieces of felt that I magic braided (but really, you can just regular braid some felt and stitch the end so it stays braided) and then […]
Thanks for sharing….. brought back memories !
I remember making these late 60s/early 70s. Made wrist bands and I used to ” remodel ” leather belts :)
[…] addition to my links from last vacation, here’s a tutorial for making a braid when the strands are attached to each other at both […]
great tuto! I just wonder how you decide on the length of strap; how much does it shrink when braiding?
It shrinks a little, depending upon the width of the braided segments. Add anywhere between 1″-3″.
Hi, Do you know if i can make this braids with 5 bands instead of 3 ??
Thanks :)
Yes! It just has to be an odd number.
Love this! Where did you get your leather from?
I get a lot of my leather at Tandy Leather. They have stores across the country and shopping online. For small scraps (like for bracelets) you can often go to an upholstery store and ask for remnants. Often they’ll just give away scraps that are too small for them to use, but just right for a bracelet!
[…] le bracelet en cuir tressé chez Melissa Esplin […]
Hi Melissa,
I used your tutorial to make a bracelet and love it! I also made a few other things like bracelets, earrings, elbow patch using the same leather.
[…] le bracelet en cuir tressé chez Melissa Esplin […]
[…] you’ll see how I untangled it. If you’re still unsure how it’s done maybe the tutorial from Melissa Esplin can […]
It’s wonderful to hear from you Thank you for sharing your post