Sponsored: Full-Coverage Wrap Skirt Tutorial

45 Comments

Inspired by this month’s style theme for the Fiesta Movement, I wonder what styles are out of your comfort zone? Bold patterns? Hats? Harem pants?

Have you seen those little challenges they post monthly? It’s cool what Fiesta Agents have been doing, taking on challenges outside their respective comfort zones. Last month I went outside my comfort zone and sewed up some harem pants, and I’d say they were a hit! I wear them at least once a week (which is tight rotation considering my closet).

I don’t do hats. Maybe that’s next. What clothing item would you like to find within your comfort zone?

istillloveyou-sewing-maxi-wrap-skirt-5

I love this skirt. I didn’t know how much I would wear it because of the bold pattern, but it gets just as much play as the other skirts in my wardrobe. It’s been amazing to wear this fall. My legs don’t freeze to Otter Pop status.

This skirt (as mentioned in the original post) has a super power. It’s a full-coverage wrap skirt. It’s not going to show off my lady bits with a small gust of wind. NO. It’s going to take 15+ mile an hour winds to achieve that.

When you’ve got winds that crazy, you don’t want to be wearing any kind of skirt anyway.

istillloveyou-sewing-maxi-wrap-skirt-2

Now let’s make ourselves a maxi wrap skirt that won’t give you a red-faced Marilyn moment, shall we?

Full-Coverage Maxi Wrap Skirt Tutorial
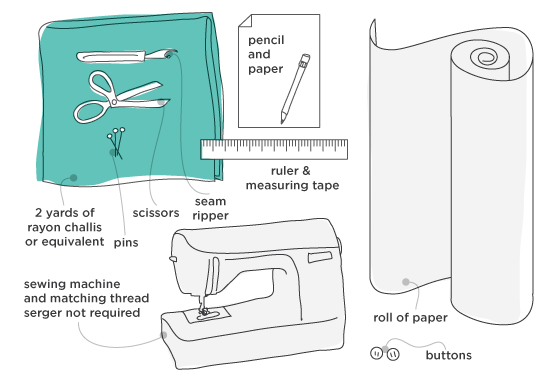
istillloveyou-a-line-maxi-wrap-skirt-sewing-diy-01

Supplies

  • 2 yards rayon challis
  • pins
  • scissors (paper and fabric)
  • seam ripper
  • ruler
  • measuring tape
  • pencil
  • paper
  • large roll of paper
  • sewing machine
  • coordinating thread
  • coordinating buttons
  • iron

You could get away with any drapey fabric. A knit, a silk georgette or a cotton lawn. Rayon challis is going to give you a lot of drape and it’s not terribly expensive.

If you don’t have a large roll of butcher paper on-hand, several small sheets taped together will do. You’ll still want a large-ish floor or table space to draft up your pattern.

Let’s get drafting!

istillloveyou-a-line-maxi-wrap-skirt-sewing-diy-02

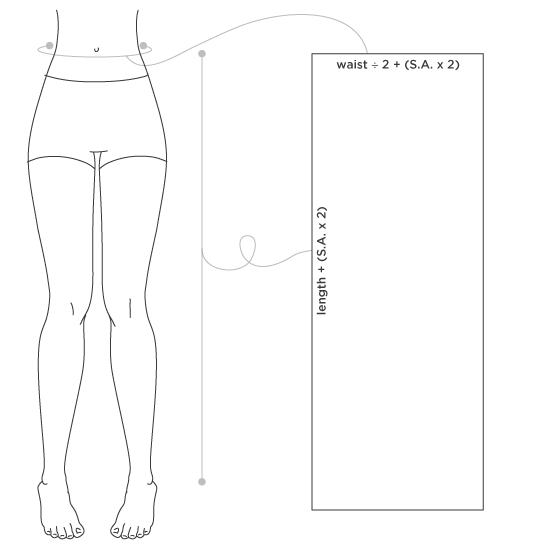
Take your measurements. See the above diagram for the rectangle you’re going to make. Draw out your rectangle.

istillloveyou-a-line-maxi-wrap-skirt-sewing-diy-03

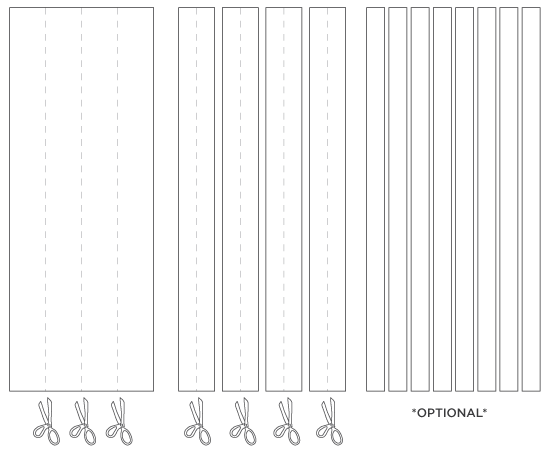
Now I want you to fold your paper into fourths hot-dog style. Cut the strips. It’s optional to cut the strips into strips again, but recommended.

istillloveyou-a-line-maxi-wrap-skirt-sewing-diy-04

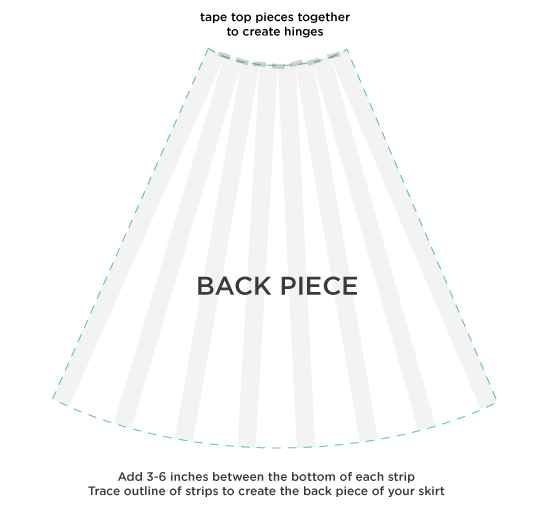
On a large sheet of paper, tape the top of the middle two strips together and spread the bottom of the strips about 3-6 inches apart. Add strips to the top with the same spread on the bottom. This will create an even curvature and proper drape for your wrap skirt.

Quickly measure your widest hip measurement and make sure that the hip on the drafted pattern is 2-3 inches bigger than your measurement. This will allow for a comfortable fit.

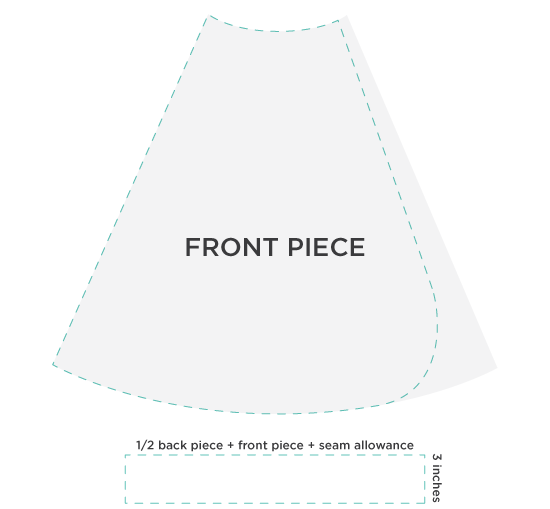
Trace and cut the outline of your back piece.

istillloveyou-a-line-maxi-wrap-skirt-sewing-diy-05

On another sheet of paper trace out the back piece. About 1-2 inches shy of the full width of the back piece, draw a line all the way down the skirt, curving into the bottom hem. This will be your front piece.

For the waist measurement, add half of the width of your back waist measurement, 1 full front piece measurement and two seam allowances. That will be the width of half your waistband. Make it 3 inches tall.

istillloveyou-a-line-maxi-wrap-skirt-sewing-diy-06

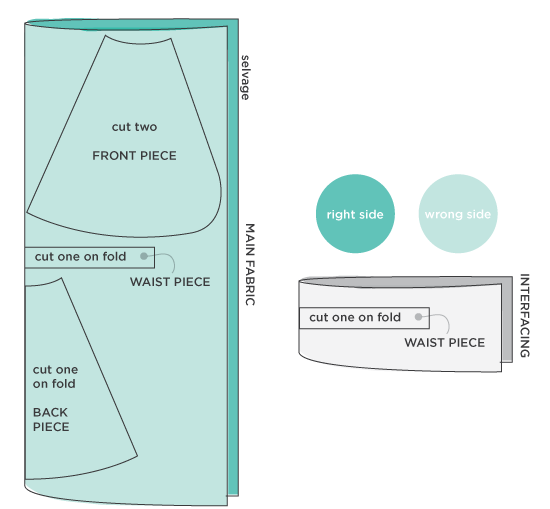
Fold the fabric in half, right sides together. Fold your back piece in half and cut one piece on the fold line. Cut two front pieces. If you can’t fit the front piece on a folded fabric, don’t forget to reverse one of the panels.

Cut one waistband from the main fabric, one from the interfacing.

Iron interfacing onto the waistband.

istillloveyou-a-line-maxi-wrap-skirt-sewing-diy-07

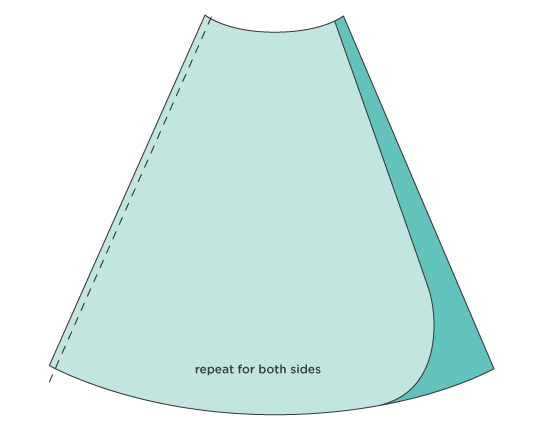
With right sides together, sew the straight side of the front piece to the back. Repeat for the other side.

istillloveyou-a-line-maxi-wrap-skirt-sewing-diy-08

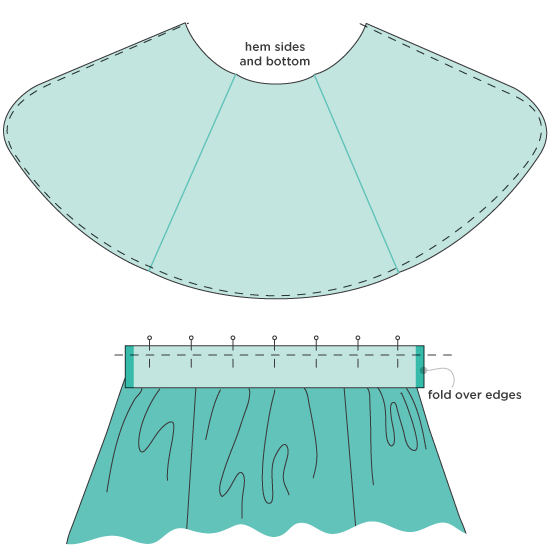
Open up  your skirt and press seams. Hem the sides and bottom. A rolled hem is easiest with the curved lines.

You’ll also want to stay-stitch the waist (just baste stitch the opening of the waist before sewing the waistband on so it doesn’t get distorted).

With right sides together, sew the waistband to the skirt. Having ends folded over on each side.

istillloveyou-a-line-maxi-wrap-skirt-sewing-diy-09

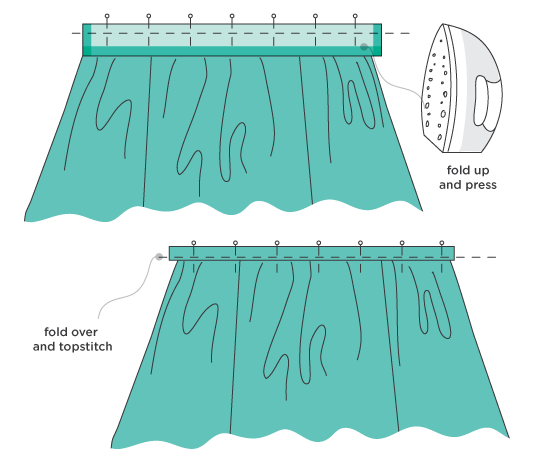
Fold the raw edge of the waistband up (I used 5/8 on all of my seams) and press with an iron. Then fold the waistband in half so the folded edge meets the inside of the skirt. Press flat and topstitch into place.

istillloveyou-a-line-maxi-wrap-skirt-sewing-diy-10

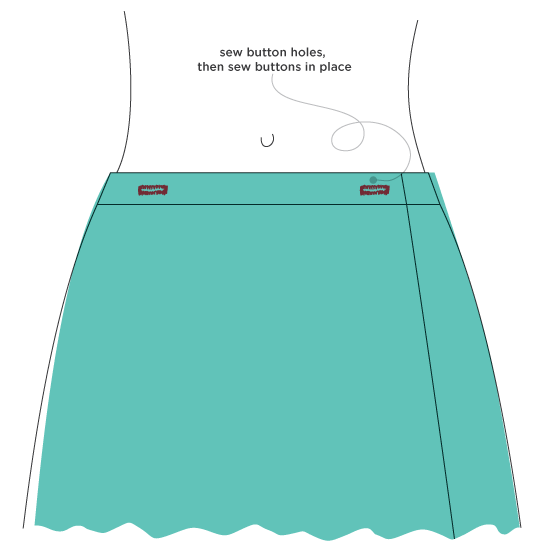
Try on your skirt and pin where the button holes are to go (they go on the top flap) where the skirt and the end of the waistband meet. Make sure button holes accommodate your buttons.

Sew buttons. Enjoy!

This is a sponsored post and I was compensated for my participation. The opinions expressed are my own.
This tutorial/freebie is free for personal use and should not be distributed/republished without my consent. Altering any files is NOT ALLOWED. If you would like to use this tutorial for commercial purposes, please email me. Thanks!


view or add a comment
  1. Leslie says:

    Great Tutorial Melissa thank you. You did a wonderful job on the skirt. The pattern on the fabric reminds me of something and I can’t put a finger on it. Not sure if its reminiscent of a Diane Von Furstenberg or what. Good Job!!!

  2. Thanks so much for the tutorial Melissa, I have been wanting to make one of these amazing skirts ever since you originally posted. I’m off to buy some fabric…..Thanks again!

  3. I can’t sew – I blame my mother and her incredible sewing skills for always sewing things FOR me! Regardless, you look LOVELY and I love the pattern on that skirt.

    <3 Daryl

    • Melissa says:

      Thanks so much Daryl!! Are you familiar with the author and 70s homemaker Daryl Hoole? I read her book before I got married. It was hilarious.

  4. Suzanne says:

    Yay thank you I can’t wait to try!!!

  5. kathy says:

    it will use less fabric if you flip the front to fit along the back…how 2 triangles make a square. cut the waistband from the end of the fabric, rather than out of the middle!

    • Melissa says:

      It depends upon the drafted size and the width and pattern of the fabric. If you have a directional pattern, you want to cut as suggested so the print will match up on the side seams. You also don’t want to orient the skirt any other direction besides parallel to the grain, otherwise you’ll get a wonky drape.

  6. Sarah Helene says:

    THANKS for this MAXI WRAP SKIRT tutorial… FAB instructions & drawings to follow. I love longer length skirts even in the summertime. Your print is bright, but coordinates with many colors/ hues of Tees & tops. Sarah Helene in Minneapolis

  7. chris says:

    thanks for this = used to sew a lot but alas no more due to MS. HOWEVER last autumn I passed my skills on to my lovely friend and carer, Sally,who made super home made Christmas presents for her whole family and got so good she’s going to make me some of these for the summer. LUCKY ME and thank you Chris

  8. […] Full coverage wrap skirt @ Melissa Esplin […]

  9. Amy says:

    Thank you so much for this exceptional tutorial! Great pics, too! I have been DYING to have a wrap skirt but just can’t figure out the instructions. (new sewist, here.) I can actually do this one! Now if only I looked as fantastic in mine as you do! Thx again!!

  10. Mary Ellen Wessels says:

    Beautiful and clear tutorial! Looks like I could actually give it a try. :-D Also what a clever way to help get the right shape!!

  11. Kathy says:

    On my gosh I think I can do this. I’ve been wanting a wrap skirt for a long time. Could not find one I really liked. These instructions are so good I think I can do it. Time to blow the dust off of my machine. Then a trip to the fabric store, that’s an all day trip.

    • Melissa says:

      I feel ya! We live about 15 minutes away from any kind of anything so if I’m going to go to the fabric store, I’m going to do all of my errands in one trip. It takes all day. I hope you enjoy the tutorial! I wear this skirt constantly!

  12. Kathy says:

    Thank you so much for sharing your talent.
    Kathy

  13. Belinda says:

    Could you please explain this further to me?

    “Add strips to the top with the same spread on the bottom. This will create an even curvature and proper drape for your wrap skirt.”

  14. Yankat says:

    Helpful

  15. Anne says:

    I love the look of this skirt and am looking forward to making it. Please tell me what “S.A.” means in the tutorial. Thank you!

  16. Lindsey says:

    I have all of my patterns drawn and am going to buy the fabric next. I’m trying to figure out how much fabric I need. What was the width of the fabric you used?
    If my fabric is a width of 45 inches, I’m thinking I need closer to 4 yards of fabric.

  17. Cally says:

    I’ve been looking for the suggested fabric online, but it seems to be light and sheer. Do you have this problem with the fabric you used? Where can I find the same type that’s not sheer? I don’t want to lone it.

  18. Cally says:

    Sorry, one more thing. What does S.A mean when drafting the pattern?

  19. […] a pattern every time you want to sew something so for this project I managed to find an excellent wrap skirt tutorial online and set to […]

  20. Debbie Fraser says:

    Thanks Melissa, my daughter is expecting her first baby and asked I could make her an easy wrap around skirt with a ruffled hem, and your pattern is just I was looking for, I will make allowances to the length to allow for the ruffle.
    kind regards and happy sewing.
    Debbie Fraser (Australia NSW)

  21. I just love your graphics! They make it so easy to follow along. Thanks for writing this! It’s such a cute skirt.

  22. Carolyn Story says:

    If I’m reading this correctly, all three pattern pieces are the full waist measurement or am I missing something?

    • Melissa says:

      All three pattern pieces are the waist measurement DIVIDED by 2 PLUS seam allowance. So you have enough overlap that it doesn’t come all the way open at the slightest breeze or movement. So if you have a waist of 30 and you’re using a 1/2 inch seam allowance your equation would look like this: 30÷2= 15, now add seam allowance: 15+.5+.5= 16. Your waist measurement on ALL pattern pieces is 16.

  23. Beth says:

    What was the width of the fabric you used? Great skirt!

  24. Jo A says:

    Hello

    The skirt really looks nice but I cannot see any of the images so I am finding it difficult to understand how to make it.

    • Melissa says:

      Unfortunately 12 years of images have been deleted off my blog and we’re working on recovering them. It’s a long process. Sorry for the inconvenience.

  25. Jane Cooper says:

    I am a beginner and this looks like a great skirt venture. I have the fabric but do not see the images to go along with your tutorial. Are the links no longer valid?
    thank you for any assistance

    • Melissa says:

      Unfortunately 12 years of images have been deleted off my blog and we’re working on recovering them. It’s a long process. Sorry for the inconvenience.

  26. Jane Cooper says:

    Love the skirt and as I am a beginner it seems a perfect project. Already have the material. But all the image links re broken. Are they no longer available or is there something happening on my end? Thank you and looking forward to trying this wrap skirt.

    • Melissa says:

      Unfortunately 12 years of images have been deleted off my blog and we’re working on recovering them. It’s a long process. Sorry for the inconvenience.

      • Ilyana says:

        So glad you are trying to recover the images. I so look forward to making this skirt as well. I have my fabric ready! Thank you Melissa!

  27. evelyn says:

    need the wrap skirt pattern

  28. Roxanne says:

    I would love this pattern!

mobile site