A little history:
When I was 12 or so, my mom found a pom pom kit that she used ages ago. I tried making pom poms out of it (there may have been Japanese instructions), failed miserably and gave up. Then just over a year ago, I saw an adorable post by Jenn over at Ambrosia Girl about kid friendly Christmas Decorating ideas by Martha. They were all pom poms. I died. I made a bunch of white poms for my Christmas tree. Then I made a bunch of poms for winter hats. Then I made more poms for my Christmas tree this year. Then ALT happened.
At ALT, I met so many cool people with fabulous style. Each person was trendier than the next, wearing unique handmade jewelery and accessories to make anyone swoon. One of the many stand out pieces that I remember was Erin’s necklace. I remember things like that. Erin had the raddest embroidered necklace on from etsy seller spinthread. I want one.
As soon as I got home to some internet, I googled spinthread and was delighted to find so many cool things! Mostly I was blown away by her pom pom headbands and her crazy curly hair. You need to check it out. AND buy one of her headbands. Too bad they’re not in my budget. Boo.
My sister modeling the elastic pom since my hair is far too short for that sort of thing. Isn’t she so pretty?
I had to make some sort of accessory right away with a pom pom. I’m such a copy cat. I used some of my yarn stash (very small) to make one, but I wasn’t getting the volume that I had hoped for. Then it struck me, I have 5 yards of white jersey fabric, why not cut strips and use those to make the poms? It was perfect. I’m going to make my pom poms out of jersey from now on. For sure. There are a few tricks to getting it just right, so I thought I’d include a little tutorial on how to make them, just in case anyone else is interested in making some outlandishly large poms for head ornaments.
Materials: scissors, needle & sturdy thread, cardboard sheet ~ 3×5 inches, knit fabric cut into 1/2 inch strips
When cutting fabric, cut strips parallel to the stretch so each strip. Run each strip through your fist, stretching the material slightly. Each strip will curl around itself, forming a hollow string.
Wrap each string around the card. The longer the card, the larger the pom. Don’t worry that the string isn’t continuous, just keep layering each segment on top of the other.
Once you get a nice pile of jersey wrapped around the card, you’re ready to tie it off.
Before removing the pile of strings, tie one side of the loop off. This helps to keep the strings organized when you pull it off the cardboard.
Carefully remove the pile of strings from the cardboard. Tie the entire bundle with string as TIGHTLY as possible. You may need some extra hands for this part.
With your awesome sewing scissors, cut each loop in half. You’ll want to do this over a garbage can, it gets messy. After you’ve cut each loop, fluff the material out to make a ball. Trim the ball down to a round sphere, fluffing as you go.

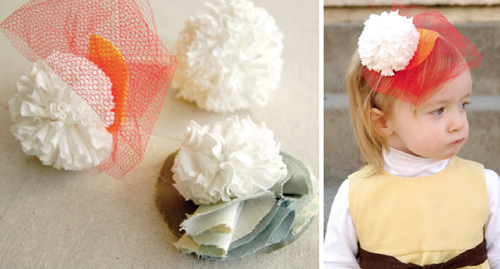
Penelope loves this headband, even though the pom is nearly the size of her head. I can’t get enough of her wearing the headband, either. I think I’m going to be making more. LOADS more.
- Put them on headbands, elastic bands, teeshirts, newborns or in a basket for admiring. Enjoy.
To download this tutorial, Please click the download button above. This tutorial is free for personal use only. Thanks!
what a cute idea. since they are made of jersey material, they will be super easy to dye any color of the rainbow. TFS! i think i have to make some too.
PS- your sister has some incredibly long eye lashes! *jealous*
I remember making yarn pom poms a long time ago with my grandmother. She loved putting them on the tops of slippers she knitted for us. The headband you made for Penelope is beautiful!
This kid is an uber-rockstar. And, little girls are totally allowed to wear bows and flowers and pom pons in their hair as big as their face. Why? I don’t know, but my sister-in-law and I agree that we grown-up girls should start the fashion for ourselves. You’re a great enabler!
Okay, now I know I can do this one! That shirt dress might be beyond my skills, but this one, I can do! Love it. Can’t wait to make my baby girl a headband… maybe me too.
Your little Penelope is the most stylin girl I have ever seen! Lucky her!
I LOVE this idea for pom poms! I have to tell you though, the first thing I noticed was your sisters eyelashes- WOWSA! How about a tutorial on how to get a set of those babies ;)
I love pom poms too! Never would have thought to use jersey – brilliant! Thanks for a great tutorial. Love you blog. :)
i love pom-poms too and have made yarn ones before but i have to admit, your jersey one looks so much better. it is like a dahlia or a chrysanthemum or some other pretty flower!
Penelope is so adorable! I love the headband that you made for her!
Those are darling! I love both of them. Thanks so much for this, I’ll be linking.
I just found your lovely site, and fell in love! I was coo coo for pom poms as well, they ended up on pretty much every chritmas present I wrapped, but I used yarn not jersey – so know I MUST try it with jersey, thank you!
Mimi,
I’ve never thought of the dying thing, but you’re right! They would look so cool dyed all sorts of colors. Maybe you should teach me not to be so afraid of fabric dye. It scares me so bad. seriously.
Mimi, Rachel,
My sister has crazy long eyelashes naturally, BUT she got eyelash extensions at her work. She’s a hairstylist at a spa where they do eyelash extensions. I’ve been tempted a few times to get them.
Hi!! Thanks for the tutorial, I love it :)
Oh my heavens! This is a super fantastic tutorial – and it looks way easy too! I think I am going to dress up a few plain t-shirts with these pom poms!!
Thanks for this little tute! Love it! So fun! I added you to our “link luv roundup” today, come by for a peek! http://www.luvinthemommyhood.com/2010/02/link-luv-roundup_17.html
This is wonderful! If you are interested, you can link this up at my Thursday carnival called Make it, Wear it. This would be perfect!
[…] Jersey Knit Pom Poms […]
I so wish I would have had this tutorial when I recently made pom pom sandals! The one I used was so hard!
[…] dag bjó ég til dúskahálsmen/ennisband úr gömlum bómullarbol. Hugmyndin er af þessari síðu (þar eru líka allar leiðbeiningar) og útfærslurnar hjá henni eru ótrúlega krúttlegar, […]
[…] image via ISLY|I Still Love You […]
Thank you so much for sharing this. I’m thinking of getting my hands busy with something other than the stuff I do for my day job. Mwah! :D
Gotta try this. Looks very easy. Since I make t-shirt quilts, I am constantly throwing away the scraps. Now I know how to use those scraps. Thanks for the lesson!
[…] Fa pampoane pentru fetita ta din tricourile nepurtate, stiu ca ai destule :) Instructiuni aici: pom-poms. […]
How long do you cut the 1/2″ strips?
[…] http://melissaesplin.com/2010/02/im-coo-coo-for-pom-poms/ […]
[…] El este Pom-Pom […]
[…] http://melissaesplin.com/2010/02/im-coo-coo-for-pom-poms/ […]
I have tried and tried to make these pom poms but they just don’t look good. How much fabric do you need to use. I am using tshirt fabric. I use about 3-4 60 inch strips. I cannot seem to get them to shape into a ball . Any suggestions would be greatly appreciated.
What did you use under the pom pom and net/tulle for the orange part of the headband? Or was it a ready-made/shop-bought headband you customised?
It was just a red tulle netting that I glued underneath. I used felt under the headband to stabilize it all.